タイルパレットの作成
選択したタイル群を Tile Palette (タイルパレット) に置くと、パレットからタイルを選んで タイルマップ をペイントできます。タイルパレット を作成するには、Window > 2D > Tile Palette の順に移動し Tile Palette ウィンドウを開きます。このオプションがない場合は、2D Tilemap Editor パッケージがインストールされていない可能性があります。その場合は、Package Manager から 2D Tilemap Editor パッケージをダウンロードしてください。
Tile Palette ウィンドウは、デフォルトでは何も表示されません。New Palette ドロップダウンをクリックして、プロジェクトで利用可能なタイルパレットのリストを開くか、または新しいパレットを作成するオプションを表示します。新しいパレットを作成するには、Create New Palette オプションを選択します。

ドロップダウンから Create New Palette オプションを選択します。
新しいタイルパレットを作成するオプションを選択すると、Create New Palette のダイアログボックスが開きます。このダイアログボックスには、新しいパレットを作成する際に利用できるさまざまなプロパティ設定やオプションが含まれています。
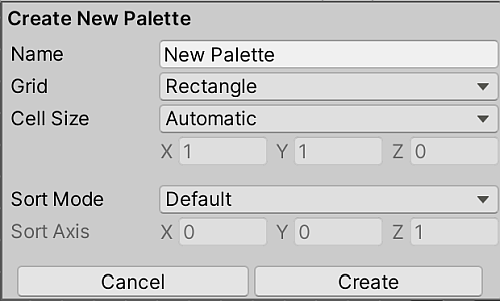
Create New Palette オプション
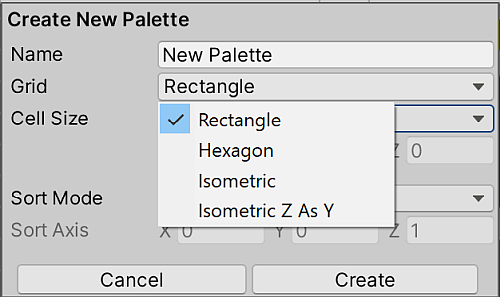
Grid のオプション
Create New Palette のプロパティ
| プロパティ | 機能 |
|---|---|
| Name | 作成したタイルパレットアセットの名前を入力します。 |
| Grid | 作成したタイルパレットを使用してペイントする グリッド のレイアウトを選択します。 |
| Rectangle | デフォルトの矩形のタイルマップのパレットを作成します。 |
| Hexagon | 六角形タイルマップ のパレットを作成します。 |
| Isometric | 等角タイルマップ のパレットを作成します。詳細は、等角タイルマップのタイルパレットの作成 を参照してください。 |
| Isometric Z as Y | Isometric Z as Y Tilemap (アイソメトリック Z As Y) のパレットを作成します。詳細は、等角タイルマップのタイルパレットの作成 を参照してください。 |
| * Hexagon Type (Grid に Hexagon タイプを選択する場合にのみ可) |
ペイントのためにパレットが使用される六角形タイルマップのタイプを選択します。詳細は、六角タイルマップ のドキュメントを参照してください。 |
| Cell Size | タイルがペイントされるセルのサイズ |
| Automatic | Cell Size は Unity のユニットで自動的に設定され、タイルアセットの作成に使用されるスプライトのサイズに基づきます。複数のタイルがある場合、セルサイズは、パレットの左下から最初のタイルに一致するように調整され、セルに正確に収まるようにします。 |
| Manual | カスタムサイズの値を入力するには、このオプションを選択します。 |
| Sort Mode | タイルパレットのレンダラーの 透明度のソートモード を決定します。 |
| Default | デフォルトの透明度のソートモードです。このモードは、プロジェクトの Graphics Settings で決定されます。 |
| Orthographic | これを選択すると、カメラからタイルパレットのレンダラーまでの垂直方向の距離に基づいてレンダラーをソートします。 |
| Lifetime | これを選択すると、カメラからタイルパレット内のレンダラーまでの直線距離に基づいてレンダラーをソートします。 |
| Custom Axis Sort | これを選択すると、カスタム軸に沿った距離に基づいてオブジェクトをソートします。 |
| Sort Axis | Sort Mode が Custom Axis Sort に設定されている場合、ソート軸の XYZ 値を設定します。 |
新しく作成したパレットに名前を付け必要な設定を選択してから、Create ボタンを選択します。パレットのアセットファイルを保存するフォルダを選択します。新しく作成されたパレットは、自動的に Tile Palette ウィンドウにロードされます。
![]()
ブランクの Tile Palette
テクスチャ や スプライト を Assets フォルダーから Tile Palette にドラッグアンドドロップし、促されたら、新しい タイルアセット の保存先を選択します。選択された保存場所に新しいタイルアセットが生成され、アクティブな Tile Palette ウィンドウのグリッド上にタイルが配置されます。

以下のショートカットとアクションを使用して、Palette ウィンドウを移動し、タイルを選んで、エディターウィンドウのタイルマップでペイントを始めます。
| ショートカット/アクション | 機能 |
|---|---|
| タイルをクリック | タイルを選択 |
| 複数のタイルを選択してマウスオーバー | 複数のタイルを選択 |
| Alt + 左ボタンをおしたままドラッグ | パン |
| ホイールボタンをクリックしたままドラッグ | パン |
| ホイールボタンを回転 | ズームイン/ズームアウト |
アクティブブラシのインスペクター
アクティブブラシのインスペクターは、Tile Palette ウインドウの下部にあります。このインスペクターを使って、現在のアクティブなブラシとそのプロパティを変更できます。このインスペクターは、デフォルトでは最小化されています。拡大するには、下のツールバーを上にドラッグします。
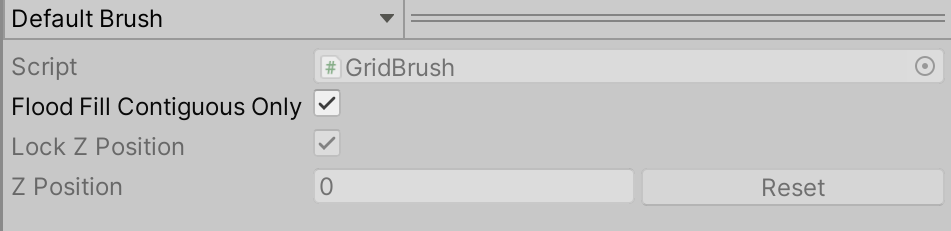
Brush ドロップダウン
Brush ドロップダウンを使って、アクティブなブラシを ‘Default Brush’ から、Scriptable Brushes などの他のブラシに変更します。
| プロパティ | 機能 |
|---|---|
| Script | 現在割り当てられているスクリプトアセットを表示します。このスクリプトアセットは、タイルマップペインティングのための固定された一揃いの API を提供します。デフォルトは GridBrush です。ユーザーは、独自のScriptable Brush を使用/作成でき、これらはドロップダウンから利用可能です。Script プロパティは、現在のアクティブなブラシを更新して反映します。 |
| Flood Fill Contiguous Only | これを有効にすると、Flood Fill ツール (塗りつぶしツール) は、ターゲットタイルと同じであり、ターゲット位置から互いに隣接しているタイルマップ上のタイルにのみ影響します。塗りつぶしツールは、タイルマップ上の対象となるタイルと同じタイルを、その位置に関係なくすべて変更します。この機能は、デフォルトブラシにのみ適用されます。 |
| Lock Z Position | これを有効にすると、アクティブなブラシの Z ポジションを変更できます。無効にすると、アクティブなブラシの現在の Z ポジションを変更できません。 |
| Z Position | Can Change Z Position が有効な場合のみ使用できます。タイルをペイントする際に、このブラシに必要な Z 軸の値 (整数のみ) を入力します。これは、Z as Y Isometric Tilemap 上のタイルの相対的な高さを調整することにもなります。詳細は、パレットでタイルの高さを調整する を参照してください。 |
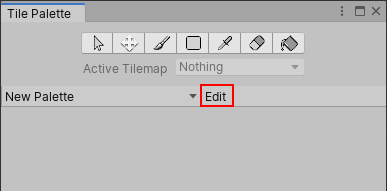
タイルパレットの編集
タイルを選択してペイントするためのツールは、タイルパレットを直接編集するためにも使用できます。タイルパレットに現在配置されているタイルを移動し操作できます。Palette ドロップダウンから編集したいパレットを選択し、Edit をクリックして編集用のパレットのロックを解除します。
パレットの編集にも使用可能なパレットツールのショートカットと機能については、タイルマップのペイント を参照してください。
既存のグリッドプレハブからのパレットアセットの作成
既存の プレハブ をパレットアセットに変換できます。これにより、Tile Palette ウィンドウで使用できるようになります。これを行うには、プレハブがまだパレットアセットではなく、最上位のゲームオブジェクトに Grid コンポーネントがある必要があります。
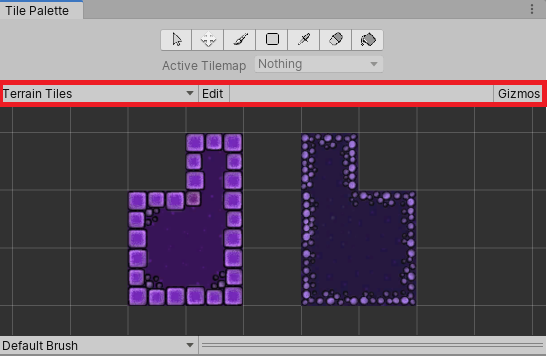
プレハブを変換するには、Tile Palette ツールバー (上の画像のハイライト部分) にドラッグアンドドロップします。エディターは自動的にプレハブをパレットアセットに変換し、グリッドパレットアセットを加えます。新しいパレットアセットはソースと同じ名前になり、パレットのドロップダウンから選択できます。
タイルパレットギズモ

Tile Palette (タイルパレット) では、現在のパレットアセットの上にアイコン (ギズモ) を表示して、特定の条件を視覚化することができます。例えば、ギズモを追加して、スプライトが含まれていないタイルを特別なアイコンで表示することができます。
デフォルトの Unity とパレットアセットのギズモをタイルアセットに表示するにはギズモのトグルを有効にします (上の画像で赤枠で表示)。Tile Palette には、パレットアセットにあるMonoBehaviour.OnDrawGizmos() を持つコンポーネントが即座に表示されます。
DrawGizmo を搭載したコンポーネントを Palette Asset に追加するには、次のようにします。
Project ウィンドウで画像ファイルを選択します。
プレハブモード でパレットアセットを開きます。
プレハブモードでコンポーネントを追加します。
プレハブモードでアセットを保存します。
プレハブモードを終了します。
タイルパレットのコンテクストメニュー
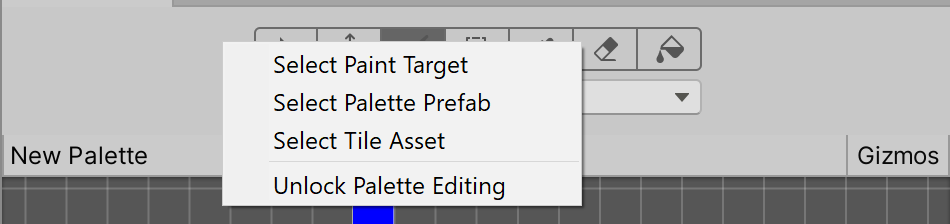
タイルパレットツールバー上で右クリックすると、コンテクストメニューが表示され、タイルパレットで操作するオブジェクトを選択したり配置したりするために使用できるいくつかのアクションが表示されます。利用できるアクションは以下のとおりです。
| アクション | 機能 |
|---|---|
| Select Paint Target | タイルマップで現在のアクティブタイルマップとなっている Hierarchy ウィンドウのゲームオブジェクトを選択します。 |
| Select Palette Prefab | タイルパレットで現在アクティブな Project ウィンドウでパレットプレハブアセットを選択します。 |
| Select Tile Asset | Project ウィンドウで現在選択されているタイルアセットを選択します。 |
| Unlock/Lock Palette Editing | タイルパレットを編集可能/不可能に設定します。 |