C# スクリプトを使用したカスタムエディターウィンドウの作成
バージョン:2022.3+
この例では、C# スクリプトを使用してカスタムエディターウィンドウを作成し、ユーザー入力に反応し、UI をサイズ変更可能にし、ホットリロードを処理する方法を示します。
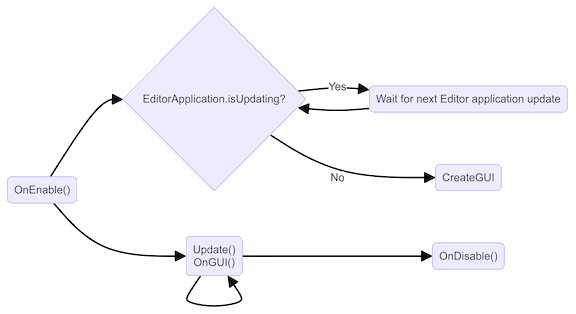
カスタムエディターウィンドウは、EditorWindow クラスから派生したクラスです。UI Toolkit は CreateGUI メソッドを使用してエディター UI にコントロールを追加し、Unity はウィンドウの表示が必要になると CreateGUI メソッドを自動的に呼び出します。このメソッドは、Awake や Update などのメソッドと同じように機能します。
カスタムエディターウィンドウを作成する場合は、以下のガイドラインに従ってください。
- UXML/USS のロードに依存するコードは
CreateGUIメソッドに配置し、必要なすべてのアセットを使用可能にします。 - イベント登録コードは
CreateGUI内、またはCreateGUIが呼び出された後に配置します。
以下の図は、エディターウィンドウの実行順序を示しています。
詳細については、EditorWindow クラスのドキュメントを参照してください。
例の概要
この例では、プロジェクト内のすべてのスプライトを検索しリストとして表示する、スプライトブラウザーを作成します。リストでスプライトを選択すると、スプライトの画像がウィンドウの右側に表示されます。

この例で作成する完成したファイルは、この GitHub リポジトリ にあります。
必要な要件
このガイドは、Unity エディター、UI Toolkit、および C# スクリプトに精通している開発者を対象としています。始める前に、以下の点を理解しておいてください。
エディターウィンドウスクリプトを作成する
UI に UI コントロールを追加するには、ビジュアルツリーにビジュアル要素を追加します。UI Toolkit は、VisualElement.Add() メソッドを使用して既存のビジュアル要素に子を追加し、rootvisualElement プロパティを介してエディターウィンドウの ビジュアルツリー にアクセスします。
- Unity で任意のテンプレートを使用してプロジェクトを作成します。
- Project ウィンドウで右クリックし、Create > UI Toolkit > Editor Window の順に選択します。
-
C# ボックスに
MyCustomEditorと入力します。 - UXML チェックボックスと USS チェックボックスをオフにします。
- Confirm を選択します。
- メニューから Window > UI Toolkit > MyCustomEditor の順に選択して、ウィンドウを開きます。ウィンドウに “Hello World!From C#” というテキストのラベルが表示されます。
スプライトのリストを作成する
スプライトのリストを表示するために、この例では AssetDatabase を使用してプロジェクト内のすべてのスプライトを検索します。スプライトブラウザーで、使用可能なウィンドウスペースを 2 つのペインに分割する TwoPaneSplitView を追加します。1 つは固定サイズで、もう 1 つはサイズを柔軟に変更できます。ウィンドウのサイズを変更すると、フレキシブルなペインはサイズ変更されますが、固定サイズのペインは同じサイズのままです。
-
ファイルの先頭に、リストに必要な以下のディレクティブを追加します。
using System.Collections.Generic; -
CreateGUI()内のコードを以下のコードに置き換えます。プロジェクト内のすべてのスプライトが列挙されます。public void CreateGUI() { // Get a list of all sprites in the project var allObjectGuids = AssetDatabase.FindAssets("t:Sprite"); var allObjects = new List<Sprite>(); foreach (var guid in allObjectGuids) { allObjects.Add(AssetDatabase.LoadAssetAtPath<Sprite>(AssetDatabase.GUIDToAssetPath(guid))); } } -
CreateGUI()内に、以下のコードを追加します。TwoPaneSplitview が作成され、異なるコントロールのプレースホルダーとして、2 つの子要素が追加されます。// Create a two-pane view with the left pane being fixed. var splitView = new TwoPaneSplitView(0, 250, TwoPaneSplitViewOrientation.Horizontal); // Add the view to the visual tree by adding it as a child to the root element. rootVisualElement.Add(splitView); // A TwoPaneSplitView needs exactly two child elements. var leftPane = new VisualElement(); splitView.Add(leftPane); var rightPane = new VisualElement(); splitView.Add(rightPane); -
メニューから Window > UI Toolkit > MyCustomEditor の順に選択して、ウィンドウを開きます。ウィンドウに、2 つの空のパネルを持つ分割ビューが表示されます。分割バーを動かして、動きを確認します。

2 つの分割ペインを持つウィンドウ
リストビューを追加する
スプライトブラウザーの場合、左ペインはプロジェクト内のすべてのスプライトの名前を含むリストになります。ListView コントロールは VisualElement から派生するため、VisualElement の代わりに ListView を使用するようにコードを変更するのは簡単です。
ListView コントロールは、選択可能なアイテムのリストを表示します。可視領域をカバーするのに十分な要素を作成するように最適化されており、リストがスクロールされると、ビジュアル要素をプールして再利用します。これにより、アイテムが多数あるリストでもパフォーマンスを最適化し、メモリフットプリントを削減します。
これを利用するには、以下で ListView を初期化します。
- データアイテムの配列
- リスト内の個々のビジュアルリストエントリーを作成するコールバック関数
- データ配列のアイテムでビジュアルリストエントリーを初期化するバインド関数
リストの各要素に複雑な UI 構造を作成できます。デモの目的で、この例では単純なテキストラベルを使用してスプライト名を表示しています。
-
CreateGUI()内で、左ペインをVisualElementではなく ListView に変更します。public void CreateGUI() { ... var leftPane = new ListView(); splitView.Add(leftPane); ... } -
CreateGUI()の一番下に、以下のコードを追加して ListView を初期化します。public void CreateGUI() { ... // Initialize the list view with all sprites' names leftPane.makeItem = () => new Label(); leftPane.bindItem = (item, index) => { (item as Label).text = allObjects[index].name; }; leftPane.itemsSource = allObjects; } -
メニューから、Window > UI Toolkit > MyCustomEditor の順に選択して、カスタムエディターウィンドウを開きます。ウィンドウに、下の画像のように、スクロール可能なリストビューと選択可能なアイテムが表示されます。

スプライト名が表示される ListView
コールバックを追加する
リストからスプライトを選択したときにその画像を右ペインに表示するには、左ペインの selectionChanged プロパティを使用し、コールバック関数を追加します。
画像を表示するには、選択したスプライトに新しい Image コントロールを作成し、VisualElement.Clear() を使用して、コントロールを追加する前に以前のコンテンツをすべて削除します 。
ヒント:ウィンドウがなくなってしまい、メニューが再表示されない場合は、Window > Panels > Close all floating panels のメニューを使ってすべてのフローティングパネルを閉じるか、ウィンドウレイアウトをリセットします。
-
左ペインのリストでの選択が変更されたときのコールバック関数を追加します。
public void CreateGUI() { ... // React to the user's selection leftPane.selectionChanged += OnSpriteSelectionChange; } private void OnSpriteSelectionChange(IEnumerable<object> selectedItems) { } -
コールバック関数は TwoPaneSplitview の右ペインにアクセスする必要があります。これを行うには、
CreateGUI()内に作成した右ペインをメンバー変数に変更します。private VisualElement m_RightPane; public void CreateGUI() { ... m_RightPane = new VisualElement(); splitView.Add(m_RightPane); ... } -
以下のコードを
OnSpriteSelectionChange関数に追加します。ペインから以前のすべてのコンテンツが消去され、選択したスプライトが取得されて、スプライトを表示する新しい Image コントロールが追加されます。private void OnSpriteSelectionChange(IEnumerable<object> selectedItems) { // Clear all previous content from the pane. m_RightPane.Clear(); // Get the selected sprite and display it. var enumerator = selectedItems.GetEnumerator(); if (enumerator.MoveNext()) { var selectedSprite = enumerator.Current as Sprite; if (selectedSprite != null) { // Add a new Image control and display the sprite. var spriteImage = new Image(); spriteImage.scaleMode = ScaleMode.ScaleToFit; spriteImage.sprite = selectedSprite; // Add the Image control to the right-hand pane. m_RightPane.Add(spriteImage); } } } -
メニューから、Window > UI Toolkit > MyCustomEditor の順に選択して、カスタムエディターウィンドウを開きます。左側のリストからスプライトを選択すると、下の画像のように、スプライトの画像がウィンドウの右側に表示されます。
アクション中のスプライトブラウザー
UIをリサイズ可能にする
エディターウィンドウは、最小と最大の許容寸法内でサイズを変更できます。これらの寸法を設定するには、EditorWindow.minSize および EditorWindow.maxSize プロパティに書き込みます。ウィンドウのサイズが変わらないようにするには、両方のプロパティに同じ寸法を割り当てます。
ウィンドウの寸法が小さすぎて UI 全体を表示できない場合は、ScrollView 要素を使用してウィンドウをスクロールできるようにします。左ペインの ListView は内部的に ScrollView を使用しますが、右ペインは通常の VisualElement です。右ペインのサイズを変更できるようにするには、双方向スクロールが可能な ScrollView に変更します。
-
以下のコードを
ShowMyEditor()関数の最後尾に追加して、ウィンドウのサイズを制限します。public static void ShowMyEditor() { ... // Limit size of the window. wnd.minSize = new Vector2(450, 200); wnd.maxSize = new Vector2(1920, 720); } -
CreateGUI()内で、右ペインのVisualElementを双方向スクロールが可能なScrollViewに変更します。public void CreateGUI() { ... m_RightPane = new ScrollView(ScrollViewMode.VerticalAndHorizontal); splitView.Add(m_RightPane); ... } -
メニューから、Window > UI Toolkit > MyCustomEditor の順に選択して、カスタムエディターウィンドウを開きます。スプライトブラウザーウィンドウにスクロールバーが表示されるようになります。ウィンドウのサイズを変更して、スクロールバーの動きを確認します。

スクロールバーのあるエディターウィンドウ
エディターウィンドウでホットリロードをサポートする
C# ドメインのリロードは、スクリプトが再コンパイルされたときや、エディターが再生モードに入ったときに発生します。先ほど作成したエディターウィンドウで、スプライトブラウザーを開き、スプライトを選択してから再生モードに入ります。ウィンドウがリセットされ、選択内容が消えます。
適切なエディターウィンドウは、ホットリロード ワークフローで動作する必要があります。VisualElement オブジェクトはシリアル化できないため、リロードが発生するたびに UI を再作成する必要があります。つまり、リロードが完了した後に CreateGUI() メソッドが呼出されます。これにより、必要なデータを EditorWindow クラスに格納することで、リロード前の UI 状態を復元できます。
-
メンバー変数を
MyCustomEditorクラスに追加して、選択されているインデックスをスプライトリストに保存します。選択するとき、このメンバー変数は ListView の新しい選択インデックスを保存します。public class MyCustomEditor : EditorWindow { [SerializeField] private int m_SelectedIndex = -1; .... } -
選択されたリストインデックスを保存し復元する以下のコードを
CreateGUI()の最後に追加します。public void CreateGUI() { ... // Restore the selection index from before the hot reload. leftPane.selectedIndex = m_SelectedIndex; // Store the selection index when the selection changes. leftPane.selectionChanged += (items) => { m_SelectedIndex = leftPane.selectedIndex; }; } メニューから、Window > UI Toolkit > MyCustomEditor の順に選択して、カスタムエディターウィンドウを開きます。リストからスプライトを選択し、再生モードを開始してホットリロードをテストします。
リファレンスとして、完成したスクリプトを次に示します。
using System.Collections.Generic;
using UnityEditor;
using UnityEngine;
using UnityEngine.UIElements;

public class MyCustomEditor : EditorWindow
{
    [SerializeField] private int m_SelectedIndex = -1;
    private VisualElement m_RightPane;

    [MenuItem("Window/UI Toolkit/MyCustomEditor")]
    public static void ShowMyEditor()
    {
        // This method is called when the user selects the menu item in the Editor.
        EditorWindow wnd = GetWindow<MyCustomEditor>();
        wnd.titleContent = new GUIContent("My Custom Editor");

        // Limit size of the window.
        wnd.minSize = new Vector2(450, 200);
        wnd.maxSize = new Vector2(1920, 720);
  }

  public void CreateGUI()
  {
      // Get a list of all sprites in the project.
      var allObjectGuids = AssetDatabase.FindAssets("t:Sprite");
      var allObjects = new List<Sprite>();
      foreach (var guid in allObjectGuids)
      {
        allObjects.Add(AssetDatabase.LoadAssetAtPath<Sprite>(AssetDatabase.GUIDToAssetPath(guid)));
      }

      // Create a two-pane view with the left pane being fixed.
      var splitView = new TwoPaneSplitView(0, 250, TwoPaneSplitViewOrientation.Horizontal);

      // Add the panel to the visual tree by adding it as a child to the root element.
      rootVisualElement.Add(splitView);

      // A TwoPaneSplitView always needs two child elements.
      var leftPane = new ListView();
      splitView.Add(leftPane);
      m_RightPane = new ScrollView(ScrollViewMode.VerticalAndHorizontal);
      splitView.Add(m_RightPane);

      // Initialize the list view with all sprites' names.
      leftPane.makeItem = () => new Label();
      leftPane.bindItem = (item, index) => { (item as Label).text = allObjects[index].name; };
      leftPane.itemsSource = allObjects;

      // React to the user's selection.
      leftPane.selectionChanged += OnSpriteSelectionChange;

      // Restore the selection index from before the hot reload.
      leftPane.selectedIndex = m_SelectedIndex;

      // Store the selection index when the selection changes.
      leftPane.selectionChanged += (items) => { m_SelectedIndex = leftPane.selectedIndex; };
  }

  private void OnSpriteSelectionChange(IEnumerable<object> selectedItems)
  {
      // Clear all previous content from the pane.
      m_RightPane.Clear();

      var enumerator = selectedItems.GetEnumerator();
      if (enumerator.MoveNext())
      {
          var selectedSprite = enumerator.Current as Sprite;
          if (selectedSprite != null)
          {
              // Add a new Image control and display the sprite.
              var spriteImage = new Image();
              spriteImage.scaleMode = ScaleMode.ScaleToFit;
              spriteImage.sprite = selectedSprite;

              // Add the Image control to the right-hand pane.
              m_RightPane.Add(spriteImage);
          }
      }
  }
}