GUI Basics (Legacy)
このセクションでは,UnityGUIでControls のスクリプティングの基本について説明します。
UnityGUI でのコントロールの作成
UnityGUI コントロールは,OnGUI()と呼ばれる特殊な関数を使用します。 OnGUI()関数は,Update()関数同様,含んでいるスクリプトが有効になるたびに呼び出されます。
GUIコントロール自体の構造は非常にシンプルです。この構造は,次の例で明らかになります。
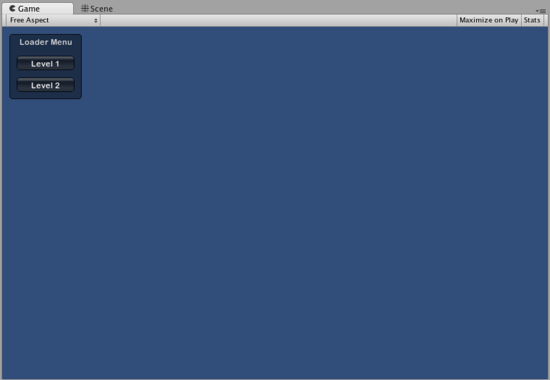
/* Example level loader */


// JavaScript
function OnGUI () {
    // Make a background box
    GUI.Box (Rect (10,10,100,90), "Loader Menu");

    // Make the first button. If it is pressed, Application.Loadlevel (1) will be executed
    if (GUI.Button (Rect (20,40,80,20), "Level 1")) {
        Application.LoadLevel (1);
    }

    // Make the second button.
    if (GUI.Button (Rect (20,70,80,20), "Level 2")) {
        Application.LoadLevel (2);
    }
}


//C#
using UnityEngine;
using System.Collections;

public class GUITest : MonoBehaviour {

    void OnGUI () {
        // Make a background box
        GUI.Box(new Rect(10,10,100,90), "Loader Menu");

        // Make the first button. If it is pressed, Application.Loadlevel (1) will be executed
        if(GUI.Button(new Rect(20,40,80,20), "Level 1")) {
            Application.LoadLevel(1);
        }

        // Make the second button.
        if(GUI.Button(new Rect(20,70,80,20), "Level 2")) {
            Application.LoadLevel(2);
        }
    }
}
この例は,完全な,機能的なレベルローダーです。 このスクリプトをコピー&ペーストして,GameObject に追加する場合,Play Mode に入ると,次のメニューが表示されます:
サンプルコードの詳細を見てみましょう。
最初のGUI行,GUI.Box (Rect (10,10,100,90), “Loader Menu”);には,ヘッダテキストLoader Menuのある Box が表示されます。これから少しの間見ていく通常のGUIコントロールの宣言スキームに従います。
次のGUI行は,Buttonコントロールの宣言になります。Box Controlの宣言とは若干異なることに留意ください。具体的には,Button 宣言全体がif文内に置かれます。 ゲーム実行中にボタンをクリックすると,このif文は真を返し,ifブロック内のコードが実行されます。
OnGUI()コードはフレームごとに呼び出されるので,GUIコントロールを明示的にcreateまたはdestroyする必要はありません。 コントロールを宣言する行は,createする行と同じです。 特定の時間にControlを表示する必要がある場合,スクリプティングロジックを使用して,行うことができます。
/* Flashing button example */


// JavaScript
function OnGUI () {
    if (Time.time % 2 < 1) {
        if (GUI.Button (Rect (10,10,200,20), "Meet the flashing button")) {
            print ("You clicked me!");
        }
    }
}


// C#
using UnityEngine;
using System.Collections;

public class GUITest : MonoBehaviour {

    void OnGUI () {
        if (Time.time % 2 < 1) {
            if (GUI.Button (new Rect (10,10,200,20), "Meet the flashing button")) {
                print ("You clicked me!");
            }
        }
    }
}
ここで,GUI.Button()は,毎秒呼び出されるだけなので,ボタンは表示されたり,消えたりします。 当然,ユーザーはボタンが表示されている時にのみクリックできます。
ご覧のとおり,必要なロジックを使用して,GUIコントロールが表示され,関数となるタイミングを制御します。 各コントロールの宣言の詳細を詳しく見てみましょう。
コントロールの分解(Anatomy of a Control)
GUIコントロールの宣言時に必要な,重要な情報は次の3つです。
Type (Position, Content)
この構造が 2 つの引数を持つ関数であることを確認します。 この構造の詳細を詳しく見てみましょう。
Type
Type は,Control Type で,Unity の GUI class または GUILayout class で関数を呼び出すことで宣言されます。これについては,本ガイドの Layout Modes で詳細に説明します。 例えば,GUI.Label()は非インタラクティブなラベルを作成します。 各種コントロールのタイプについては,すべて,本ガイドの Controls で後述します。
Position
Position は,GUIコントロール関数の 1 つ目の引数です。 この引数自体は,Rect()によって提供されます。Rect()は次の 4 つのプロパティを定義します。 left-most position,top-most position,total width,total height。これらの値はすべて integers で提供されます。これらの値はピクセル値に対応しています。UnityGUIコントロールはすべてScreen Space で機能します。これは,パブリッシュされたプレイヤーのピクセル単位の解像度です。
座標系は上-左ベースになります。Rect(10, 20, 300, 100)は,0,20と,座標310,120の端で始まる 長方形を定義します。Rect()の値の2つ目のペアは,合計の幅と高さであり,コントロールが終了する座標ではありません。このため,前述の例は,300,100ではなく,310,120で終了します。
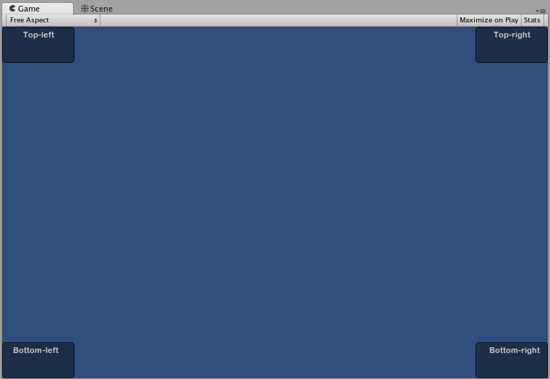
Screen.widthとScreen.heightプロパティを使用して,プレイヤーで使用できる画面空間の合計寸法を取得できます。次の例は,これがどのようにして行われるのかを理解する手助けとなります:
/* Screen.width & Screen.height example */


// JavaScript
function OnGUI () {
    GUI.Box (Rect (0,0,100,50), "Top-left");
    GUI.Box (Rect (Screen.width - 100,0,100,50), "Top-right");
    GUI.Box (Rect (0,Screen.height - 50,100,50), "Bottom-left");
    GUI.Box (Rect (Screen.width - 100,Screen.height - 50,100,50), "Bottom-right");
}


// C#
using UnityEngine;
using System.Collections;

public class GUITest : MonoBehaviour {

    void OnGUI(){
        GUI.Box (new Rect (0,0,100,50), "Top-left");
        GUI.Box (new Rect (Screen.width - 100,0,100,50), "Top-right");
        GUI.Box (new Rect (0,Screen.height - 50,100,50), "Bottom-left");
        GUI.Box (new Rect (Screen.width - 100,Screen.height - 50,100,50), "Bottom-right");
    }

}
Content
GUI コントロールの 2 つ目の引数は,コントロールで表示される実際の内容です。 コントロールでテキストや画像を表示したい場合がほとんどです。 テキストを表示するには,次のように Content引数として文字列を渡します。
/* String Content example */


// JavaScript
function OnGUI () {
    GUI.Label (Rect (0,0,100,50), "This is the text string for a Label Control");
}


// C#
using UnityEngine;
using System.Collections;

public class GUITest : MonoBehaviour {

    void OnGUI () {
        GUI.Label (new Rect (0,0,100,50), "This is the text string for a Label Control");
    }

}
画像を表示するには,パブリック変数 Texture2D を宣言し,次のように Content 引数として変数名を渡します:
/* Texture2D Content example */


// JavaScript
var controlTexture : Texture2D;

function OnGUI () {
    GUI.Label (Rect (0,0,100,50), controlTexture);
}


// C#
public Texture2D controlTexture;
  ...

void OnGUI () {
    GUI.Label (new Rect (0,0,100,50), controlTexture);
}
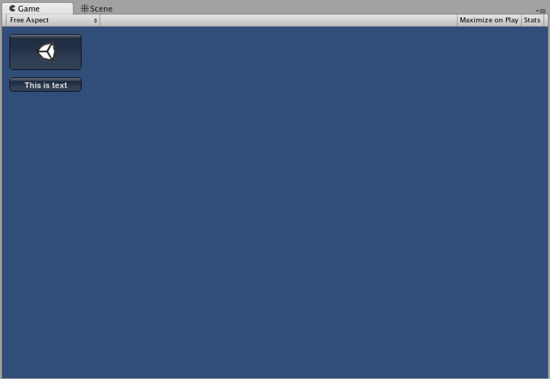
以下は,より現実に近いシナリオの例です:
/* Button Content examples */


// JavaScript
var icon : Texture2D;

function OnGUI () {
    if (GUI.Button (Rect (10,10, 100, 50), icon)) {
        print ("you clicked the icon");
    }

    if (GUI.Button (Rect (10,70, 100, 20), "This is text")) {
        print ("you clicked the text button");
    }
}


// C#
using UnityEngine;
using System.Collections;

public class GUITest : MonoBehaviour {

    public Texture2D icon;

    void OnGUI () {
        if (GUI.Button (new Rect (10,10, 100, 50), icon)) {
            print ("you clicked the icon");
        }

        if (GUI.Button (new Rect (10,70, 100, 20), "This is text")) {
            print ("you clicked the text button");
        }
    }

}
3つめのオプションとして,GUI コントロール内で画像とテキストを一緒に表示する方法があります。GUIContent オブジェクトを Content 引数として渡し,GUIContent 内で表示する文字列と画像を定義できます。
/* Using GUIContent to display an image and a string */


// JavaScript
var icon : Texture2D;

function OnGUI () {
    GUI.Box (Rect (10,10,100,50), GUIContent("This is text", icon));
}


// C#
using UnityEngine;
using System.Collections;

public class GUITest : MonoBehaviour {

    public Texture2D icon;

    void OnGUI () {
        GUI.Box (new Rect (10,10,100,50), new GUIContent("This is text", icon));
    }

}
GUIContentでTooltip を定義し,マウスオーバーすると,GUIのどこの場所でもヒント(Tooltip)を表示できます。
/* Using GUIContent to display a tooltip */


// JavaScript
function OnGUI () {
    // This line feeds "This is the tooltip" into GUI.tooltip
    GUI.Button (Rect (10,10,100,20), GUIContent ("Click me", "This is the tooltip"));
    // This line reads and displays the contents of GUI.tooltip
    GUI.Label (Rect (10,40,100,20), GUI.tooltip);
}


// C#
using UnityEngine;
using System.Collections;

public class GUITest : MonoBehaviour {

    void OnGUI () {
        // This line feeds "This is the tooltip" into GUI.tooltip
        GUI.Button (new Rect (10,10,100,20), new GUIContent ("Click me", "This is the tooltip"));

        // This line reads and displays the contents of GUI.tooltip
        GUI.Label (new Rect (10,40,100,20), GUI.tooltip);
    }

}
大胆に行くならば,GUIContent を使用して文字列,アイコンおよびTooltipを表示できます!
/* Using GUIContent to display an image, a string, and a tooltip */


// JavaScript
var icon : Texture2D;

function OnGUI () {
    GUI.Button (Rect (10,10,100,20), GUIContent ("Click me", icon, "This is the tooltip"));
    GUI.Label (Rect (10,40,100,20), GUI.tooltip);
}


// C#
using UnityEngine;
using System.Collections;

public class GUITest : MonoBehaviour {

    public Texture2D icon;

    void OnGUI () {
        GUI.Button (new Rect (10,10,100,20), new GUIContent ("Click me", icon, "This is the tooltip"));
        GUI.Label (new Rect (10,40,100,20), GUI.tooltip);
    }

}
GUIContentのコンストラクタ のスクリプティング リファレンス ページで幅広いサンプルの一覧を参照下さい。