画面遷移の作成
複数のUI Screens間を移動することが必要なのはかなり一般的で,私たちは,これらの移動を行い,管理するための簡単な方法を調べます。私たちはドライブ,各スクリーンを制御するためにアニメーションやステートマシンを使用して移動を行う方法を示します。
概要
高レベルの考えは私達のそれぞれのスクリーンがAnimation Controllerと2つのstates (Open and Closed)とブーリアンParamenter (Open)を持っているということです。スクリーン間の遷移には,あなたは現在開いているスクリーンを閉じ,望むひとつを開く必要があります。このプロセスを容易にするために,私たちが追跡し,私たちのためにあらゆるすでに開いているスクリーンを閉じるように世話をする小さなクラスScreenManagerをつくります。遷移をトリガーするボタンは,ScreenManagerに望むスクリーンを開けるように依頼する必要があります。
ナビゲーションについて
あなたがUI要素のコントローラ/キーボードのナビゲーションをサポートする予定の場合,それを念頭に置いて重要ないくつかのことがあります。これは,スプレーヤーがオフスクリーン要素を選択することができるので,すなわち,クリーン外で選択可能な要素がないようにすることが重要です。私たちはすべてのオフスクリーンヒエラルキーをネガティブにすることでそれを行うことができます。私たちはまた,新しいスクリーンを選択したとして,それから要素を設定して表示されるときに確認する必要があり,さもなければ,プレイヤーは新しいスクリーンに移動することができません。私たちは下記のScreenManagerクラスですべてのそのようなことをケアします。
アニメーターコントローラの設定
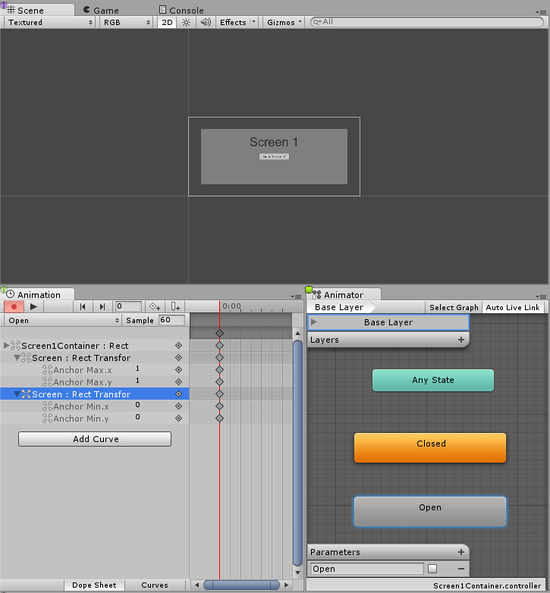
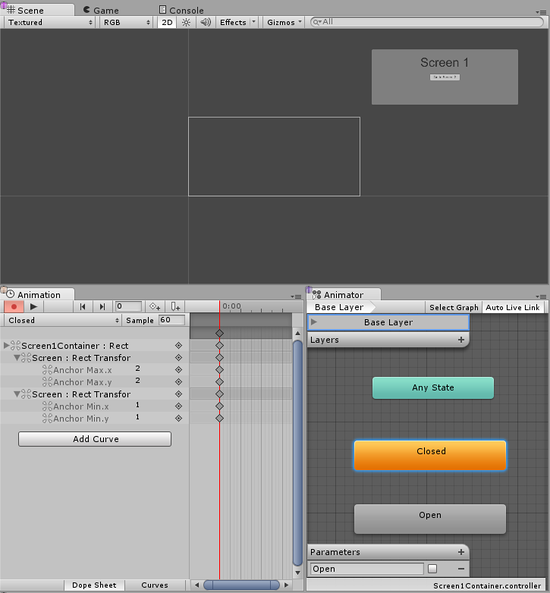
アニメーションコントローラがスクリーン遷移を行うための,最も一般的な最小限の設定を見てみましょう。コントローラは,ブール·パラメータ(オープン)と2つのステート(オープンとクローズ)が必要で,各ステートは,一つのキーフレームでアニメーションを持っていなければなりません。この方法でステートマシンに遷移ブレンドをやらせます。
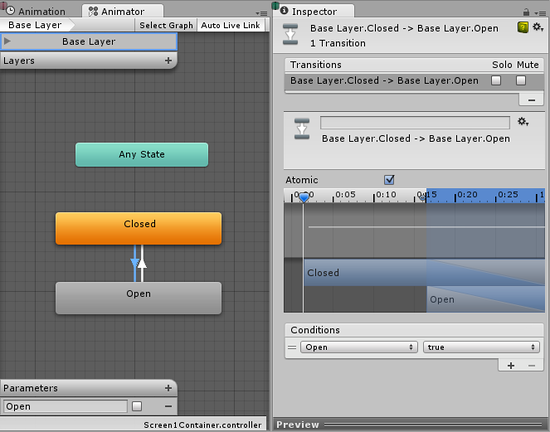
今,私たちは両方のステート間のtransition を作成する必要があり,それではオープンからクローズへの移行から始め,適切に条件を設定してみましょう。オープンパラメータがfalseに設定されているときにオープンからクローズに行きたいです。今,私たちはクローズドからオープンにトランジションを作成し,パラメータ・オープンがtrueであるとき,クローズドからオープンに行くための条件を設定してください。

スクリーンの管理
上記のすべてのセットアップで,不足している唯一のものは,スクリーンアニメーターでオープンパラメータをtrueに設定することで,私たちは現在開いているスクリーンアニメーターのfalseをオープンにして遷移するようにしたいです。そのために,私たちはそれを引き受ける小さなScriptをつくります。
using UnityEngine;
using UnityEngine.UI;
using UnityEngine.EventSystems;
using System.Collections;
using System.Collections.Generic;

public class ScreenManager : MonoBehaviour {

    //Screen to open automatically at the start of the Scene
    public Animator initiallyOpen;

    //Currently Open Screen
    private Animator m_Open;

    //Hash of the parameter we use to control the transitions.
    private int m_OpenParameterId;

    //The GameObject Selected before we opened the current Screen.
    //Used when closing a Screen, so we can go back to the button that opened it.
    private GameObject m_PreviouslySelected;

    //Animator State and Transition names we need to check against.
    const string k_OpenTransitionName = "Open";
    const string k_ClosedStateName = "Closed";

    public void OnEnable()
    {
        //We cache the Hash to the "Open" Parameter, so we can feed to Animator.SetBool.
        m_OpenParameterId = Animator.StringToHash (k_OpenTransitionName);

        //If set, open the initial Screen now.
        if (initiallyOpen == null)
            return;
        OpenPanel(initiallyOpen);
    }

    //Closes the currently open panel and opens the provided one.
    //It also takes care of handling the navigation, setting the new Selected element.
    public void OpenPanel (Animator anim)
    {
        if (m_Open == anim)
            return;

        //Activate the new Screen hierarchy so we can animate it.
        anim.gameObject.SetActive(true);
        //Save the currently selected button that was used to open this Screen. (CloseCurrent will modify it)
        var newPreviouslySelected = EventSystem.current.currentSelectedGameObject;
        //Move the Screen to front.
        anim.transform.SetAsLastSibling();

        CloseCurrent();

        m_PreviouslySelected = newPreviouslySelected;

        //Set the new Screen as then open one.
        m_Open = anim;
        //Start the open animation
        m_Open.SetBool(m_OpenParameterId, true);

        //Set an element in the new screen as the new Selected one.
        GameObject go = FindFirstEnabledSelectable(anim.gameObject);
        SetSelected(go);
    }

    //Finds the first Selectable element in the providade hierarchy.
    static GameObject FindFirstEnabledSelectable (GameObject gameObject)
    {
        GameObject go = null;
        var selectables = gameObject.GetComponentsInChildren<Selectable> (true);
        foreach (var selectable in selectables) {
            if (selectable.IsActive () && selectable.IsInteractable ()) {
                go = selectable.gameObject;
                break;
            }
        }
        return go;
    }

    //Closes the currently open Screen
    //It also takes care of navigation.
    //Reverting selection to the Selectable used before opening the current screen.
    public void CloseCurrent()
    {
        if (m_Open == null)
            return;

        //Start the close animation.
        m_Open.SetBool(m_OpenParameterId, false);

        //Reverting selection to the Selectable used before opening the current screen.
        SetSelected(m_PreviouslySelected);
        //Start Coroutine to disable the hierarchy when closing animation finishes.
        StartCoroutine(DisablePanelDeleyed(m_Open));
        //No screen open.
        m_Open = null;
    }

    //Coroutine that will detect when the Closing animation is finished and it will deactivate the
    //hierarchy.
    IEnumerator DisablePanelDeleyed(Animator anim)
    {
        bool closedStateReached = false;
        bool wantToClose = true;
        while (!closedStateReached && wantToClose)
        {
            if (!anim.IsInTransition(0))
                closedStateReached = anim.GetCurrentAnimatorStateInfo(0).IsName(k_ClosedStateName);

            wantToClose = !anim.GetBool(m_OpenParameterId);

            yield return new WaitForEndOfFrame();
        }

        if (wantToClose)
            anim.gameObject.SetActive(false);
    }

    //Make the provided GameObject selected
    //When using the mouse/touch we actually want to set it as the previously selected and
    //set nothing as selected for now.
    private void SetSelected(GameObject go)
    {
        //Select the GameObject.
        EventSystem.current.SetSelectedGameObject(go);

        //If we are using the keyboard right now, that's all we need to do.
        var standaloneInputModule = EventSystem.current.currentInputModule as StandaloneInputModule;
        if (standaloneInputModule != null && standaloneInputModule.inputMode == StandaloneInputModule.InputMode.Buttons)
            return;

        //Since we are using a pointer device, we don't want anything selected.
        //But if the user switches to the keyboard, we want to start the navigation from the provided game object.
        //So here we set the current Selected to null, so the provided gameObject becomes the Last Selected in the EventSystem.
        EventSystem.current.SetSelectedGameObject(null);
    }
}
それではこのスクリプトを取り上げてみましょう。私たちは新しいゲームオブジェクトを作成することでこれを行い,例えばそれを ScreenManager と名前を変更することができ,そしてそれに上記コンポーネントを追加できます。あなたは,最初のスクリーンをそれに割り当てることができ,このスクリーンは,あなたのシーンの開始時に開きます。
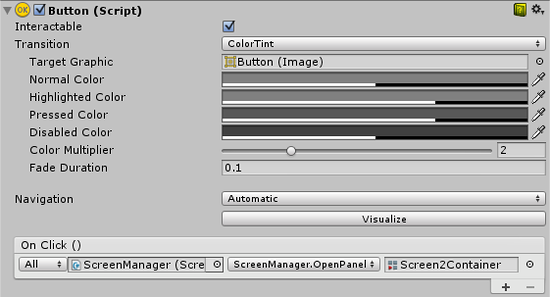
今,最後の部分のために,UI buttons を動かしてみましょう。スクリーン遷移を起動し,インスペクタでOn Click ()リストの下に新しいアクションを追加する必要があるボタンを選択します。ちょうど ObjectField に作成した ScreenManager の GameObject をドラッグし,選択したの上にドロップダウンします。そして,ユーザーが最後のObjectFieldへのボタンをクリックしたときに,あなたが開きたいパネルをドラッグ&ドロップします。
注意
この技術は,それを動作させるための唯一の要件は,それぞれのスクリーンはオープン·パラメータとクローズドステートとAnimatorControllerを持つべきであるという利点があります。あなたのスクリーンか,または,あなたのステートマシンがどうのように構築されるかといった詳細とは完全に無関係です。そして,入れ子になったスクリーンとうまく動作し,ちょうど入れ子になったレベルごとに1つのScreenManagerが必要になります。
上記のセットアップしたステートマシンはクローズドのデフォルトのステートを持っていたので,このコントローラを使用するスクリーンの全ては,クローズドで開始します。そういうわけでScreenManagerの上で,私たちはinitiallyOpenのプロパティを提供するので,あなたは示すべき最初のスクリーンが何であるかを指定することができます。