ShaderLab構文:Culling & Depth Testing
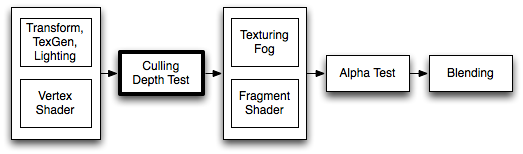
カリングは,視点と反対側に向いたポリゴンをレンダリングしない,最適化です。全てのポリゴンは表と裏側があります。カリングは,オブジェクトのほとんどのが閉じている事実を利用します,もしキューブがあった場合,視点と反対側を見ることはない(必ず視点の側を向いている面がある)ので,反対側の面は描画する必要がありません。このためバックフェース カリング(反対側の面の除去)と名づけられてます。
レンダリングを正しく見せるもうひとつの機能はデプス テスト(Depth testing)です。デプス テストにより,シーンの中で最も近いオブジェクト表面のみ描画されることをチェックします。
構文
カリング
Cull Back | Front | Off
ポリゴンのどちら側をカリングする(描画しない)か制御。
–>Back 視点と反対側のポリゴンをレンダリングしない (デフォルト).
–>Front 視点と同じ側のポリゴンをレンダリングしない。オブジェクトを反転するのに使用します。
–>Off カリングを無効にして,全ての面を描画します。特殊なエフェクトで使用します。
ZWrite
ZWrite On | Off
このオブジェクトのピクセルをデプスバッファに書き込みするか制御(デフォルトは On )。もし不透明なオブジェクトを描画する場合,オンにします。もし部分的に透過のエフェクトを描く場合, ZWrite Off に切り替えます。詳細については以下を参照下さい。
ZTest
ZTest Less | Greater | LEqual | GEqual | Equal | NotEqual | Always
デプステストの実行方法。デフォルトは LEqual (すでに描画されているオブジェクトと距離が等しいか,より近い場合に描画します,それより遠い場合はオブジェクトで隠します)
Offset
Offset Factor, Units
デプスオフセットを二つのパラメータ, factor および units ,で指定できるようにします。 Factor は,ポリゴンのXあるいはYに関連して,最大のZ勾配をスケールし,_units_は最小のデプスバッファ値をスケールします。例えば,_Offset 0, –1_ により,ポリゴンの勾配を無視してポリゴンをカメラに近づけ,一方で Offset –1, –1 はさらに見上げる角度でポリゴンを近づけます。
例
オブジェクトの反対側の面のみレンダリングします:
Shader "Show Insides" {
    SubShader {
        Pass {
            Material {
                Diffuse (1,1,1,1)
            }
            Lighting On
            Cull Front
        }
    }
}
キューブで適用してみて,周回したときに形状に違和感を感じることに気付いて下さい。これはキューブの内部しか見ていないためです。
デプス書き込みありの透過シェーダ
通常semitransparent shaders (部分的に透過なシェーダ)はデプスバッファに書き込みしません。しかしこれにより,特に複雑でConvex(非凸)のメッシュでは,描画順の問題が生まれる可能性があります。もしそのようなメッシュをフェードイン・フェードアウトした場合,透過をレンダリングする前に,デプスバッファを埋めるシェーダを使用するのが役立ちます。
Shader "Transparent/Diffuse ZWrite" {
Properties {
    _Color ("Main Color", Color) = (1,1,1,1)
    _MainTex ("Base (RGB) Trans (A)", 2D) = "white" {}
}
SubShader {
    Tags {"Queue"="Transparent" "IgnoreProjector"="True" "RenderType"="Transparent"}
    LOD 200

    // extra pass that renders to depth buffer only
    Pass {
        ZWrite On
        ColorMask 0
    }

    // paste in forward rendering passes from Transparent/Diffuse
    UsePass "Transparent/Diffuse/FORWARD"
}
Fallback "Transparent/VertexLit"
}
法線のデバッグ
次はより興味深い内容で,最初にオブジェクトを法線マップ頂点ライティングでレンダリングした後,次にバックフェースを明るいピンクでレンダリングします。これにより法線が反転しないといけないところがハイライトされる効果が得られます。物理挙動で制御されたオブジェクトがどれかのメッシュにより’吸い込まれる’ 現象がある場合,このシェーダを割り当てて下さい。もしピンクの部分が見える場合,これらの部分がそれに触れる部分を残念ながら引っ張り込んでしまいます。
実際にやってみます:
Shader "Reveal Backfaces" {
    Properties {
        _MainTex ("Base (RGB)", 2D) = "white" { }
    }
    SubShader {
        // Render the front-facing parts of the object.
        // We use a simple white material, and apply the main texture.
        Pass {
            Material {
                Diffuse (1,1,1,1)
            }
            Lighting On
            SetTexture [_MainTex] {
                Combine Primary * Texture
            }
        }

        // Now we render the back-facing triangles in the most
        // irritating color in the world: BRIGHT PINK!
        Pass {
            Color (1,0,1,1)
            Cull Front
        }
    }
}
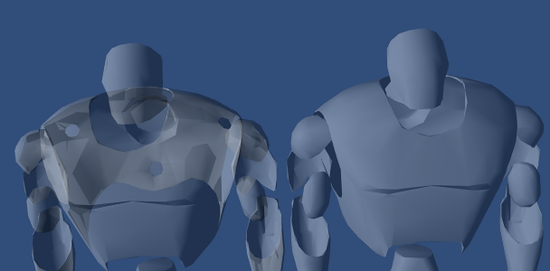
グラスカリング
カリングの制御はバックフェース以外でも便利です。もし透過オブジェクトがある場合,しばしばオブジェクトのバックフェースを表示した場合があります。もしカリング一切なしでレンダリングした場合(Cull Off ),いくつか裏面が表面と重なってしまうことがよくあります。
次の例は,凸なオブジェクト(球,キューブ,車のフロントガラス)で使用できる,シンプルなシェーダです。
Shader "Simple Glass" {
    Properties {
        _Color ("Main Color", Color) = (1,1,1,0)
        _SpecColor ("Spec Color", Color) = (1,1,1,1)
        _Emission ("Emmisive Color", Color) = (0,0,0,0)
        _Shininess ("Shininess", Range (0.01, 1)) = 0.7
        _MainTex ("Base (RGB)", 2D) = "white" { }
    }

    SubShader {
        // We use the material in many passes by defining them in the subshader.
        // Anything defined here becomes default values for all contained passes.
        Material {
            Diffuse [_Color]
            Ambient [_Color]
            Shininess [_Shininess]
            Specular [_SpecColor]
            Emission [_Emission]
        }
        Lighting On
        SeparateSpecular On

        // Set up alpha blending
        Blend SrcAlpha OneMinusSrcAlpha

        // Render the back facing parts of the object.
        // If the object is convex, these will always be further away
        // than the front-faces.
        Pass {
            Cull Front
            SetTexture [_MainTex] {
                Combine Primary * Texture
            }
        }
        // Render the parts of the object facing us.
        // If the object is convex, these will be closer than the
        // back-faces.
        Pass {
            Cull Back
            SetTexture [_MainTex] {
                Combine Primary * Texture
            }
        }
    }
}