フォント
Font GUI Text または Text Mesh Component のいずれかで使用するするに,作成またはインポートできます。
フォントファイルのインポート
プロジェクトにフォントを追加するには,Assets フォルダに フォントファイルを置く必要があります。 Unity が,自動的にフォントをインポートします。 サポートしているフォント形式は TrueType Fonts .ttf ,OpenType Fonts .otf です。
フォントの「サイズ」を変更するには,Project View で強調表示すると,Inspector の Import Settings に多くのオプションが表示されます。

| プロパティ: | 特徴: |
|---|---|
| Font Size | ワード プロセッサに設定されたサイズに基づいた,フォントのサイズ。 |
| Rendering mode | The font rendering mode, which tells Unity how to apply smoothing to the glyphs. |
| Character | The character set of the font to import into the font texture |
| このモードを Dynamic に設定すると,ユーティリティがOS の基本フォント レンダリング ルーチンを使用するようになります (下記参照)。 |
Dynamic フォントに固有のインポート設定
| プロパティ: | 特徴: |
|---|---|
| Include Font Data | Dynamic フォント プロパティと併用される際に,この設定がフォントのパッケージングを制御します。 選択すると,TTF がビルドの出力に含まれます。 選択しないと,エンド ユーザーがマシンにインストール済みのフォントを持っているとみなされます。 フォントは著作権の対象となるため,使用許諾を受けたフォントか,自身で作成してフォントのみ使用してください。 |
| Font Names | A list of fallback fonts to use when fonts or characters are not available (see below). |
フォントをインポート後に,プロジェクト ビューでそのフォントを展開し,自動生成されたアセットがあるかを確認できます。 次の2 つのアセットはインポート中に作成されます。 「フォント マテリアル」と「フォント テクスチャ」
Dynamic フォント
Unity 3.0 は,Dynamic フォントのレンダリングのサポートを追加します。 インポート設定の「Characters」ドロップダウンリストを「Dynamic」に設定すると,Unity はすべてのフォント キャラクターを持つテクスチャを事前に生成しません。 代わりに,OS に組み込まれたフォント レンダリングを使用して,オン ザ フライでテクスチャを作成します。 これには,特にユーザーシステムに一般に含まれるフォントの使用しているために,フォント データを含める必要がない場合やアジア言語や大きいフォント サイズ (通常のフォント テクスチャを使用するので,フォント テクスチャが非常に大きくなる)をサポートする必要がある場合に,ダウンロードのサイズやテクスチャ メモリに保存できるという利点があります。
When Unity tries to render text with a dynamic font, but it cannot find the font (because Include Font Data was not selected, and the font is not installed on the user machine), or the font does not include the requested glyph (like when trying to render text in east Asian scripts using a latin font), then it will try each of the fonts listed in the Font Names field, to see if it can find a font matching the font name in the project (with font data included) or installed on the user machine which has the requested glyph. If non of the listed fallback fonts are present and have the requested glpyh, Unity will fall back to a hard-coded global list of fallback fonts, which contains various international fonts commonly installed on the current runtime platform.
Note that some target platforms (WebGL, some consoles) do not have OS default fonts Unity can access for rendering text. For those platforms, Include Font Data will be ignored, and font data will always be included. All fonts to be used as fallbacks must be included in the project, so if you need to render international text, you need to supply a font which has the required characters, and set up that font in the Font Names list of other fonts.
Custom fonts
To create a custom font select ‘Create->custom font’ from the project window. This will add a custom font asset to your project library.
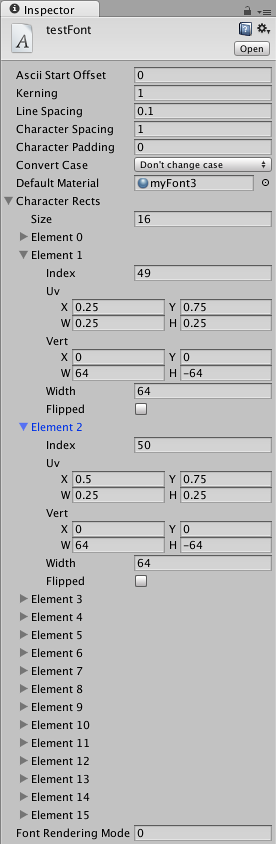
The Ascii Start Offset field is a decimal that defines the Ascii index you would like to begin your Character Rects index from. For example, if your Ascii Start Offset is set to 0 then the capital letter A will be at index 65 but if the Ascii Start Offset is set to 65 then the letter A will be at index 0. You can consult the Ascii Table here but you should bear in mind that custom font uses the decimal ascii numbering system.
Kerning can be set to define how close each character will be to the next character on the same line and Line spacing can be set to define how close each line will be to the next.
To create a font material you will need to import your font as a texture then apply that texture to a material, then drag your font material onto the Default Material section.
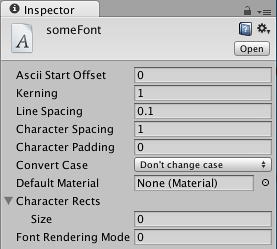
The Character Rects section is where each character of your font is defined.
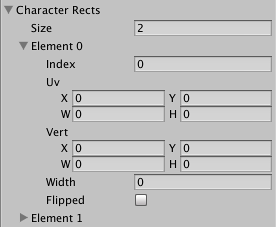
The Size field is for defining how many characters are in your font.
Within each Element there is an index field for the ascii index of the character. This will be an integer that represents the character in this element.
To work out the UV values you need to figure out how your characters are positioned on a scale of 0 to 1. You divide 1 by the number of characters on a dimension. For example if you have a font and the image dimensions on it are 256x128; 4 characters across, 2 down (so 64x64) then UV width will be 0.25 and UV height will be 0.5.
For UV X and Y, it’s just a matter of deciding which character you want and multiplying the width or height value times the column/row of the letter.
Vert size is based on the pixel size of the characters e.g. your characters are each 128x128, putting 128 and –128 into the Vert Width and Height will give properly proportioned letters. Vert Y must be negative.
Width will be the width of your character in pixels.
Custom fonts
To create a custom font select ‘Create->custom font’ from the project window. This will add a custom font asset to your project library.
The Ascii Start Offset field is a decimal that defines the Ascii index you would like to begin your Character Rects index from. For example, if your Ascii Start Offset is set to 0 then the capital letter A will be at index 65 but if the Ascii Start Offset is set to 65 then the letter A will be at index 0. You can consult the Ascii Table here but you should bear in mind that custom font uses the decimal ascii numbering system.
Kerning can be set to define how close each character will be to the next character on the same line and Line spacing can be set to define how close each line will be to the next.
To create a font material you will need to import your font as a texture then apply that texture to a material, then drag your font material onto the Default Material section.
The Character Rects section is where each character of your font is defined.
The Size field is for defining how many characters are in your font.
Within each Element there is an index field for the ascii index of the character. This will be an integer that represents the character in this element.
To work out the UV values you need to figure out how your characters are positioned on a scale of 0 to 1. You divide 1 by the number of characters on a dimension. For example if you have a font and the image dimensions on it are 256x128; 4 characters across, 2 down (so 64x64) then UV width will be 0.25 and UV height will be 0.5.
For UV X and Y, it’s just a matter of deciding which character you want and multiplying the width or height value times the column/row of the letter.
Vert size is based on the pixel size of the characters e.g. your characters are each 128x128, putting 128 and –128 into the Vert Width and Height will give properly proportioned letters. Vert Y must be negative.
Width will be the width of your character in pixels.
Unicode サポート
Unity はUnicode を完全にサポートしています。 Unicode のテキストにより,通常 ASCII 文字セットでサポートされていないドイツ語,フランス語,デンマーク語,日本語の文字を表示することができます。 また,フォントがサポートしている場合に,矢印やオプション キーなどの多くの異なる特殊用途文字を入力することができます。
Unicode 文字を使用するには,インポート設定の「Characters」ドロップダウンから「Unicode」か「Dynamic」のいずれかを選択します。 このフォントで Unicode 文字を表示できます。 GUIText または Text Mesh を使用している場合,インスペクタにあるコンポーネントの「Text」フィールドに Unicode 文字を入力できます。
また,スクリプトから表示されるテキストを設定したい場合,Unicode 文字も使用できます。 Javascript と C# コンパイラは,Unicode ベースのスクリプトを完全にサポートしています。 UTF–16 エンコーディングでスクリプトを保存するだけでかまいません。 Unitron で, を選択することで,この操作を行うことができます。 Unicode 文字をスクリプトの文字列に追加すると,UnityGUI や,GUI テキスト,またはテキスト メッシュで期待されるように表示されます。
フォント カラーの変更
フォントの使用方法に応じて,表示フォントの色を変更する方法がいくつかあります。
GUI テキストとテキスト メッシュ
GUI テキストまたはテキスト メッシュを使用して,フォントに対してカスタムの Material を使用して,その色を変更できます。 プロジェクト ビューで, をクリックし,Inspector で新規作成したマテリアルを選択および設定します。 フォント アセットからそのマテリアルにテクスチャを割り当ててください。 フォント マテリアルに組み込みの「GUI/Text Shader」シェーダーを使用することで,マテリアルの「テキスト カラー」で色を選択できます。
UnityGUI
UnityGUI スクリプティングを使用して,フォントする場合,異なる環境で,フォントの色をより制御できます。 フォントの色を変更するには, から GUISkin を作成し, などから,特定の制御状態に色を定義します。 詳細については,GUI Skin page を参照してください。
ヒント
- インポートされたフォントを表示するには,フォントを選択し, を選択します。
- 小文字または大文字のみ使用することで,生成されたテクスチャ サイズが小さくなります。
- Unity が提供するデフォルトのフォントは,Arial になります。 このフォントは,常に使用可能で,プロジェクト ビューには表示されません。
Fontsのページを参照してください。