サーフェイスシェーダの例
Surface Shaders の例です。 以下の例は,組み込みライティング モデルの使用に集中しています。カスタムのライティング モデルの実装方法については,サーフェイスシェーダ ライティングの例 にあります。
簡単
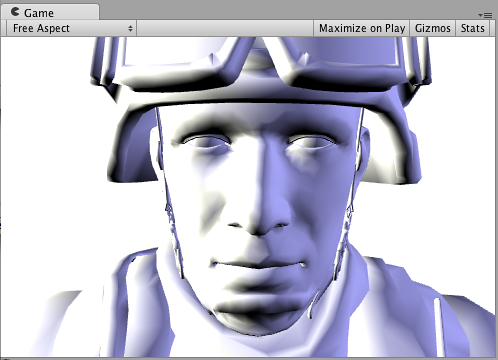
非常に基本的なシェーダとその作成から始めましょう。 以下は,表面の色を_白_にするだけのシェーダです。 これは,組み込み Lambert (デフューズ) ライティング モデルを使用します。
  Shader "Example/Diffuse Simple" {
    SubShader {
      Tags { "RenderType" = "Opaque" }
      CGPROGRAM
      #pragma surface surf Lambert
      struct Input {
          float4 color : COLOR;
      };
      void surf (Input IN, inout SurfaceOutput o) {
          o.Albedo = 1;
      }
      ENDCG
    }
    Fallback "Diffuse"
  }
以下は,2 つの lights が設定されたモデルでどのように見えるかです。
テクスチャ
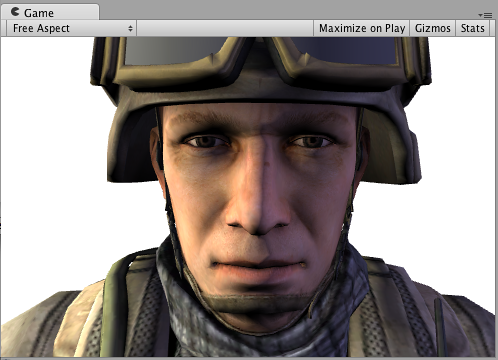
真っ白なオブジェクトはかなりつまらないので,テクスチャを追加しましょう。 Properties block をこのシェーダに追加するので,マテリアルからテクスチャ セレクタを取得します。 その他の変更は以下に太字で記載されています。
  Shader "Example/Diffuse Texture" {
    Properties {
      _MainTex ("Texture", 2D) = "white" {}
    }
    SubShader {
      Tags { "RenderType" = "Opaque" }
      CGPROGRAM
      #pragma surface surf Lambert
      struct Input {
          float2 uv_MainTex;
      };
      sampler2D _MainTex;
      void surf (Input IN, inout SurfaceOutput o) {
          o.Albedo = tex2D (_MainTex, IN.uv_MainTex).rgb;
      }
      ENDCG
    }
    Fallback "Diffuse"
  }
法線マッピング
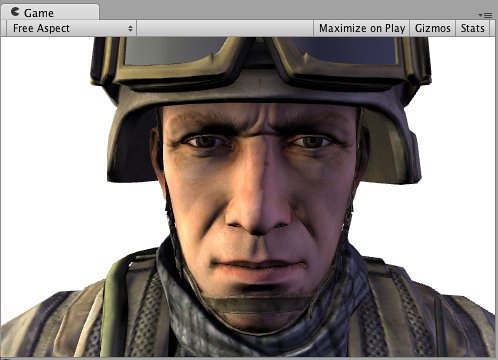
法線マッピングを追加しましょう。
  Shader "Example/Diffuse Bump" {
    Properties {
      _MainTex ("Texture", 2D) = "white" {}
      _BumpMap ("Bumpmap", 2D) = "bump" {}
    }
    SubShader {
      Tags { "RenderType" = "Opaque" }
      CGPROGRAM
      #pragma surface surf Lambert
      struct Input {
        float2 uv_MainTex;
        float2 uv_BumpMap;
      };
      sampler2D _MainTex;
      sampler2D _BumpMap;
      void surf (Input IN, inout SurfaceOutput o) {
        o.Albedo = tex2D (_MainTex, IN.uv_MainTex).rgb;
        o.Normal = UnpackNormal (tex2D (_BumpMap, IN.uv_BumpMap));
      }
      ENDCG
    }
    Fallback "Diffuse"
  }
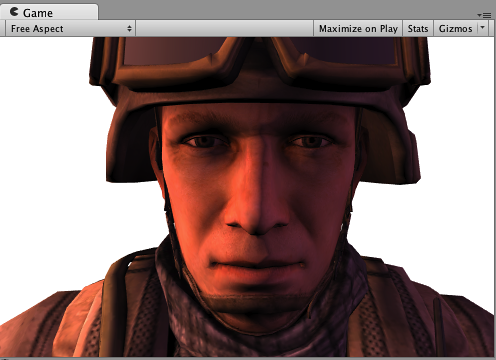
リム ライティング
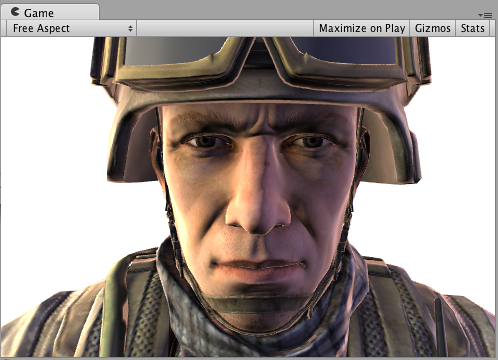
今度は,リム ライティングを追加して,オブジェクトの縁をハイライトします。 表面の法線とビュー方向間の角度に基づいて,放射光を追加します。 そのため,viewDir 組み込みサーフェイスシェーダ変数を使用します。
  Shader "Example/Rim" {
    Properties {
      _MainTex ("Texture", 2D) = "white" {}
      _BumpMap ("Bumpmap", 2D) = "bump" {}
      _RimColor ("Rim Color", Color) = (0.26,0.19,0.16,0.0)
      _RimPower ("Rim Power", Range(0.5,8.0)) = 3.0
    }
    SubShader {
      Tags { "RenderType" = "Opaque" }
      CGPROGRAM
      #pragma surface surf Lambert
      struct Input {
          float2 uv_MainTex;
          float2 uv_BumpMap;
          float3 viewDir;
      };
      sampler2D _MainTex;
      sampler2D _BumpMap;
      float4 _RimColor;
      float _RimPower;
      void surf (Input IN, inout SurfaceOutput o) {
          o.Albedo = tex2D (_MainTex, IN.uv_MainTex).rgb;
          o.Normal = UnpackNormal (tex2D (_BumpMap, IN.uv_BumpMap));
          half rim = 1.0 - saturate(dot (normalize(IN.viewDir), o.Normal));
          o.Emission = _RimColor.rgb * pow (rim, _RimPower);
      }
      ENDCG
    }
    Fallback "Diffuse"
  }
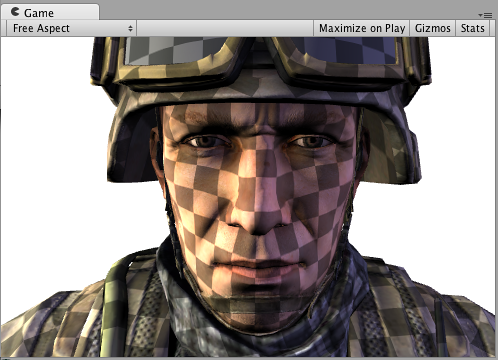
細部テクスチャ
異なる効果を与えるため,ベース テクスチャと結合する細部テクスチャを追加しましょう。 細部テクスチャは,同じ UV。 を使用しますが,通常,マテリアルでのタイリングが異なるため,異なる入力 UV 座標を使用する必要があります。
  Shader "Example/Detail" {
    Properties {
      _MainTex ("Texture", 2D) = "white" {}
      _BumpMap ("Bumpmap", 2D) = "bump" {}
      _Detail ("Detail", 2D) = "gray" {}
    }
    SubShader {
      Tags { "RenderType" = "Opaque" }
      CGPROGRAM
      #pragma surface surf Lambert
      struct Input {
          float2 uv_MainTex;
          float2 uv_BumpMap;
          float2 uv_Detail;
      };
      sampler2D _MainTex;
      sampler2D _BumpMap;
      sampler2D _Detail;
      void surf (Input IN, inout SurfaceOutput o) {
          o.Albedo = tex2D (_MainTex, IN.uv_MainTex).rgb;
          o.Albedo *= tex2D (_Detail, IN.uv_Detail).rgb * 2;
          o.Normal = UnpackNormal (tex2D (_BumpMap, IN.uv_BumpMap));
      }
      ENDCG
    }
    Fallback "Diffuse"
  }
チェッカー テクスチャを使用してもあまり意味はありませんが,何が起こるかが分かります。
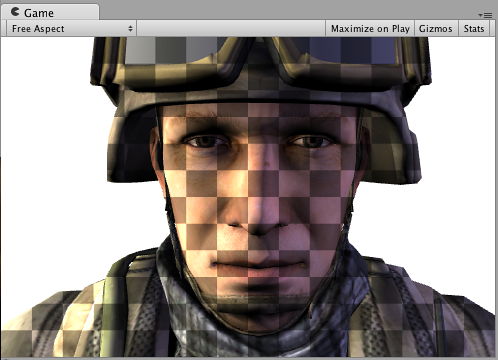
画面空間内の細部テクスチャ
画面空間での細部テクスチャはどうなりますか? 兵士の頭部モデルにはあまり意味はありませんが,組み込み screenPos 入力がどのように使用されるかが分かります。
  Shader "Example/ScreenPos" {
    Properties {
      _MainTex ("Texture", 2D) = "white" {}
      _Detail ("Detail", 2D) = "gray" {}
    }
    SubShader {
      Tags { "RenderType" = "Opaque" }
      CGPROGRAM
      #pragma surface surf Lambert
      struct Input {
          float2 uv_MainTex;
          float4 screenPos;
      };
      sampler2D _MainTex;
      sampler2D _Detail;
      void surf (Input IN, inout SurfaceOutput o) {
          o.Albedo = tex2D (_MainTex, IN.uv_MainTex).rgb;
          float2 screenUV = IN.screenPos.xy / IN.screenPos.w;
          screenUV *= float2(8,6);
          o.Albedo *= tex2D (_Detail, screenUV).rgb * 2;
      }
      ENDCG
    }
    Fallback "Diffuse"
  }
短くするために,上記シェーダから法線マッピングを削除しました:
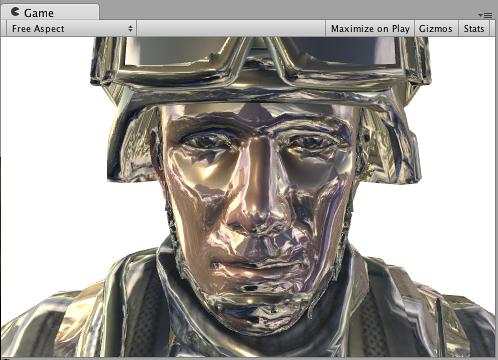
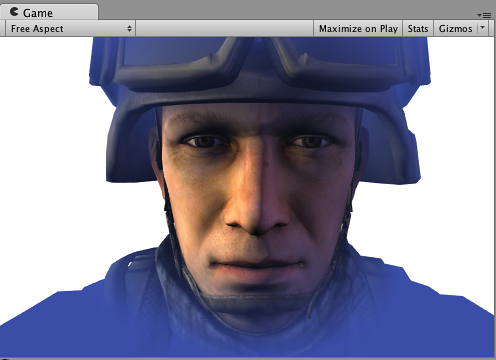
キューブマップ反射
以下は組み込み worldRefl 入力を使用してキューブマッピング反射を行うシェーダです。 組み込みの反射/デフューズ シェーダを使うのと実際非常に似ています。
  Shader "Example/WorldRefl" {
    Properties {
      _MainTex ("Texture", 2D) = "white" {}
      _Cube ("Cubemap", CUBE) = "" {}
    }
    SubShader {
      Tags { "RenderType" = "Opaque" }
      CGPROGRAM
      #pragma surface surf Lambert
      struct Input {
          float2 uv_MainTex;
          float3 worldRefl;
      };
      sampler2D _MainTex;
      samplerCUBE _Cube;
      void surf (Input IN, inout SurfaceOutput o) {
          o.Albedo = tex2D (_MainTex, IN.uv_MainTex).rgb * 0.5;
          o.Emission = texCUBE (_Cube, IN.worldRefl).rgb;
      }
      ENDCG
    }
    Fallback "Diffuse"
  }
放出として反射色を割り当てるので,非常に輝いた兵士が得られます。
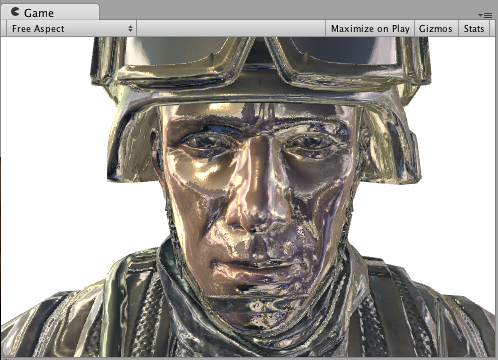
法線マップに影響される反射を行たい場合,わずかに関与させる必要があります。 INTERNAL_DATA を入力構造に追加し,WorldReflectionVector 関数を,法線出力記述後にピクセルごとの反射ベクトルを計算するために使用する必要があります。
  Shader "Example/WorldRefl Normalmap" {
    Properties {
      _MainTex ("Texture", 2D) = "white" {}
      _BumpMap ("Bumpmap", 2D) = "bump" {}
      _Cube ("Cubemap", CUBE) = "" {}
    }
    SubShader {
      Tags { "RenderType" = "Opaque" }
      CGPROGRAM
      #pragma surface surf Lambert
      struct Input {
          float2 uv_MainTex;
          float2 uv_BumpMap;
          float3 worldRefl;
          INTERNAL_DATA
      };
      sampler2D _MainTex;
      sampler2D _BumpMap;
      samplerCUBE _Cube;
      void surf (Input IN, inout SurfaceOutput o) {
          o.Albedo = tex2D (_MainTex, IN.uv_MainTex).rgb * 0.5;
          o.Normal = UnpackNormal (tex2D (_BumpMap, IN.uv_BumpMap));
          o.Emission = texCUBE (_Cube, WorldReflectionVector (IN, o.Normal)).rgb;
      }
      ENDCG
    }
    Fallback "Diffuse"
  }
これは,法線マッピングされた輝いている兵士です:
世界空間の位置を介したスライス
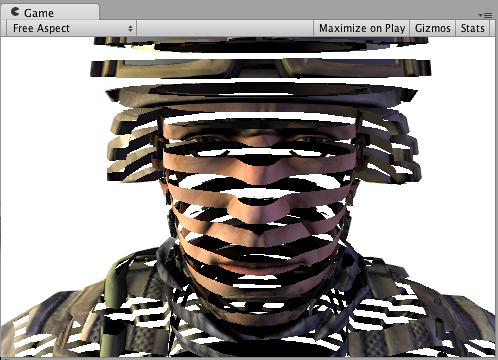
以下は,ほぼ水平の輪の中のピクセルを破棄することで,オブジェクトを_スライス_するシェーダです。 これは,ピクセルの世界での位置に基づいて,clip() Cg/HLSL 関数を使用して行います。 worldPos 組み込みサーフェイスシェーダ変数を使用します。
  Shader "Example/Slices" {
    Properties {
      _MainTex ("Texture", 2D) = "white" {}
      _BumpMap ("Bumpmap", 2D) = "bump" {}
    }
    SubShader {
      Tags { "RenderType" = "Opaque" }
      Cull Off
      CGPROGRAM
      #pragma surface surf Lambert
      struct Input {
          float2 uv_MainTex;
          float2 uv_BumpMap;
          float3 worldPos;
      };
      sampler2D _MainTex;
      sampler2D _BumpMap;
      void surf (Input IN, inout SurfaceOutput o) {
          clip (frac((IN.worldPos.y+IN.worldPos.z*0.1) * 5) - 0.5);
          o.Albedo = tex2D (_MainTex, IN.uv_MainTex).rgb;
          o.Normal = UnpackNormal (tex2D (_BumpMap, IN.uv_BumpMap));
      }
      ENDCG
    }
    Fallback "Diffuse"
  }
頂点修飾子のある法線押し出し
頂点シェーダで入ってくる頂点データを修正する_vertex modifier_関数を使用することができます。 これは,手続き型アニメーションや法線に沿った押し出しなどに使用できます。 このため,サーフェイスシェーダ コンパイル ディレクティブ vertex:functionName が使用されますが,これは,inout appdata_full パラメータを取る関数です。
以下は,マテリアルで指定した量だけ法線に沿って頂点を動かすシェーダです。
  Shader "Example/Normal Extrusion" {
    Properties {
      _MainTex ("Texture", 2D) = "white" {}
      _Amount ("Extrusion Amount", Range(-1,1)) = 0.5
    }
    SubShader {
      Tags { "RenderType" = "Opaque" }
      CGPROGRAM
      #pragma surface surf Lambert vertex:vert
      struct Input {
          float2 uv_MainTex;
      };
      float _Amount;
      void vert (inout appdata_full v) {
          v.vertex.xyz += v.normal * _Amount;
      }
      sampler2D _MainTex;
      void surf (Input IN, inout SurfaceOutput o) {
          o.Albedo = tex2D (_MainTex, IN.uv_MainTex).rgb;
      }
      ENDCG
    }
    Fallback "Diffuse"
  }
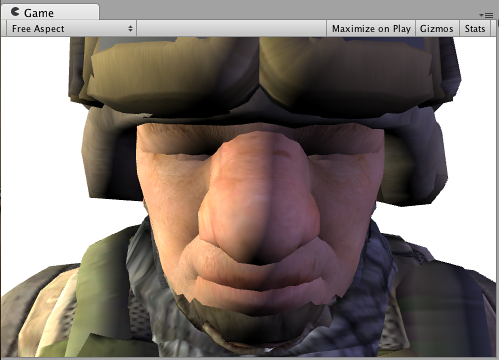
法線に沿って頂点を動かすことで,兵士が太った外見になります。
頂点ごとに計算されたカスタムのデータ
頂点修飾子関数を使用すると,頂点シェーダ内のカスタムのデータを計算でき,これが,ピクセルごとにサーフェイスシェーダ関数に渡されます。 同じコンパイル ディレクティブ vertex:functionName が使用されますが,この関数は, inout appdata_full out Input の 2 つのパラメータを摂る必要があります。 ここで組み込み値ではない入力メンバーを記入できます。
Note: Custom Input members used in this way must not have names beginning with ‘uv’ or they won’t work properly.
下の例では,カスタムの float3 customColor メンバーを定義しますが,これは,頂点関数で計算されます。
  Shader "Example/Custom Vertex Data" {
    Properties {
      _MainTex ("Texture", 2D) = "white" {}
    }
    SubShader {
      Tags { "RenderType" = "Opaque" }
      CGPROGRAM
      #pragma surface surf Lambert vertex:vert
      struct Input {
          float2 uv_MainTex;
          float3 customColor;
      };
      void vert (inout appdata_full v, out Input o) {
          UNITY_INITIALIZE_OUTPUT(Input,o);
          o.customColor = abs(v.normal);
      }
      sampler2D _MainTex;
      void surf (Input IN, inout SurfaceOutput o) {
          o.Albedo = tex2D (_MainTex, IN.uv_MainTex).rgb;
          o.Albedo *= IN.customColor;
      }
      ENDCG
    }
    Fallback "Diffuse"
  }
In this example customColor is set to the absolute value of the normal:

More practical uses could be computing any per-vertex data that is not provided by built-in Input variables; or optimizing shader computations. For example, it’s possible to compute Rim lighting at object’s vertices, instead of doing that in the surface shader per-pixel.
Final Color Modifier
It is possible to use a “final color modifier” function that will modify final color computed by the shader. Surface shader compilation directive finalcolor:functionName is used for that, with a function that takes Input IN, SurfaceOutput o, inout fixed4 color parameters.
Here’s a simple shader that applies tint to final color. This is different from just applying tint to surface Albedo color: this tint will also affect any color that came from lightmaps, light probes and similar extra sources.
  Shader "Example/Tint Final Color" {
    Properties {
      _MainTex ("Texture", 2D) = "white" {}
      _ColorTint ("Tint", Color) = (1.0, 0.6, 0.6, 1.0)
    }
    SubShader {
      Tags { "RenderType" = "Opaque" }
      CGPROGRAM
      #pragma surface surf Lambert finalcolor:mycolor
      struct Input {
          float2 uv_MainTex;
      };
      fixed4 _ColorTint;
      void mycolor (Input IN, SurfaceOutput o, inout fixed4 color)
      {
          color *= _ColorTint;
      }
      sampler2D _MainTex;
      void surf (Input IN, inout SurfaceOutput o) {
           o.Albedo = tex2D (_MainTex, IN.uv_MainTex).rgb;
      }
      ENDCG
    }
    Fallback "Diffuse"
  }
Custom Fog with Final Color Modifier
Common use case for final color modifier (see above) would be implementing completely custom Fog. Fog needs to affect the final computed pixel shader color, which is exactly what the finalcolor modifier does.
Here’s a shader that applies fog tint based on distance from screen center. This combines both the vertex modifier with custom vertex data (fog) and final color modifier. When used in forward rendering additive pass, Fog needs to fade to black color, and this example handles that as well with a check for UNITY_PASS_FORWARDADD.
  Shader "Example/Fog via Final Color" {
    Properties {
      _MainTex ("Texture", 2D) = "white" {}
      _FogColor ("Fog Color", Color) = (0.3, 0.4, 0.7, 1.0)
    }
    SubShader {
      Tags { "RenderType" = "Opaque" }
      CGPROGRAM
      #pragma surface surf Lambert finalcolor:mycolor vertex:myvert
      struct Input {
          float2 uv_MainTex;
          half fog;
      };
      void myvert (inout appdata_full v, out Input data)
      {
          UNITY_INITIALIZE_OUTPUT(Input,data);
          float4 hpos = mul (UNITY_MATRIX_MVP, v.vertex);
          data.fog = min (1, dot (hpos.xy, hpos.xy) * 0.1);
      }
      fixed4 _FogColor;
      void mycolor (Input IN, SurfaceOutput o, inout fixed4 color)
      {
          fixed3 fogColor = _FogColor.rgb;
          #ifdef UNITY_PASS_FORWARDADD
          fogColor = 0;
          #endif
          color.rgb = lerp (color.rgb, fogColor, IN.fog);
      }
      sampler2D _MainTex;
      void surf (Input IN, inout SurfaceOutput o) {
           o.Albedo = tex2D (_MainTex, IN.uv_MainTex).rgb;
      }
      ENDCG
    }
    Fallback "Diffuse"
  }
Linear Fog
Shader "Example/Linear Fog" {
  Properties {
    _MainTex ("Base (RGB)", 2D) = "white" {}
  }
  SubShader {
    Tags { "RenderType"="Opaque" }
    LOD 200

    CGPROGRAM
    #pragma surface surf Lambert finalcolor:mycolor vertex:myvert

    sampler2D _MainTex;
    uniform half4 unity_FogColor;
    uniform half4 unity_FogStart;
    uniform half4 unity_FogEnd;

    struct Input {
      float2 uv_MainTex;
      half fog;
    };

    void myvert (inout appdata_full v, out Input data) {
      UNITY_INITIALIZE_OUTPUT(Input,data);
      float pos = length(mul (UNITY_MATRIX_MV, v.vertex).xyz);
      float diff = unity_FogEnd.x - unity_FogStart.x;
      float invDiff = 1.0f / diff;
      data.fog = clamp ((unity_FogEnd.x - pos) * invDiff, 0.0, 1.0);
    }
    void mycolor (Input IN, SurfaceOutput o, inout fixed4 color) {
      fixed3 fogColor = unity_FogColor.rgb;
      #ifdef UNITY_PASS_FORWARDADD
      fogColor = 0;
      #endif
      color.rgb = lerp (fogColor, color.rgb, IN.fog);
    }

    void surf (Input IN, inout SurfaceOutput o) {
      half4 c = tex2D (_MainTex, IN.uv_MainTex);
      o.Albedo = c.rgb;
      o.Alpha = c.a;
    }
    ENDCG
  }
  FallBack "Diffuse"
}