Introduction to Wheel colliders
To simulate accurate wheel behavior in Unity, you use a Wheel colliderAn invisible shape that is used to handle physical collisions for an object. A collider doesn’t need to be exactly the same shape as the object’s mesh - a rough approximation is often more efficient and indistinguishable in gameplay. More info
See in Glossary for each wheel. Wheel collidersA special collider for grounded vehicles. It has built-in collision detection, wheel physics, and a slip-based tire friction model. It can be used for objects other than wheels, but it is specifically designed for vehicles with wheels. More info
See in Glossary manage wheel rotation and vehicle movement, and also have properties that simulate a suspension system.
The Wheel collider component is represented in the API as the WheelCollider class.
Wheel collider raycast
The Wheel collider appears in the SceneA Scene contains the environments and menus of your game. Think of each unique Scene file as a unique level. In each Scene, you place your environments, obstacles, and decorations, essentially designing and building your game in pieces. More info
See in Glossary view as a 2D circle (see Wheel collider visualization). However, it is actually a single Physics raycast. PhysX casts the ray down the local Y-axis along the direction of suspension through the center of the wheel. The start and end of the raycast are at the following points:
- The raycast starts just above the top of the wheel at maximum suspension compressionA method of storing data that reduces the amount of storage space it requires. See Texture Compression, Animation Compression, Audio Compression, Build Compression.
See in Glossary (that is, just outside the Radius, at the top of the Suspension Distance on the Y axis). - The raycast ends just below the bottom of the wheel at maximum suspension extension (that is, just outside the Radius, at the bottom of the Suspension Distance on the Y axis).
This raycast configuration means that a Wheel collider does not actually roll across other surfaces (such as the ground) while moving. In Play mode, the rotation of the Wheel collider does not change. However, the rotation of the wheel model does need to change so that the wheel appears to roll along the ground. To achieve this, the model and the collider need to be on two separate GameObjectsThe fundamental object in Unity scenes, which can represent characters, props, scenery, cameras, waypoints, and more. A GameObject’s functionality is defined by the Components attached to it. More info
See in Glossary. The Wheel colliders’ Transform should be fixed relative to the vehicle, and the models should be able to rotate. You can then configure the Wheel collider to send its global position to the wheel model and rotate the wheel model via script. For an example of this workflow, refer to the walkthrough Create an example vehicle with Wheel colliders.
For more details on the Wheel collider raycast setup in PhysX, refer to the PhysX 4.1 Vehicles SDK documentation.
Prepare the ground for raycast Wheel colliders
An important implication of the raycast setup is that wheels don’t always smoothly roll up or step down variations in road level (for example, rolling up from the road onto a step). When encountering a step or curb, the wheel is likely to clip and then “pop” up only as the center line crosses the step:

The raycast can also slip down into small drops or steps in the road when the center point reaches them:

For this reason, the ground collisionA collision occurs when the physics engine detects that the colliders of two GameObjects make contact or overlap, when at least one has a Rigidbody component and is in motion. More info
See in Glossary geometry must be as smooth as possible to ensure a smooth and accurate simulation. If you have bumps or dips in the ground, you must test and iterate on them to make sure you are happy with the wheels’ behavior.
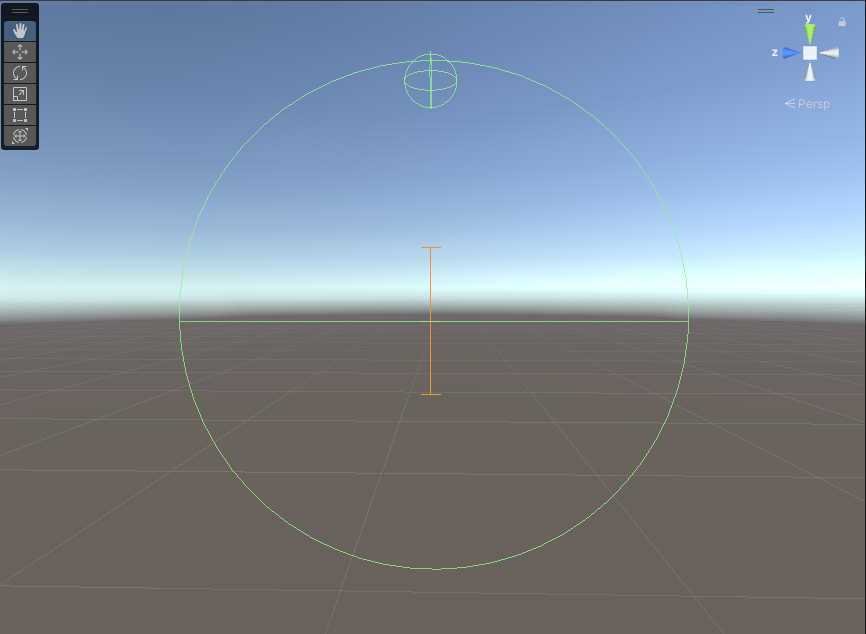
Wheel collider visualization
When you select a Wheel collider, the Scene viewAn interactive view into the world you are creating. You use the Scene View to select and position scenery, characters, cameras, lights, and all other types of Game Object. More info
See in Glossary displays a gizmoA graphic overlay associated with a GameObject in a Scene, and displayed in the Scene View. Built-in scene tools such as the move tool are Gizmos, and you can create custom Gizmos using textures or scripting. Some Gizmos are only drawn when the GameObject is selected, while other Gizmos are drawn by the Editor regardless of which GameObjects are selected. More info
See in Glossary which provides a visualization of some key Wheel collider properties.

The gizmo’s visual indicators are as follows:
- Large 2D circle: Represents the size of the physics wheel. To change the size, use the Wheel collider’s Radius property.
- Horizontal green line: Represents the halfway point of the Wheel collider along the X axis. The angle of this line represents the rotation of the wheel.
- Small 3D sphere: Represents the point where the wheel forces are applied. To change this value, use the Wheel collider’s Force App Point Distance property.
- Vertical orange line: The top and bottom points of the line represent the maximum distances that the wheel can move up and down (along the vertical Y axis) from its central point as a result of forces applied to it. To change this value, use the Wheel collider’s Suspension Distance property. The point where the orange line intersects the green line represents the “resting” point where the wheel sits when there are no forces or equal forces acting upon it. To change this value, use the Wheel collider’s Target PositionA joint property to set the target position that the joint’s drive force should move it to. More info
See in Glossary property.
You can use the gizmo visualization for quick reference and debugging.