Audio Clip Import Settings reference
Switch to ScriptingExplore the properties and settings to specify the sampling rate, compressionA method of storing data that reduces the amount of storage space it requires. See Texture Compression, Animation Compression, Audio Compression, Build Compression.
See in Glossary format, and quality of your imported audio assets.
For a list of the audio files Unity supports and information about how to import these files, refer to Audio file format compatibility and Import audio files into Unity.
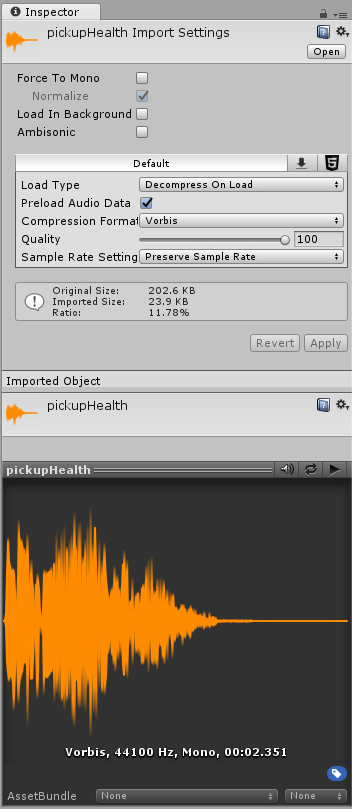
The audio file used in this image is an asset from the FREE Casual Game SFX Pack by Dustyroom, available on the Unity Asset StoreA growing library of free and commercial assets created by Unity and members of the community. Offers a wide variety of assets, from textures, models and animations to whole project examples, tutorials and Editor extensions. More info
See in Glossary.
Properties
The following properties are available in the InspectorA Unity window that displays information about the currently selected GameObject, asset or project settings, allowing you to inspect and edit the values. More info
See in Glossary for your imported audio files:
| Property | Function |
|---|---|
| Force To Mono | Enable to mix multi-channel audio down to a mono track before packing occurs. |
| Normalize | Enable to normalize audio during the Force To Mono mixing down process. |
| Load In Background | Enable to ensure Unity loads the audio clip asynchronously (in the background) when the game starts, which takes pressure off the main thread. This setting can enhance performance if you need to load large audio files. |
| Ambisonic | Enable this option if your audio file contains Ambisonic-encoded audio. Ambisonic audio sourcesA component which plays back an Audio Clip in the scene to an audio listener or through an audio mixer. More info See in Glossary store audio in a format which represents a soundfield that can be rotated based on the listener’s orientation. It’s useful for 360-degree videos and XRAn umbrella term encompassing Virtual Reality (VR), Augmented Reality (AR) and Mixed Reality (MR) applications. Devices supporting these forms of interactive applications can be referred to as XR devices. More info See in Glossary applications. |
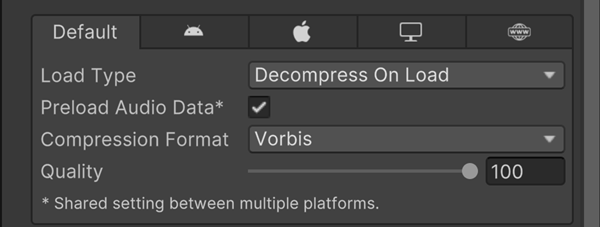
Platform-specific audio clip override settings
The following table shows the options available in the platform-specific overrides panel in the Audio Clip Import Settings Inspector window. In this panel, you can configure the audio clip’s settings for various platforms. To access the settings for a specific platform, select the tab for that platform.
| Property | Function |
|---|---|
| Load Type | Choose the method Unity uses to load audio assets at runtime:
|
| Compression Format | Choose the format for the sound to use at runtime. Note that the options available depend on the currently selected build target:
|
| Sample Rate Setting | Control the sample rate of the audio, which affects audio file size and quality. PCM and ADPCM compression formats allow automatically optimized or manual sample rate reduction. The following options are available:
|
| Force To Mono | Enable to down-mix the audio clip to a single channel sound. The down-mixing process typically results in signals that are more quiet than the original. After the down-mixing, the signal is peak-normalized. The peak-normalized signal provides space for later adjustments through the volume property of AudioSource. |
| Load In Background | Enable this setting to load the audio clip in the background, which prevents stalls on the main thread. This setting is disabled by default to ensure the standard Unity behavior, where all AudioClips are fully loaded when the sceneA Scene contains the environments and menus of your game. Think of each unique Scene file as a unique level. In each Scene, you place your environments, obstacles, and decorations, essentially designing and building your game in pieces. More info See in Glossary starts to play. Unity defers play requests on AudioClips that are still loading in the background until the clip loads fully. You can use the AudioClip.loadState property to query the load state. |
| Preload Audio Data | Enable to preload the audio clip after the scene fully loads. This setting is enabled by default to reflect standard Unity behavior where all AudioClips complete loading as soon as the scene starts to play. If this flag isn’t set, the audio data will either load on the first AudioSource.Play, AudioSource.PlayOneShot. It can also load through AudioClip.LoadAudioData, and unload again through AudioClip.UnloadAudioData. |
| Quality | Determine the amount of compression to apply to a compressed clip. Doesn’t apply to PCM/ADPCM/HEVAG formats. Start with high-quality compression and gradually reduce the setting until you notice the sound quality drops. Then, increase it again slightly until the perceived loss of quality disappears. The Inspector shows statistics about the file size. Note: The original size relates to the original file, so if your file is an MP3 file and you set Compression Format to PCM (uncompressed), the resulting Ratio will be bigger than 100% because the file is now stored uncompressed and takes up more space than the source MP3 that it came from. |
Preview window
The Preview window lets you play the audio in the Unity Editor outside of Play mode. This window allows you to check audio files to ensure they sound as expected before you use them in your application.
| Property | Function |
|---|---|
 |
Select the Play button to play the selected audio clip. |
 |
Enable the Turn Auto Play On/Off toggle to play the audio clips as soon as you select any clip in your project. |
 |
Enable this toggle to play the audio clips in a continuous loop. |
Note: If Unity Audio is disabled in Project SettingsA broad collection of settings which allow you to configure how Physics, Audio, Networking, Graphics, Input and many other areas of your project behave. More info
See in Glossary, preview is unavailable.