Description
カスタムプロパティドローワーのベースクラスです。自身で作成した Serializable クラスや PropertyAttribute 変数のカスタムドローワーを作成して使用することが出来ます。
PropertyDrawersは 2 つの使い方があります:
- Serializable クラスのGUIをカスタマイズ
- PropertyAttribute の付いたスクリプトメンバーのGUIをカスタマイズ
自身で作成した Serializable クラスを持つ場合、Inspectorの見た目を変更できるPropertyDrawerを使用することが出来ます。
SerializableクラスのIngredientクラスを考慮したスクリプトが以下になります:
// Recipe.js
// This is not an editor script

enum IngredientUnit { Spoon, Cup, Bowl, Piece }

// Custom serializable class
class Ingredient extends System.Object {
	var name : String;
	var amount : int = 1;
	var unit : IngredientUnit;
}

var potionResult : Ingredient;
var potionIngredients : Ingredient[];

function Update () {
	// Update logic here...
}
using UnityEngine;
using System.Collections;

public class Ingredient : MonoBehaviour {
    public string name;
    public int amount = 1;
    public IngredientUnit unit;
}
public class ExampleClass : MonoBehaviour {
    public Ingredient potionResult;
    public Ingredient[] potionIngredients;
}
import UnityEngine
import System.Collections

public enum IngredientUnit:

	Spoon

	Cup

	Bowl

	Piece

public class Ingredient(System.Object):

	public name as string

	public amount as int = 1

	public unit as IngredientUnit

public class ExampleClass(MonoBehaviour):

	public potionResult as Ingredient

	public potionIngredients as (Ingredient)
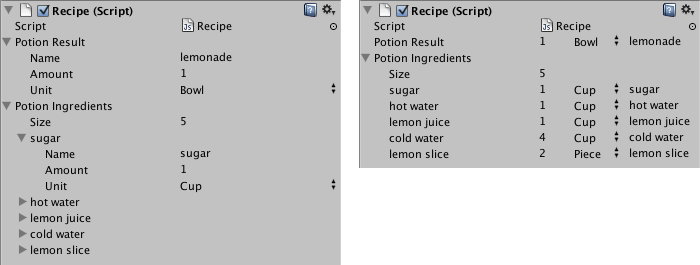
PropertyDrawerを使用すると、Ingredientクラスの状況によってInspectorを変更することが可能です。
PropertyDrawerを使った場合と使っていない時のIngredientクラスのInspectorを比較してみてください:

PropertyDrawerを使用していない (left) 時と使用している (right) 時のクラスのInspectorの表示
PropertyDrawerは CustomPropertyDrawer アトリビュートとドローワーを使用するSerializableクラスの型をアタッチします。
// IngredientDrawer.js
@CustomPropertyDrawer (Ingredient)
class IngredientDrawer extends PropertyDrawer {

	// Draw the property inside the given rect
	function OnGUI (position : Rect, property : SerializedProperty, label : GUIContent) {
		// Using BeginProperty / EndProperty on the parent property means that
		// prefab override logic works on the entire property.
		EditorGUI.BeginProperty (position, label, property);

		// Draw label
		position = EditorGUI.PrefixLabel (position, GUIUtility.GetControlID (FocusType.Passive), label);

		// Don't make child fields be indented
		var indent = EditorGUI.indentLevel;
		EditorGUI.indentLevel = 0;

		// Calculate rects
		var amountRect = new Rect (position.x, position.y, 30, position.height);
		var unitRect = new Rect (position.x+35, position.y, 50, position.height);
		var nameRect = new Rect (position.x+90, position.y, position.width-90, position.height);

		// Draw fields - passs GUIContent.none to each so they are drawn without labels
		EditorGUI.PropertyField (amountRect, property.FindPropertyRelative ("amount"), GUIContent.none);
		EditorGUI.PropertyField (unitRect, property.FindPropertyRelative ("unit"), GUIContent.none);
		EditorGUI.PropertyField (nameRect, property.FindPropertyRelative ("name"), GUIContent.none);

		// Set indent back to what it was
		EditorGUI.indentLevel = indent;

		EditorGUI.EndProperty ();
	}
}
no example available in C#
no example available in Boo
PropertyDrawerの他の使い方は PropertyAttribute の付いたメンバーの外観を変更することが出来ます。 例えば整数で特定の範囲内で値を設定したい場合に、Inspectorにはスライダーとして表示することが出来ます。 これは RangeAttribute としてビルドインされているPropertyAttribute機能でこのように使用します:
// Show this float in the Inspector as a slider between 0 and 10
@Range (0.0, 10.0)
var myFloat = 0.0;
using UnityEngine;
using System.Collections;

public class ExampleClass : MonoBehaviour {
    [Range(0.0F, 10.0F)]
    public float myFloat = 0.0F;
}
import UnityEngine
import System.Collections

public class ExampleClass(MonoBehaviour):

	[Range(0.0F, 10.0F)]
	public myFloat as float = 0.0F
自分で PropertyAttribute を作成することも出来ます。 RangeAttribute を実装例として参考にしてください。 このアトリビュートはPropertyAttributeクラスを継承する必要があります。必要であればこのアトリビュートクラスにパラメータや変数の値を保持しておくことが出来ます。
// This is not an editor script. The property attribute class should be placed in a regular script file.
class RangeAttribute extends PropertyAttribute {
	var min : float;
	var max : float;

	function RangeAttribute (min : float, max : float) {
		this.min = min;
		this.max = max;
	}
}
アトリビュートを作成したら次はアトリビュートを持つプロパティの描画のためにPropertyDrawerを作成する必要があります。 このドローワークラスはPropertyDrawerを継承することと、 CustomPropertyDrawer アトリビュートを付ける必要があります。
// The property drawer class should be placed in an editor script, inside a folder called Editor.

// Tell the RangeDrawer that it is a drawer for properties with the RangeAttribute.
@CustomPropertyDrawer (RangeAttribute)
class RangeDrawer extends PropertyDrawer {

	// Draw the property inside the given rect
	function OnGUI (position : Rect, property : SerializedProperty, label : GUIContent) {

		// First get the attribute since it contains the range for the slider
		var range : RangeAttribute = attribute as RangeAttribute;

		// Now draw the property as a Slider or an IntSlider based on whether it's a float or integer.
		if (property.propertyType == SerializedPropertyType.Float)
			EditorGUI.Slider (position, property, range.min, range.max, label);
		else if (property.propertyType == SerializedPropertyType.Integer)
			EditorGUI.IntSlider (position, property, range.min, range.max, label);
		else
			EditorGUI.LabelField (position, label.text, "Use Range with float or int.");
	}
}
no example available in C#
no example available in Boo
パフォーマンス上の理由からEditorGUILayoutクラスはPropertyDrawerでは使用できないことに注意してください。 See Also: PropertyAttribute クラス, CustomPropertyDrawer クラス.
Variables
| attribute | プロパティの PropertyAttribute を取得します (Read Only) |
| fieldInfo | このプロパティが表すメンバーのリフレクション FieldInfo (Read Only) |
Functions
| GetPropertyHeight | ピクセル単位でGUIの高さを設定します。そのためにはこのメソッドをオーバーライドしてください |
| OnGUI | 独自のGUI描画を作成するためにこのメソッドをオーバーライドします |