パラメーター
| position | 現在のハンドルカメラから見た 3D 空間の位置 |
| text | ラベルとして表示するテキスト |
| image | ラベル上で表示するテクスチャ |
| content | ラベルのテキスト、画像、ツールチップ |
| style | 使用するスタイル。設定しない場合は、現在の GUISkin から label スタイルを使用します。注意: 画面サイズに対して固定サイズのハンドルを持ちたい場合、 HandleUtility.GetHandleSize を使用します。 |
説明
3D 空間に配置されるテキスト ラベルを作成します。
ラベルはユーザーとの対話処理をせず、マウスのクリック(イベント)を拾わずに常に標準スタイルが表示されます。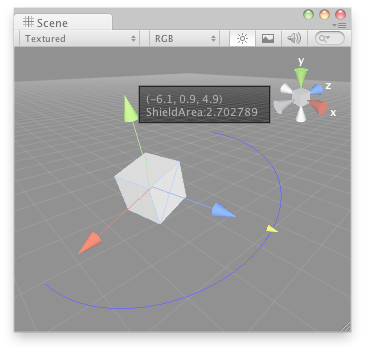
シーンビューのラベル
この例を使用するには、以下のスクリプトを Assets/Editor フォルダーに保存します。
using UnityEngine;
using UnityEditor;

[CustomEditor( typeof( DrawWireArc ) )]
public class DrawWireArcEditor : Editor
{
    void OnSceneGUI( )
    {
        DrawWireArc t = target as DrawWireArc;

        Handles.color = Color.blue;
        Handles.Label( t.transform.position + Vector3.up * 2,
            t.transform.position.ToString( ) + "\nShieldArea: " +
            t.shieldArea.ToString( ) );

        Handles.BeginGUI( );
        GUILayout.BeginArea( new Rect( Screen.width - 100, Screen.height - 80, 90, 50 ) );

        if( GUILayout.Button( "Reset Area" ) )
            t.shieldArea = 5;

        GUILayout.EndArea( );
        Handles.EndGUI( );

        Handles.color = new Color( 1, 1, 1, 0.2f );
        Handles.DrawWireArc( t.transform.position, t.transform.up, -t.transform.right,
	180, t.shieldArea );

        Handles.color = Color.white;
        t.shieldArea = Handles.ScaleValueHandle( t.shieldArea,
        t.transform.position + t.transform.forward * t.shieldArea,
        t.transform.rotation, 1, Handles.ConeCap, 1 );
    }
}
このスクリプトをゲームオブジェクトに置きます。
using UnityEngine;


[ExecuteInEditMode]
public class DrawWireArc : MonoBehaviour
{
	public float shieldArea = 5;
}