Create a custom inventory property drawer
You can create custom property drawersA Unity feature that allows you to customize the look of certain controls in the Inspector window by using attributes on your scripts, or by controlling how a specific Serializable class should look More info
See in Glossary to customize the appearance and behavior of UXML attributes of a custom control in the InspectorA Unity window that displays information about the currently selected GameObject, asset or project settings, allowing you to inspect and edit the values. More info
See in Glossary panel of the UI Builder.
SerializedFields support custom property drawers, similar to ScriptableObject or MonoBehaviour. You can apply a custom property drawer to either the type or the field.
Example overview
This example creates an inventory system which includes an Item class, a variety of items, and an Inventory class. The Inventory class manages inventory items inside a visual elementA node of a visual tree that instantiates or derives from the C# VisualElement class. You can style the look, define the behaviour, and display it on screen as part of the UI. More info
See in Glossary. The example uses custom property drawers to manage the inventory system.
You can find the completed files that this example creates in this GitHub repository.
Prerequisites
This guide is for developers familiar with the Unity Editor, UI Toolkit, and C# scripting. Before you start, get familiar with the following:
- UXML
CustomPropertyDrawerUxmlObjectUxmlAttributeUxmlSerializedDataCreator.CreateUxmlSerializedData
Create an item and a variety of items
First, create an Item class. This class is abstract and serves as a blueprint for all types of objects, encompassing their shared properties. Next, create a variety of items, including a heath pack and different types of weapons.
Create a project in Unity with any template.
In your Project window, create a folder named
inventory-property-drawersto store your files.In the
inventory-property-drawersfolder, create a subfolder namedScriptsto store your C# scriptsA piece of code that allows you to create your own Components, trigger game events, modify Component properties over time and respond to user input in any way you like. More info
See in Glossary.-
In the
Scriptsfolder, create a C# script namedItem.cswith the following content:using UnityEngine.UIElements; using UnityEngine; [UxmlObject] public abstract partial class Item { [UxmlAttribute, HideInInspector] public int id; [UxmlAttribute] public string name; [UxmlAttribute] public float weight; } -
In the
Scriptsfolder, create a C# script namedHealthPack.cswith the following content:using System; using UnityEngine; using UnityEngine.UIElements; [UxmlObject] public partial class HealthPack : Item { [UxmlAttribute] public float healAmount = 100; public HealthPack() { name = "Health Pack"; } } [UxmlObject] public partial class Sword : Item { [UxmlAttribute, Range(1, 100)] public float slashDamage; } [Serializable] public class Ammo { public int count; public int maxCount; } [UxmlObject] public partial class Gun : Item { [UxmlAttribute] public float damage; [UxmlAttribute] public Ammo ammo = new Ammo { count = 10, maxCount = 10 }; }
Create an attribute converter and an inventory
This example uses a custom attribute named Ammo, therefore, you must define an attribute converter for it. You need an Inventory class to store all items. To use the inventory, create a Character custom control to manage the inventory items.
-
In the
Scriptsfolder, create a C# script namedAmmoConverter.cswith the following content:using UnityEditor.UIElements; public class AmmoConverter : UxmlAttributeConverter<Ammo> { public override Ammo FromString(string value) { var ammo = new Ammo(); var values = value.Split('/'); if (values.Length == 2) { int.TryParse(values[0], out ammo.count); int.TryParse(values[1], out ammo.maxCount); } return ammo; } public override string ToString(Ammo value) { return $"{value.count}/{value.maxCount}"; } } -
In the
Scriptsfolder, create a C# script namedInventory.cswith the following content:using System.Collections.Generic; using UnityEngine.UIElements; [UxmlObject] public partial class Inventory { List<Item> m_Items = new List<Item>(); Dictionary<int, Item> m_ItemDictionary = new Dictionary<int, Item>(); [UxmlAttribute] int nextItemId = 1; [UxmlObjectReference("Items")] public List<Item> items { get => m_Items; set { m_Items = value; m_ItemDictionary.Clear(); foreach (var item in m_Items) { m_ItemDictionary[item.id] = item; } } } public Item GetItem(int id) => m_ItemDictionary.TryGetValue(id, out var item) ? item : null; }
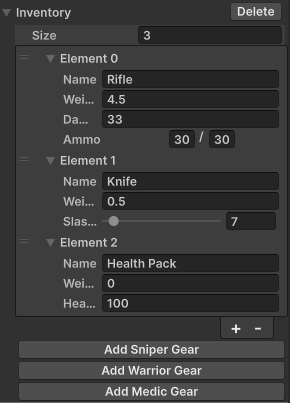
Create a custom property drawer
When you add the Character element to UI Builder, you can manage inventory items,but the ID value isn’t assigned automatically. To fix this, add a InventoryPropertyDrawer to the Inventory class. This allows you to manage the inventory items directly in the UI Builder. Note that when you add the custom property drawer, edit the UxmlSerializedData not the Inventory class directly.
To ensure the Ammo class to clamp the count value to be less than maxCount, create a AmmoPropertyDrawer for the Ammo class.
-
In the
Scriptsfolder, create a C# script namedInventoryPropertyDrawer.cswith the following content:// When you add a UxmlObject to the inventory list, include an instance of UxmlSerializedData, not an Item. // To simplify this process, this example uses `UxmlSerializedDataCreator.CreateUxmlSerializedData`, // a utility method that creates a UxmlObject’s UxmlSerializedData with default values. // // In this approach, the assignment of an ID value is introduced. To manage this, the last used ID value is stored // within the element as a hidden field labeled `nextItemId`. Additionally, buttons are incorporated to add preconfigured // sets of items. For instance, a Soldier might receive a Rifle, Machete, and Performance Pack. using UnityEditor; using UnityEngine.UIElements; using UnityEngine; using UnityEditor.UIElements; [CustomPropertyDrawer(typeof(Inventory.UxmlSerializedData))] public class InventoryPropertyDrawer : PropertyDrawer { SerializedProperty m_InventoryProperty; SerializedProperty m_ItemsProperty; public override VisualElement CreatePropertyGUI(SerializedProperty property) { m_InventoryProperty = property; var root = new VisualElement(); m_ItemsProperty = property.FindPropertyRelative("items"); var items = new ListView { showAddRemoveFooter = true, showBorder = true, showFoldoutHeader = false, reorderable = true, virtualizationMethod = CollectionVirtualizationMethod.DynamicHeight, reorderMode = ListViewReorderMode.Animated, bindingPath = m_ItemsProperty.propertyPath, overridingAddButtonBehavior = OnAddItem }; root.Add(items); var addSniperGear = new Button(() => { AddGun("Rifle", 4.5f, 33, 30, 30); AddSword("Knife", 0.5f, 7); AddHealthPack(); m_InventoryProperty.serializedObject.ApplyModifiedProperties(); }); addSniperGear.text = "Add Sniper Gear"; var addWarriorGear = new Button(() => { AddGun("Rifle", 4.5f, 33, 30, 30); AddHealthPack(); AddSword("Machete", 1, 11); m_InventoryProperty.serializedObject.ApplyModifiedProperties(); }); addWarriorGear.text = "Add Warrior Gear"; var addMedicGear = new Button(() => { AddGun("Pistol", 1.5f, 10, 15, 15); AddHealthPack(); AddHealthPack(); AddHealthPack(); m_InventoryProperty.serializedObject.ApplyModifiedProperties(); }); addMedicGear.text = "Add Medic Gear"; root.Add(addSniperGear); root.Add(addWarriorGear); root.Add(addMedicGear); root.Bind(property.serializedObject); return root; } void AddGun(string name, float weight, float damage, int ammo, int maxAmmo) { m_ItemsProperty.arraySize++; var newItem = m_ItemsProperty.GetArrayElementAtIndex(m_ItemsProperty.arraySize - 1); newItem.managedReferenceValue = UxmlSerializedDataCreator.CreateUxmlSerializedData(typeof(Gun)); newItem.FindPropertyRelative("id").intValue = NextItemId(); newItem.FindPropertyRelative("name").stringValue = name; newItem.FindPropertyRelative("weight").floatValue = weight; newItem.FindPropertyRelative("damage").floatValue = damage; var ammoInstance = newItem.FindPropertyRelative("ammo"); ammoInstance.FindPropertyRelative("count").intValue = ammo; ammoInstance.FindPropertyRelative("maxCount").intValue = maxAmmo; } void AddSword(string name, float weight, float damage) { m_ItemsProperty.arraySize++; var newItem = m_ItemsProperty.GetArrayElementAtIndex(m_ItemsProperty.arraySize - 1); newItem.managedReferenceValue = UxmlSerializedDataCreator.CreateUxmlSerializedData(typeof(Sword)); newItem.FindPropertyRelative("id").intValue = NextItemId(); newItem.FindPropertyRelative("name").stringValue = name; newItem.FindPropertyRelative("weight").floatValue = weight; newItem.FindPropertyRelative("slashDamage").floatValue = damage; } void AddHealthPack() { m_ItemsProperty.arraySize++; var newItem = m_ItemsProperty.GetArrayElementAtIndex(m_ItemsProperty.arraySize - 1); newItem.managedReferenceValue = UxmlSerializedDataCreator.CreateUxmlSerializedData(typeof(HealthPack)); newItem.FindPropertyRelative("id").intValue = NextItemId(); } int NextItemId() => m_InventoryProperty.FindPropertyRelative("nextItemId").intValue++; void OnAddItem(BaseListView baseListView, Button button) { var menu = new GenericMenu(); var items = TypeCache.GetTypesDerivedFrom<Item>(); foreach (var item in items) { if (item.IsAbstract) continue; menu.AddItem(new GUIContent(item.Name), false, () => { m_ItemsProperty.arraySize++; var newItem = m_ItemsProperty.GetArrayElementAtIndex(m_ItemsProperty.arraySize - 1); newItem.managedReferenceValue = UxmlSerializedDataCreator.CreateUxmlSerializedData(item); newItem.FindPropertyRelative("id").intValue = NextItemId(); m_InventoryProperty.serializedObject.ApplyModifiedProperties(); }); } menu.DropDown(button.worldBound); } } -
In the
Scriptsfolder, create a C# script namedAmmoPropertyDrawer.cswith the following content:// Note that this example creates a PropertyDrawer for the Ammo type because it's not a UxmlObject. using UnityEditor; using UnityEditor.UIElements; using UnityEngine; using UnityEngine.UIElements; [CustomPropertyDrawer(typeof(Ammo))] public class AmmoPropertyDrawer : PropertyDrawer { public override VisualElement CreatePropertyGUI(SerializedProperty property) { var root = new VisualElement { style = { flexDirection = FlexDirection.Row } }; var count = property.FindPropertyRelative("count"); var maxCount = property.FindPropertyRelative("maxCount"); var ammoField = new IntegerField("Ammo") { isDelayed = true, bindingPath = count.propertyPath }; ammoField.TrackPropertyValue(count, p => { count.intValue = Mathf.Min(p.intValue, maxCount.intValue); property.serializedObject.ApplyModifiedProperties(); }); root.Add(ammoField); root.Add(new Label("/")); var countField = new IntegerField { isDelayed = true, bindingPath = maxCount.propertyPath }; countField.TrackPropertyValue(maxCount, p => { count.intValue = Mathf.Min(p.intValue, count.intValue); property.serializedObject.ApplyModifiedProperties(); }); root.Add(countField); root.Bind(property.serializedObject); return root; } }
Test the inventory system in UI Builder
To test the inventory system, in UI Builder, add a Character element and add items to the inventory.
- From the main menu, select Window > UI Toolkit > UI Builder to open the UI Builder window.
- In UI Builder, in the Library panel, select the Project > Custom Controls tab.
- Drag the
Characterelement from the Library panel to the Hierarchy panel. - In the Inspector panel, you can now add items to the inventory. The ID value is automatically assigned, and you can add pre-configured sets of items.