Сборка AssetBundles в 4.x
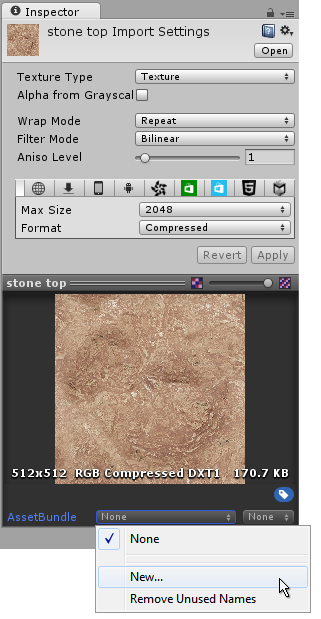
To begin creating an AssetBundle (called AssetBundle in scripts and within the Unity Editor), select an asset from your project folder that you want to include in a bundle. At the very bottom of the Inspector window for that asset is the AssetBundle menu. Clicking this reveals the names of any currently defined AssetBundles, plus the option to define a new bundle:

If you haven’t yet defined a bundle, click New…, and enter a name for your bundle.
Then, to add further assets to this bundle, use the menu at the bottom of the Inspector window to select an asset in the Project window and assign it to the named bundle.
By default, the AssetBundle option for assets is set to None, meaning the asset is not written into an AssetBundle but is instead packaged with the main project itself. Using this menu, you can create one or more AssetBundles, give them names, and then use these new AssetBundle names as the destination for the asset.

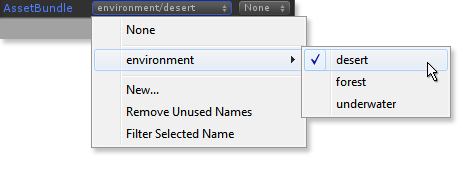
In this example the asset has been added to an AssetBundle called environment/desert. This AssetBundle may contain other assets which have previously been added. AssetBundle names are always lower-case. If you use upper-case characters in the name, they are converted to lower-case. Using a forward slash in the name of the AssetBundle effectively creates folders so that the menu contains sub-menus, as the screenshot above shows.
If you create AssetBundles which have no assets assigned to them, you can use the Remove Unused Names option. This deletes the empty AssetBundle.
The meta file belonging to an Asset has the chosen AssetBundle name written into it.
Сборка AssetBundles в 4.x
AssetBundles are exported from the editor using script code. The following script exports AssetBundles:
using UnityEditor;

public class CreateAssetBundles
{
    [MenuItem ("Assets/Build AssetBundles")]
    static void BuildAllAssetBundles ()
    {
        BuildPipeline.BuildAssetBundles ("Assets/AssetBundles", BuildAssetBundleOptions.None, BuildTarget.StandaloneOSXUniversal);
    }
}
This script creates a menu item at the bottom of the Assets menu. When you select this menu item to call the function and build the AssetBundles, a build dialog with a progress bar appears. The BuildPipeline.BuildAssetBundles function creates the AssetBundles that have been labelled, and puts them into an output folder called “AssetBundles”. (Note that you need to create the “AssetBundles” folder in your project folder before you run this script.)
Each AssetBundle that is exported has the name displayed in the AssetBundle menu. Additionally, each AssetBundle has an associated file with a “.manifest” extension. This manifest file is a text file that you can open with any text editor. It provides information such as the file CRC and asset dependencies. The AssetBundle in the example above has a manifest file that looks like this:
ManifestFileVersion: 0
CRC: 2422268106
Hashes:
  AssetFileHash:
    serializedVersion: 2
    Hash: 8b6db55a2344f068cf8a9be0a662ba15
  TypeTreeHash:
    serializedVersion: 2
    Hash: 37ad974993dbaa77485dd2a0c38f347a
HashAppended: 0
ClassTypes:
- Class: 91
  Script: {instanceID: 0}
Assets:
  Asset_0: Assets/Mecanim/StateMachine.controller
Dependencies: {}
In addition to these, another two files are created: another AssetBundle and another manifest file. They are created for each folder that AssetBundles are created in, so if you always create AssetBundles in the same place, you only get two extra files. The additional manifest file (in this example AssetBundles.manifest) can be used in much the same way as other manifest files, but shows information on how AssetBundles relate and depend on each other. In this case, since we only have a single AssetBundle, it has no other dependencies.
ManifestFileVersion: 0
AssetBundleManifest:
  AssetBundleInfos:
    Info_0:
      Name: scene1assetbundle
      Dependencies: {}
Shader stripping
When you include shaders in your bundle, the Unity editor looks at the current scene and lightmapping settings to decide which Lightmap modes to use. This means that you need to have a configured scene open when building the bundle.
However, you can also manually specify which scene to calculate Lightmap modes from. This is necessary when building bundles from the command line.
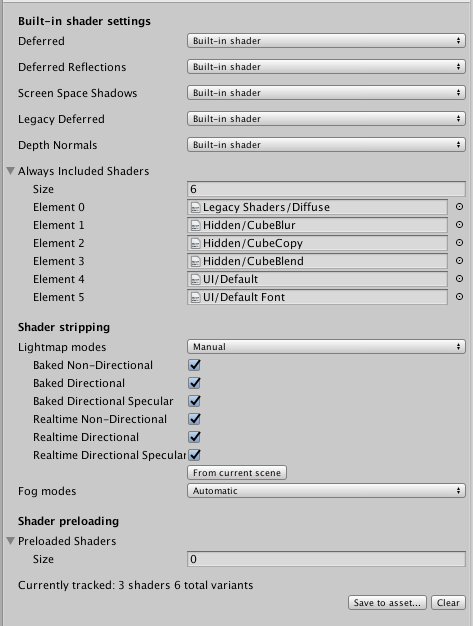
Open the scene you would like to use. In the Graphics Settings Inspector (Edit > Project Settings > Graphics), go to Shader stripping/Lightmap modes and select Manual, then select From current scene.

Сборка AssetBundles в 4.x
Getting names of AssetBundles
The following Editor script can display the names of the AssetBundles which the build process can create.
using UnityEditor;
using UnityEngine;

public class GetAssetBundleNames
{
    [MenuItem ("Assets/Get AssetBundle names")]
    static void GetNames ()
    {
        var names = AssetDatabase.GetAllAssetBundleNames();
        foreach (var name in names)
            Debug.Log ("AssetBundle: " + name);
    }
}
Getting told when an asset changes AssetBundle
Use the OnPostprocessAssetbundleNameChanged method from the AssetPostprocessorclass to get a callback when an asset from the the AssetBundle is associated with changes.
using UnityEngine;
using UnityEditor;

public class MyPostprocessor : AssetPostprocessor {

    void OnPostprocessAssetbundleNameChanged ( string path,
            string previous, string next) {
        Debug.Log("AB: " + path + " old: " + previous + " new: " + next);
    }
}
Сборка AssetBundles в 4.x
This can be used to achieve a result similar to virtual assets. For example, you can set AssetBundle variants like “MyAssets.hd” and “MyAssets.sd”. Make sure the assets exactly match. The Unity build pipeline gives the objects in these two variant AssetBundles the same internal IDs. Now these two variant AssetBundles can be switched out arbitrarily, with AssetBundles of different variant extension at runtime.
To set AssetBundle variants:
- From the Editor, use the one extra variant name to the right of the asset labels GUI.
- In code, use the
AssetImporter.assetBundleVariantoption.

The full AssetBundle name is the combination of the AssetBundle name and the variant name. For example, if you want to add “MyAssets.hd” as a variant AssetBundle, you should set the AssetBundle name to “MyAssets” and AssetBundle variant to “hd”.
If you only set the AssetBundle a name like “MyAssets.hd”, it is created as a normal AssetBundle, not a variant AssetBundle. “MyAssets”+“hd” and “MyAssets.hd”+"" cannot coexist, as they lead to the same full AssetBundle name.
Scripting advice
API to mark the asset as an AssetBundle
- You can use AssetImporter.assetBundleName to set the AssetBundle name.
Сборка AssetBundles в 4.x * BuildPipeline.BuildAssetBundle позволяет вам собрать AssetBundle из любого типа ассетов.
- The output path for all the AssetBundles.
- BuildAssetBundleOptions (see below).
- BuildTarget which is same as before.
- An overloaded version to provide an array of
AssetBundleBuildwhich contains one map from assets to AsssetBundles. This provides flexibility to you: you can set your mapping information by script and build from it. This mapping information does not replace or break the existing one in the asset database.
API to manipulate AssetBundle names in the asset database
- AssetDatabase.GetAllAssetBundleNames() returns all the AssetBundle names in the asset database.
- AssetDatabase.GetAssetPathsFromAssetBundle returns the asset paths marked in the given AssetBundle.
- AssetDatabase.RemoveAssetBundleName() removes a given AssetBundle name in the asset database.
- AssetDatabase.GetUnusedAssetBundleNames() returns the unused AssetBundle names.
- AssetDatabase.RemoveUnusedAssetBundleNames() removes all the unused AssetBundle names in the asset database.
- The callback AssetPostProcessor.OnPostprocessAssetbundleNameChanged is called if user changes the AssetBundle name of an asset.
Сборка AssetBundles в 4.x Сборка AssetBundles в 4.x * CollectDependencies and DeterministicAssetBundle are always enabled. * CompleteAssets is ignored as it always starts from assets rather than objects. It should be complete by default. * ForceRebuildAssetBundle. Even if there is no change to the assets, you can force rebuild the AssetBundles by setting this flag. * IngoreTypeTreeChanges. Even if the typetree changes, you can ignore the changes with this flag. * DisableWriteTypeTree conflicts with IngoreTypeTreeChanges. You cannot ignore typetree changes if you disable typetree.
Manifest file
A manifest file is created for every AssetBundle which contains the following information:
- The manifest file is next to the AssetBundle.
- CRC.
- Asset file hash. A single hash for all the assets included in this AssetBundle; only used for incremental build check.
- Type tree hash. A single hash for all the types included in this AssetBundle; only used for incremental build check.
- Class types. All the class types included in this AssetBundle. These are used to get the new single hash when doing the typetree incremental build check.
- Asset names. All the assets explicitly included in this AssetBundle.
- Dependent AssetBundle names. All the AssetBundles which this AssetBundle depends on.
- This manifest file is only used for incremental build, not necessary for runtime.
Single manifest file
A single manifest file is generated which includes:
- All the AssetBundles.
- All the AssetBundle dependencies.
Single manifest AssetBundle
It only contains an AssetBundleManifest object which has following API:
- GetAllAssetBundles() returns all the AssetBundle names in this build.
- GetDirectDependencies() returns the direct dependent AssetBundle names.
- GetAllDependencies() returns all the dependent AssetBundle names.
- GetAssetBundleHash(string) returns the hash for the specified AssetBundle.
- GetAllAssetBundlesWithVariant() returns all the AssetBundles with variant.
Сборка AssetBundles в 4.x
- AssetBundle.GetAllAssetNames(). Returns all the asset names in the AssetBundle.
- AssetBundle.GetAllScenePaths(). Returns all the scene asset paths if it’s a streamed scene AssetBundle.
- AssetBundle.LoadAsset(). Loads assets from the AssetBundle.
- AssetBundle.LoadAllAssets().
- AssetBundle.LoadAssetWithSubAssets().
- Asynchronous versions are also provided.
- Component types are not returned. To find the component type, load the GameObject first and then look up the component(s) on the object.
Typetrees
A typetree is written to the AssetBundle by default. The only exception is Metro, as it has a different serialization solution.