Asset Packages
Unity packages are a handy way of sharing and re-using Unity projects and collections of assets;
Unity Standard Assets and items on the Unity Asset Store are supplied in packages, for example.
Packages are collections of files and data from Unity projects, or elements of projects,
which are compressed and stored in one file, similar to Zip files.
Like Zip files, a package maintains its original directory structure when it is unpacked,
as well as meta-data about assets (such as import settings and links to other assets).
In Unity, the menu option Export Package compresses and stores the collection, while Import Package unpacks the collection into your currently open Unity project.
This page contains information on:
- Import Package: - Standard Asset Packages - Custom Packages
- Export Package
- Exporting Updated Packages
Import Package
You can import Standard Asset Packages, which are asset collections pre-made and supplied with Unity, and Custom Packages, which are made by people using Unity.
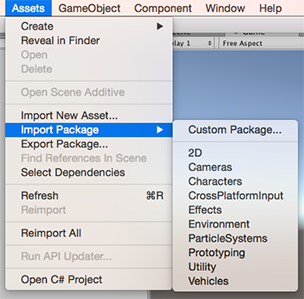
Choose __Assets > Import Package > __ to import both types of package.

Standard Asset Packages
Unity ‘Standard Assets’ consist of several different packages: __ 2D, Cameras, Characters, CrossPlatformInput, Effects, Environment, ParticleSystems, Prototyping, Utility, Vehicles__.
To import a new Standard Asset package:
Open the project you want to import assets into.
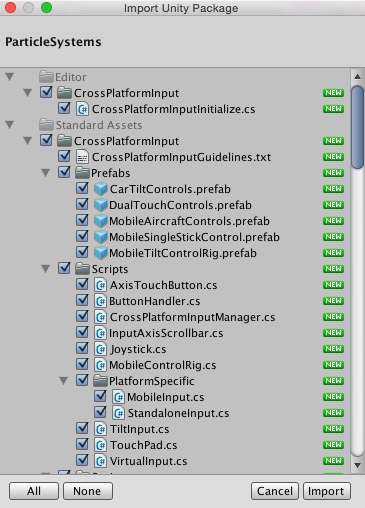
Choose Assets > Import Package > __ plus the name of the package you want to import, and the Import Unity Package__ dialog box displays, with all the items in the package pre-checked, ready to install. (See Fig 2: New install Import Unity Package Dialog Box.)
Select Import and Unity puts the contents of the package into a Standard Asset folder, which you can access from your Project View.

Custom Packages
You can import custom packages which have been exported from your own projects or from projects made by other Unity users.
To import a new custom package:
Open the project you want to import assets into.
Choose __Assets > Import Package > Custom Package… __ to bring up up File Explorer (Windows) or Finder (Mac).
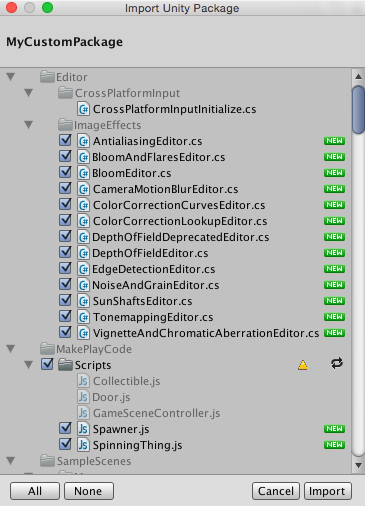
Select the package you want from Explorer or Finder, and the Import Unity Package dialog box displays, with all the items in the package pre-checked, ready to install. (See Fig 4: New install Import Unity Package dialog box.)
Select Import and Unity puts the contents of the package into the Assets folder, which you can access from your Project View.

Export Package
Use Export Package to create your own Custom Package.
- Open the project you want to export assets from.
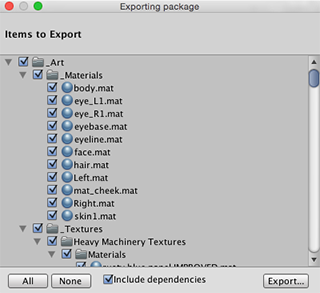
- Choose Assets > Export Package… from the menu to bring up the Exporting Package dialog box. (See Fig 6: Exporting Package dialog box.)
- In the dialog box, select the assets you want to include in the package by clicking on the boxes so they are checked.
- Leave the include dependencies box checked to auto-select any assets used by the ones you have selected.
- Click on Export to bring up File Explorer (Windows) or Finder (Mac) and choose where you want to store your package file. Name and save the package anywhere you like.
HINT: When exporting a package Unity can export all dependencies as well. So, for example, if you select a Scene and export a package with all dependencies, then all models, textures and other assets that appear in the scene will be exported as well. This can be a quick way of exporting a bunch of assets without manually locating them all.

Exporting Updated Packages
Sometimes you may want to change the contents of a package and create a newer, updated version of your asset package. To do this:
Select the asset files you want in your package (select both the unchanged ones and the new ones).
Export the files as described above in Export Package, above.
NOTE: You can re-name an updated package and Unity will recognise it as an update, so you can use incremental naming, for example: MyAssetPackageVer1, MyAssetPackageVer2.
HINT: It is not good practise to remove files from packages and then replace them with the same name: Unity will recognise them as different and possibly conflicting files and so display a warning symbol when they are imported. If you have removed a file and then decide to replace it, it is better to give it a different, but related name to the original.