Кривые цветокоррекции (Color Correction Curves)
Color Correction Curves make color adjustments using curves for each color channel. Depth based adjustments allow you to vary the color adjustment according to a pixel’s distance from the camera. For example, objects on a landscape typically get more desaturated with distance due to the effect of particles in the atmosphere scattering.
Могут быть применены и отдельные изменения, поэтому вы можете поменять целевой цвет в сцене на любой другой, какой пожелаете.
Наконец, насыщенность (Saturation) это наилегчайший способ настроить насыщенность всех цветов в большую или меньшую сторону (до тех пор пока изображение не станет абсолютно чёрным или белым), чего нельзя будет достигнуть применением только одних кривых.
See also the new Color Correction Lookup Texture Effect for lookup texture based color grading.
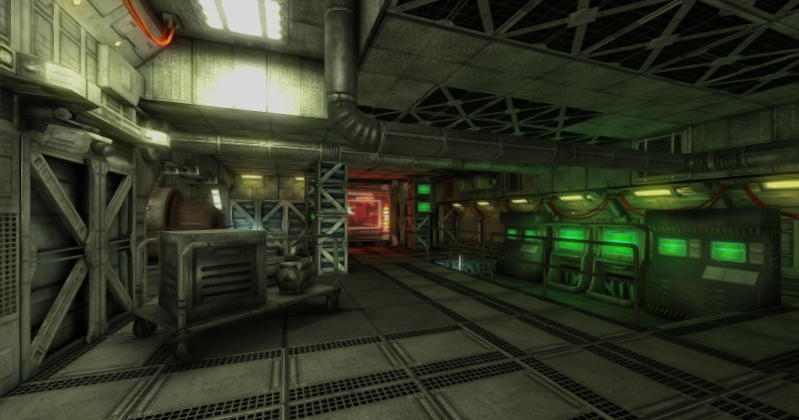
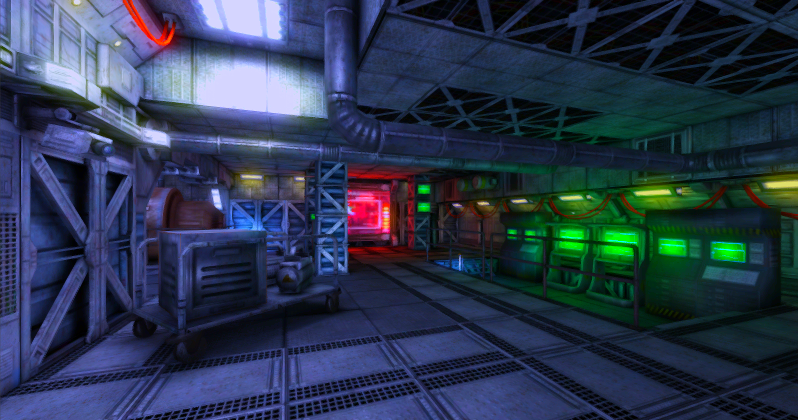
Следующие изображения демонстрируют как при помощи увеличения насыщенности при помощи слайдера и изменения кривой канала синего цвета разительно изменить общий вид сцены
As with the other image effects, you must have the Standard Assets Effects package installed before it becomes available.
Свойства
| Свойство: | Функция: |
|---|---|
| Mode | Выбирайте между продвинутыми или простыми способами конфигурации. |
| Saturation | Уровень насыщенности (0 создаёт чёрно-белое изображение) |
| Red | Кривая красного канала цвета. |
| Green | Кривая зелёного канала цвета. |
| Blue | Кривая синего канала цвета. |
| Red (Depth) | Кривая красного канала цвета для коррекции, основанной на глубине канала. |
| Green (Depth) | Кривая зелёного канала цвета для коррекции, основанной на глубине канала. |
| Blue (Depth) | Кривая синего канала цвета для коррекции, основанной на глубине канала. |
| Blend Curve | Определяет насколько выполняется смешивание между цветокоррекцией фона и переднего плана. |
| Selective Color Correction | |
| Enable | Включает опциональную выборочную цветокоррекцию. |
| Key | Ключевой цвет для выборочной цветокоррекции. |
| Target | Целевой цвет для выборочной цветокоррекции. |
Понимание кривых
Curves offer a powerful way to enhance an image and can be used to increase or decrease contrast, add a tint or create psychedelic color effects. Curves work on each of the red, green and blue color channels separately and are based around the idea of mapping each input brightness level (ie, the original brightness value of a pixel) to an output level of your choosing. The relationship between the input and output levels can be shown on a simple graph:-
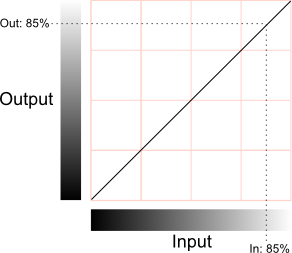
The horizontal axis represents the input level and the vertical represents the output level. Any point on the line specifies the output value that a given input is mapped to during processing. When the “curve” is the default straight line running from bottom-left to top-right, the input value is mapped to an identical output value, which will leave the pixel unchanged. However, the curve can be redrawn to re-map the brightness levels as required. A simple example is when the line goes diagonally from top-left to bottom-right:-

В этом случае, яркость пикселей будет инвертирована: 0% будет переопределено в 100%, 25% в 75% и наоборот. Если применит это ко всем каналам изображения, то оно станет похожим на негатив оригинальной фотографии.
Контрастность
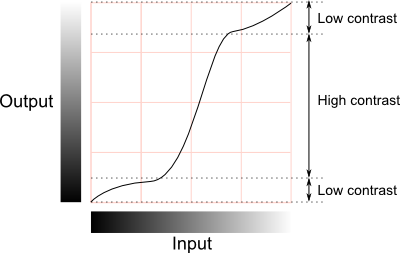
Большая часть деталей изображения передаётся различием в уровнях яркости между пикселями, независимо от их цвета. Пиксели, которые отличаются яркостью меньше 2%, вероятно, будут неразличимы, но чем больше будет это различие, тем больше будет заметна разница. Разброс значений яркости в изображении упоминается как её контрастность.
Если использовать в кривой мелкий наклон вместо диагонали угол-к-углу, тогда полный диапазон вводимых значений будет сжат в более узкий диапазон выходных данных:-
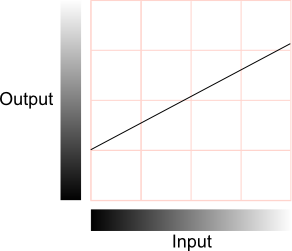
This has the effect of reducing the contrast, since the differences between pixel values in the output are necessarily smaller than those in the input (indeed, two slightly different input values may actually get mapped to the same output value). Note that since the image no longer spans the full range of output values, it is possible to slide the curve up and down the range, resulting in an image which is brighter or darker overall (the average brightness is sometimes called the “sit” point and is the parameter adjusted by the brightness control on a TV set). Reduced contrast can give the impression of gloom, fog or a dazzling light source in a scene, depending on the overall brightness.
It is not necessary to reduce the contrast across the whole range of brightness levels. The curve’s slope can vary along its length, with the shallower parts corresponding to ranges of reduced contrast. In between the shallow parts, the slope may be steeper than the default, and the contrast will actually increase in these ranges. Changing the curve like this gives a useful way to increase contrast in some parts of the image while reducing it in areas where the detail is less important:-
Цветовые эффекты
If the curves are set identically for each color channel (red, green and blue) then the changes will mainly affect the brightness of pixels while their colors remain relatively unchanged. However, if the curves are set differently for each channel then the colors can change dramatically. Many complex interactions between the color channels are possible but some basic insight can be gained from the following diagram:-
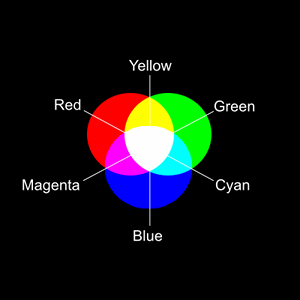
As explained in the section above, a reduction of contrast can accompany an increase or reduction in the overall brightness. If, say, the red channel is brightened then a red tint will be visible in the image. If it is darkened then the image will be tinted towards cyan (since this color is obtained by combining the other two primaries, green and blue).
Цветокоррекция, основанная на глубине
Colors often appear slightly different when viewed at a distance. For example, in a landscape scene, colors tend to get desaturated by atmospheric light scattering. This kind of effect can be created using depth-based color correction. When this is enabled, two sets of color curves become available, one for the camera’s near clipping plane and the other for the far clipping plane. The actual correction applied to an object depends on its distance from the camera; the normalized distance between the two clipping planes is used as an interpolation parameter between the two sets of color curves. The exact type of interpolation is specified by an additional blending curve, which maps the normalised distance to an interpolation value in much the same way that a color curve maps an input to an output. By default, this curve is a straight diagonal which results in linear interpolation between the two color corrections. However, it can be modified to bias the correction according to distance.
Выборочная цветокоррекция
Используя эту настройку, в оригинальном изображении можно заменять нужный цвет (обозначаемый как “ключевой” (“key”)) и заменять его выбранным целевым цветом. Используя единственный цвет в качестве ключевого может привести к дефектам отображения и поэтому между цветами должен использоваться определённый интервал. Конечным цветом будет цвет полученный интерполяцией (смешиванием) ключевого и целевого цветов, основываясь на том как близок был цвет пикселя из оригинального изображения к цвету выбранного ключевого цвета.
Редактирование кривых
Нажатие на одной из кривых в инспекторе откроет окно для их редактирования:-
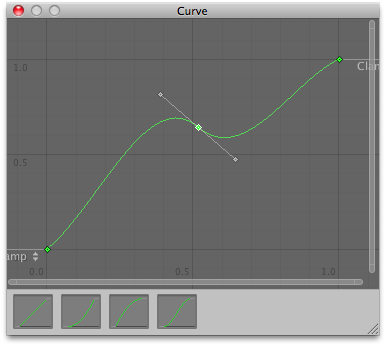
At the bottom of the window are a number of presets for common curves. However, you can also alter the curve by manipulating the key points. Right clicking on the curve line will add a new key point which can be dragged around with the mouse. If you right click on one of the points, you will see a contextual menu that gives several options for editing the curve. As well as allowing you to delete the key, there are four options that determine how it will affect the shape of the curve:-
Авто (Auto): кривая пройдёт через точку и её форма будет настроена таким образом, чтобы сгладить переходы между соседними точками.
Свободное сглаживание (Free Smooth): касательная кривой может быть настроена с использованием ручек (handles) исходящих от ключевой точки.
Плоское (Flat): применение режима сглаживания и установка касательной в горизонтальное положение.
Ломанная (Broken): Ключевая точка имеет ручки касательных, действующих в режиме свободного сглаживания (Free Smooth mode), но ручки на левой и правой стороне кривой можно также перемещать отдельно друг от друга, чтобы создать ломанный угол вместо сглаженного.
Под этими опциями расположены несколько настроек, которые управляют тем, как будут вести себя ручки (handles) касательных:-
Свободное (Free): режим сгиба (Broken mode) применяется в определённой касательно кривой.
Линейное (Linear): Кривые между ключевой точкой и окружающими её точками будут установлены как прямые линии (straight line).
Постоянное (Constant): Рисуется плоская горизонтальная линия от кривой до близлежащих кривых и вертикальное смещение (vertical displacement) происходит острыми шагами.
Аппаратная поддержка
This effect requires a graphics card that supports Depth Textures. Для более подробного ознакомления с темой и списком совместимых аппаратных средств, посетите страницу документации графические возможности аппаратных средств и их эмуляция.