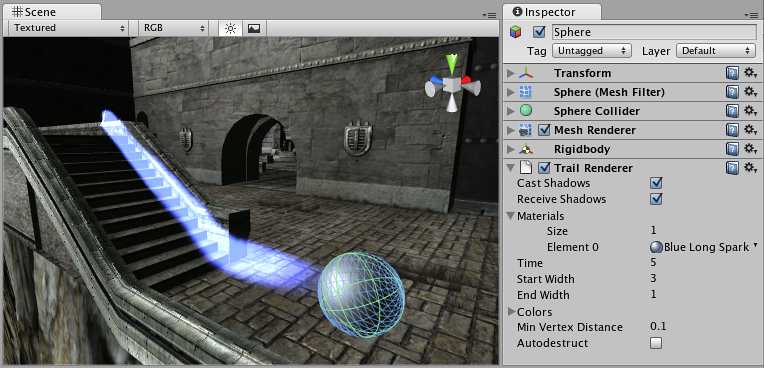
트레일 렌더러
The Trail Renderer is used to make trails behind GameObjects in the Scene as they move about.
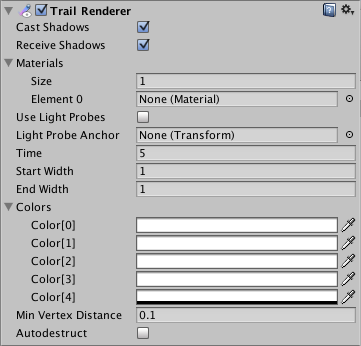
프로퍼티
| 프로퍼티: | 기능: |
|---|---|
| Cast Shadows | Determines whether the trail casts shadows, whether they should be cast from one or both sides of the trail, or whether the trail should only cast shadows and not otherwise be drawn. See Renderer-shadowCastingMode in the Script Ref to learn more. |
| Recieve Shadows | 이 옵션을 활성화하면 트레일에 그림자가 적용됩니다. |
| Use Light Probes | Check this box to enable Light Probes on the trail. |
| Light Probe Anchor | If set, this will be used as the interpolation point instead of the Transform position. |
| Materials | These properties describe an array of Materials used for rendering the trail. Particle Shaders work the best for trails. |
| Time | Length of the trail, measured in seconds. |
| Start Width | Width of the trail at the object’s position. |
| End Width | Width of the trail at the end. |
| Colors | Array of colors to use over the length of the trail. You can also set alpha transparency with the colors. Color0 to Color4 indicate the trail’s colors, from initial to final. |
| Min Vertex Distance | The minimum distance between anchor points of the trail. |
| AutoDestruct | Enable this to make the GameObject be destroyed when it has been idle for Time seconds. |
세부 정보
The Trail Renderer renders a trail of polygons behind a moving GameObject. This can be used to give an emphasised feeling of motion to a moving object, or to highlight the path or position of moving objects. A trail behind a projectile adds visual clarity to its trajectory; contrails from the tip of a plane’s wings are an example of a trail effect that happens in real life.
연결된 게임 오브젝트에는 트레일 렌더러만 렌더러로 사용해야 합니다. 빈 게임 오브젝트를 만들고 트레일 렌더러를 유일한 렌더러로 연결하는 것이 가장 좋습니다. 그 다음에는 따라가야 할 게임 오브젝트가 무엇이든 간에 트레일 렌더러의 부모로 지정할 수 있습니다.
머티리얼
A Trail Renderer component should use a Material that has a Particle Shader. The Texture used for the Material should be of square dimensions (for example 256x256, or 512x512).
Trail width
By setting the Trail’s Start Width and End Width, along with the Time property, you can tune the way it is displayed and behaves. For example, you could create the wake behind a boat by setting the Start Width to 1, and the End Width to 2.
Trail Colors
You can cycle your trail through 5 different color/opacity combinations. Using different colors could make a bright green plasma trail gradually dim down to a dull grey dissipation, or cycle through the other colors of the rainbow. If you don’t want to change the color, it can be very effective to change only the opacity of each color to make your trail fade in and out at the head and/or tail.
Min Vertex Distance
The Min Vertex Distance value determines how far the object that contains the trail must travel before a segment of the trail is solidified. Low values like 0.1 create trail segments more often, creating smoother trails. Higher values like 1.5 create segments that are more jagged in appearance. There is a slight performance trade-off when using lower values/smoother trails, so try to use the largest possible value to achieve the effect you are trying to create.
힌트
- 트레일 렌더러와 파티클 머티리얼을 함께 사용해야 합니다.
- Trail Renderers must be laid out over a sequence of frames; they can’t appear instantaneously.
- 트레일 렌더러는 다른 파티클 시스템과 비슷하게 카메라를 향하도록 회전합니다.