Vertex and Fragment Shader Examples
이 페이지에서는 버텍스 및 프래그먼트 프로그램 예제를 다룹니다. 셰이더에 대한 기본 안내는 셰이더 튜토리얼을 참조하십시오: 1부 및 2부. 표준 머리티얼 셰이더를 작성하는 쉬운 방법을 살펴보려면 표면 셰이더를 참조하십시오.
(You can download the examples shown below as a zipped Unity project, here)
Setting up the Scene
If you are not familiar with Unity’s Scene View, Hierarchy View, Project View and Inspector, now would be a good time to read the first few sections from the manual, starting with Unity Basics.
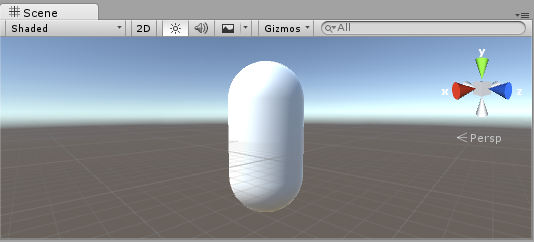
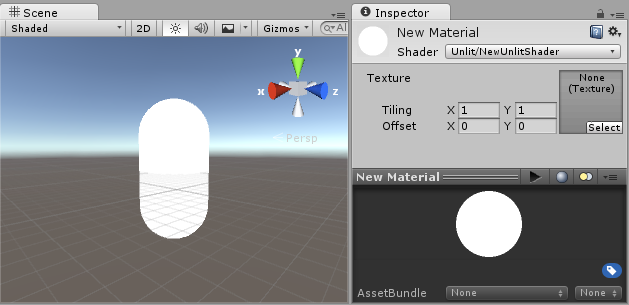
가장 먼저 할 일은 셰이더를 테스트하는 데에 사용할 오브젝트를 몇 개 만드는 일입니다. 메인 메뉴에서 Game Object > 3D Object > Capsule__을 선택해야 합니다. 다음으로 카메라가 캡슐을 바라보도록 위치시켜야 합니다. 계층 구조에서 캡슐을 더블 클릭하여 씬 뷰의 포커스를 맞춘 후 메인 카메라 오브젝트를 선택하고 메인 메뉴에서 Game object__ > __Align with View__를 클릭해야 합니다.
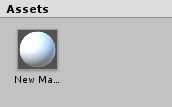
Create a new Material by selecting Create > Material from the menu in the Project Window. A new material called New Material will appear in the Project View.
Creating a Shader
Now create a new Shader asset in a similar way. Select Create > Shader > Unlit Shader from the menu in the Project Window. This creates a basic shader that just displays a texture without any lighting.
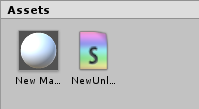
Other entries in the Create > Shader menu create barebone shaders or other types, for example a basic Surface Shader.
Linking the Mesh, Material and Shader
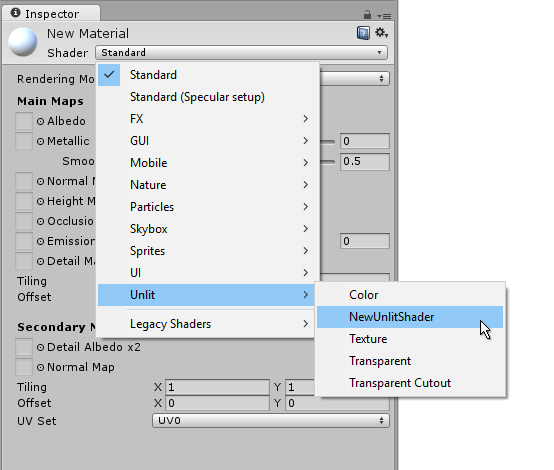
Make the material use the shader via inspector, or just drag the shader asset over the material asset in the project view. The material inspector will display a white sphere when it uses this shader.
Now drag the material onto your mesh object in either the Scene or the Hierarchy views. Alternatively, select the object, and make it use the material in Mesh Renderer component’s Materials slot.
With these things set up, you can now begin looking at the shader code, and you will see the results of your changes to the shader on the capsule in the scene view.
Main Parts of the Shader
To begin examining the code of the shader, double-click the shader asset in the Project Window. The shader code will open in your script editor (MonoDevelop or Visual Studio).
It will look like this:
셰이더는 다음 코드로 시작합니다.
Shader "Unlit/NewUnlitShader"
{
    Properties
    {
        _MainTex ("Texture", 2D) = "white" {}
    }
    SubShader
    {
        Tags { "RenderType"="Opaque" }
        LOD 100

        Pass
        {
            CGPROGRAM
            #pragma vertex vert
            #pragma fragment frag
            // make fog work
            #pragma multi_compile_fog

            #include "UnityCG.cginc"

            struct appdata
            {
                float4 vertex : POSITION;
                float2 uv : TEXCOORD0;
            };

            struct v2f
            {
                float2 uv : TEXCOORD0;
                UNITY_FOG_COORDS(1)
                float4 vertex : SV_POSITION;
            };

            sampler2D _MainTex;
            float4 _MainTex_ST;

            v2f vert (appdata v)
            {
                v2f o;
                o.vertex = mul(UNITY_MATRIX_MVP, v.vertex);
                o.uv = TRANSFORM_TEX(v.uv, _MainTex);
                UNITY_TRANSFER_FOG(o,o.vertex);
                return o;
            }

            fixed4 frag (v2f i) : SV_Target
            {
                // sample the texture
                fixed4 col = tex2D(_MainTex, i.uv);
                // apply fog
                UNITY_APPLY_FOG(i.fogCoord, col);
                return col;
            }
            ENDCG
        }
    }
}
이 초기 셰이더는 별로 간단해 보이지 않습니다! 그러나 걱정하지 말아야 합니다. 각 파트를 단계별로 짚어 봅니다.
이 단순한 셰이더의 주요 파트를 살펴 봅시다.
Shader
The Shader command contains a string with the name of the Shader. You can use forwardslash characters “/” to place your shader in sub-menus when selecting your shader in the Material inspector.
Properties
프로퍼티 블록은 머티리얼의 일부로 저장되고 머티리얼 인스펙터에 나타나게 될 셰이더 변수(텍스처, 컬러 등)를 포함하고 있습니다. 이 언릿 셰이더 템플릿에서는 하나의 텍스처 프로퍼티가 선언되었습니다.
SubShader
하나의 셰이더는 하나 이상의 서브셰이더를 포함할 수 있으며 서브셰이더는 일차적으로 다른 GPU 성능에 맞는 셰이더를 구현하기 위해 사용됩니다. 이 튜토리얼에서는 서브셰이더에 대해서는 크게 고려하지 않습니다. 따라서 여기서 모든 셰이더는 단지 하나의 서브셰이더만 포함합니다.
Pass
Each SubShader is composed of a number of passes, and each Pass represents an execution of the Vertex and Fragment code for the same object rendered with the Material of the Shader. Many simple shaders use just one pass, but shaders that interact with lighting might need more (see Lighting Pipeline for details). Commands inside Pass typically setup fixed function state, for example blending modes.
CGPROGRAM .. ENDCG
These keywords surround portions of Cg/HLSL code within the vertex and fragment shaders. Typically this is where most of the interesting code is. See vertex and fragment shaders for details.
Simple Unlit Shader
언릿(unlit) 셰이더 템플릿은 텍스처가 있는 오브젝트를 표시하기 위해 꼭 필요한 몇 가지 작업을 더 합니다. 예를 들어 안개를 지원하며 머티리얼의 텍스처 타일링/오프셋 필드를 지원합니다. 우선 셰이더를 최소한의 수준으로 단순화시킨 다음 코멘트를 더 추가해 봅시다.
Shader "Unlit/SimpleUnlitTexturedShader"
{
    Properties
    {
        // we have removed support for texture tiling/offset,
        // so make them not be displayed in material inspector
        [NoScaleOffset] _MainTex ("Texture", 2D) = "white" {}
    }
    SubShader
    {
        Pass
        {
            CGPROGRAM
            // use "vert" function as the vertex shader
            #pragma vertex vert
            // use "frag" function as the pixel (fragment) shader
            #pragma fragment frag

            // vertex shader inputs
            struct appdata
            {
                float4 vertex : POSITION; // vertex position
                float2 uv : TEXCOORD0; // texture coordinate
            };

            // vertex shader outputs ("vertex to fragment")
            struct v2f
            {
                float2 uv : TEXCOORD0; // texture coordinate
                float4 vertex : SV_POSITION; // clip space position
            };

            // vertex shader
            v2f vert (appdata v)
            {
                v2f o;
                // transform position to clip space
                // (multiply with model*view*projection matrix)
                o.vertex = mul(UNITY_MATRIX_MVP, v.vertex);
                // just pass the texture coordinate
                o.uv = v.uv;
                return o;
            }

            // texture we will sample
            sampler2D _MainTex;

            // pixel shader; returns low precision ("fixed4" type)
            // color ("SV_Target" semantic)
            fixed4 frag (v2f i) : SV_Target
            {
                // sample texture and return it
                fixed4 col = tex2D(_MainTex, i.uv);
                return col;
            }
            ENDCG
        }
    }
}
The Vertex Shader is a program that runs on each vertex of the 3D model. Quite often it does not do anything particularly interesting. Here we just transform vertex position from object space into so called “clip space”, which is what’s used by the GPU to rasterize the object on screen. We also pass the input texture coordinate unmodified - we’ll need it to sample the texture in the fragment shader.
The Fragment Shader is a program that runs on each and every pixel that object occupies on-screen, and is usually used to calculate and output the color of each pixel. Usually there are millions of pixels on the screen, and the fragment shaders are executed
for all of them! Optimizing fragment shaders is quite an important part of overall game performance work.
Some variable or function definitions are followed by a Semantic Signifier - for example : POSITION or : SV_Target. These Semantics Signifiers communicate the “meaning” of these variables to the GPU. See the shader semantics page for details.
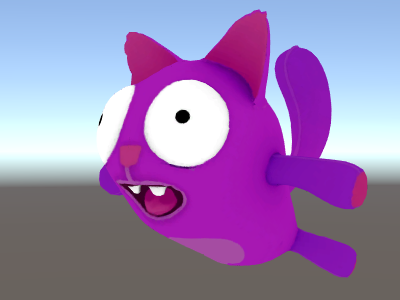
위 셰이더는 좋은 텍스처 및 모델과 함께 사용할 경우 상당히 좋은 결과를 냅니다!
Even Simpler Single Color Shader
이 셰이더를 지금보다도 더 단순화시켜 보겠습니다. 전체 오브젝트를 한 가지 컬러로 그리는 셰이더를 만듭니다. 별로 유용한 셰이더가 되지는 않겠지만 학습용으로는 충분합니다.
Shader "Unlit/SingleColor"
{
    Properties
    {
        // Color property for material inspector, default to white
        _Color ("Main Color", Color) = (1,1,1,1)
    }
    SubShader
    {
        Pass
        {
            CGPROGRAM
            #pragma vertex vert
            #pragma fragment frag

            // vertex shader
            // this time instead of using "appdata" struct, just spell inputs manually,
            // and instead of returning v2f struct, also just return a single output
            // float4 clip position
            float4 vert (float4 vertex : POSITION) : SV_POSITION
            {
                return mul(UNITY_MATRIX_MVP, vertex);
            }

            // color from the material
            fixed4 _Color;

            // pixel shader, no inputs needed
            fixed4 frag () : SV_Target
            {
                return _Color; // just return it
            }
            ENDCG
        }
    }
}
This time instead of using structs for input (appdata) and output (v2f), the shader functions just spell out inputs manually. Both ways work, and which you choose to use depends on your coding style and preference.

Using Mesh Normals For Fun and Profit
Let’s start with a shader that displays mesh normals in world space. Without further ado:
Shader "Unlit/WorldSpaceNormals"
{
    // no Properties block this time!
    SubShader
    {
        Pass
        {
            CGPROGRAM
            #pragma vertex vert
            #pragma fragment frag
            // include file that contains UnityObjectToWorldNormal helper function
            #include "UnityCG.cginc"

            struct v2f {
                // we'll output world space normal as one of regular ("texcoord") interpolators
                half3 worldNormal : TEXCOORD0;
                float4 pos : SV_POSITION;
            };

            // vertex shader: takes object space normal as input too
            v2f vert (float4 vertex : POSITION, float3 normal : NORMAL)
            {
                v2f o;
                o.pos = mul(UNITY_MATRIX_MVP, vertex);
                // UnityCG.cginc file contains function to transform
                // normal from object to world space, use that
                o.worldNormal = UnityObjectToWorldNormal(normal);
                return o;
            }

            fixed4 frag (v2f i) : SV_Target
            {
                fixed4 c = 0;
                // normal is a 3D vector with xyz components; in -1..1
                // range. To display it as color, bring the range into 0..1
                // and put into red, green, blue components
                c.rgb = i.worldNormal*0.5+0.5;
                return c;
            }
            ENDCG
        }
    }
}
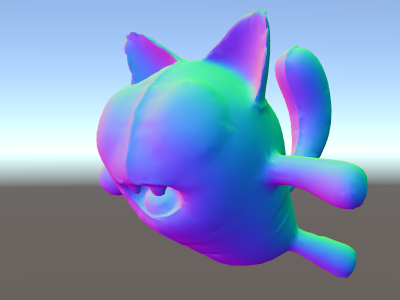
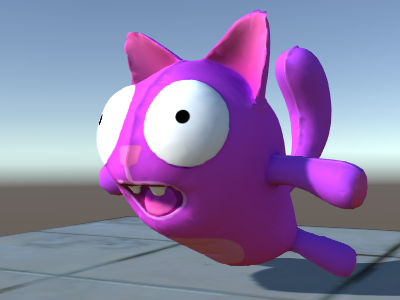
노멀은 알록달록한 컬러를 만들어내는 것 외에도 모든 종류의 그래픽스 이펙트(조명, 반사, 실루엣 등등)에 사용됩니다.
In the shader above, we started using one of Unity’s built-in shader include files.
Here, UnityCG.cginc was used which contains a handy function UnityObjectToWorldNormal.
We’ve seen that data can be passed from the vertex into fragment shader in so-called “interpolators” (or sometimes called “varyings”). In HLSL shading language they are typically labeled with TEXCOORDn semantic, and each of them can be up to a 4-component vector (see semantics page for details).
또한 정규화된 벡터를 컬러로 시각화(–1.0 ~ +1.0 범위에서)하는 방법의 간단한 기법에 대해서도 앞서 다루었습니다. 단지 이 벡터에 절반을 곱하고 나서 절반을 더하면 됩니다. 더 많은 버텍스 데이터 시각화 예는 버텍스 프로그램 입력 페이지를 참조하십시오.
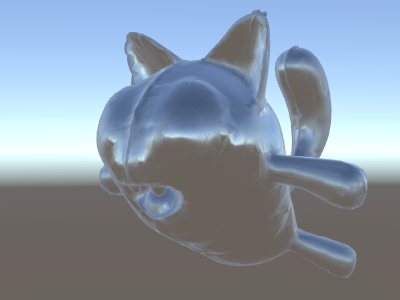
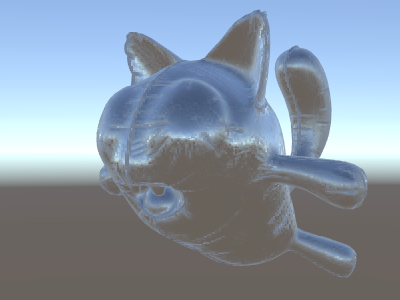
Environment Reflection using World-Space Normals
씬에서 반사 소스로 스카이박스가 사용될 때(라이팅 창 참조) 이 스카이박스 데이터를 담고 있는 “디폴트” 반사 프로브가 반드시 생성됩니다. 반사 프로브는 내부적으로는 큐브맵 텍스처입니다. 이를 살펴보기 위해 위의 월드-공간 노멀 셰이더를 확장해 보겠습니다.
The code is starting to get a bit involved by now. Of course, if you want shaders that automatically work with lights, shadows, reflections and the rest of the lighting system, it’s way easier to use Surface Shaders. This example is intended to show you how to use parts of the lighting system in a “manual” way.
Shader "Unlit/SkyReflection"
{
    SubShader
    {
        Pass
        {
            CGPROGRAM
            #pragma vertex vert
            #pragma fragment frag
            #include "UnityCG.cginc"

            struct v2f {
                half3 worldRefl : TEXCOORD0;
                float4 pos : SV_POSITION;
            };

            v2f vert (float4 vertex : POSITION, float3 normal : NORMAL)
            {
                v2f o;
                o.pos = mul(UNITY_MATRIX_MVP, vertex);
                // compute world space position of the vertex
                float3 worldPos = mul(_Object2World, vertex).xyz;
                // compute world space view direction
                float3 worldViewDir = normalize(UnityWorldSpaceViewDir(worldPos));
                // world space normal
                float3 worldNormal = UnityObjectToWorldNormal(normal);
                // world space reflection vector
                o.worldRefl = reflect(-worldViewDir, worldNormal);
                return o;
            }

            fixed4 frag (v2f i) : SV_Target
            {
                // sample the default reflection cubemap, using the reflection vector
                half4 skyData = UNITY_SAMPLE_TEXCUBE(unity_SpecCube0, i.worldRefl);
                // decode cubemap data into actual color
                half3 skyColor = DecodeHDR (skyData, unity_SpecCube0_HDR);
                // output it!
                fixed4 c = 0;
                c.rgb = skyColor;
                return c;
            }
            ENDCG
        }
    }
}
위 예제는 내장 셰이더 첨부 파일로부터 여러 가지를 사용합니다:
-
unity_SpecCube0,unity_SpecCube0_HDR,_Object2World,UNITY_MATRIX_MVPfrom the built-in shader variables. unity_SpecCube0 contains data for the active reflection probe. -
UNITY_SAMPLE_TEXCUBEbuilt-in macro to sample a cubemap. Most regular cubemaps are declared and used using standard HLSL syntax (samplerCUBEandtexCUBE), however the reflection probe cubemaps in Unity are declared in a special way to save on sampler slots. If you don’t know what that is, don’t worry, just know that in order to use unity_SpecCube0 cubemap you have to use UNITY_SAMPLE_TEXCUBE macro. -
UnityWorldSpaceViewDirfunction from UnityCG.cginc, andDecodeHDRfunction from the same file. The latter is used to get actual color from the reflection probe data – since Unity stores reflection probe cubemap in specially encoded way. -
reflectis just a built-in HLSL function to compute vector reflection around a given normal.
Environment Reflection with a Normal Map
Often Normal Maps are used to create additional detail on objects, without creating additional geometry. Let’s see how to make a shader that reflects the environment, with a normal map texture.
이제 수학이 정말 복잡해지기 시작하므로, 몇 단계로 나누어 진행합니다. 위 셰이더에서 반사 방향은 각 버텍스당 계산되었으며(버텍스 셰이더에서) 프래그먼트 셰이더는 단지 반사 프로브 큐브맵 검색만을 했습니다. 그러나 일단 노멀 맵을 사용하기 시작하면 표면 노멀 자체가 픽셀당 기준으로 계산되어야 합니다. 즉 환경이 각 픽셀마다 어떻게 반사되는지도 계산해야 한다는 의미입니다!
그러므로 우선 위의 셰이더가 같은 동작을 하도록 재작성하되 일부 계산을 프래그먼트 셰이더로 옮겨서 픽셀당으로 계산되도록 합니다:
Shader "Unlit/SkyReflection Per Pixel"
{
    SubShader
    {
        Pass
        {
            CGPROGRAM
            #pragma vertex vert
            #pragma fragment frag
            #include "UnityCG.cginc"

            struct v2f {
                float3 worldPos : TEXCOORD0;
                half3 worldNormal : TEXCOORD1;
                float4 pos : SV_POSITION;
            };

            v2f vert (float4 vertex : POSITION, float3 normal : NORMAL)
            {
                v2f o;
                o.pos = mul(UNITY_MATRIX_MVP, vertex);
                o.worldPos = mul(_Object2World, vertex).xyz;
                o.worldNormal = UnityObjectToWorldNormal(normal);
                return o;
            }

            fixed4 frag (v2f i) : SV_Target
            {
                // compute view direction and reflection vector
                // per-pixel here
                half3 worldViewDir = normalize(UnityWorldSpaceViewDir(i.worldPos));
                half3 worldRefl = reflect(-worldViewDir, i.worldNormal);

                // same as in previous shader
                half4 skyData = UNITY_SAMPLE_TEXCUBE(unity_SpecCube0, worldRefl);
                half3 skyColor = DecodeHDR (skyData, unity_SpecCube0_HDR);
                fixed4 c = 0;
                c.rgb = skyColor;
                return c;
            }
            ENDCG
        }
    }
}
이것만으로는 크게 변한 것이 없습니다. 이 셰이더는 완전히 그대로인 것처럼 보입니다. 이제 셰이더가 모델의 각 버텍스에 대해서가 아니라 화면의 모든 픽셀 각각에 대해 계산을 더 많이 하게 되면서 더 느려졌다는 것을 제외하면 말입니다. 그러나 이 계산은 빨리 이루어져야 합니다. 그래픽스 정확도를 높이려면 더 복잡한 셰이더가 필요할 경우가 많습니다.
또한 이제 새로운 것도 하나 배워야 합니다. 바로 “탄젠트 공간”입니다. 노멀 맵 텍스처는 대부분의 경우 좌표 공간에서 표현되는데 이는 모델의 “표면을 따르는” 것으로 생각할 수 있습니다. 지금 만들려는 셰이더에서는 탄젠트 공간 기반 벡터를 알아야 하고 텍스처로부터 노멀 벡터를 읽어야 하고 이 벡터를 월드 공간으로 변환하고 그 후 위 셰이더에서 모든 수학적 계산을 해야 합니다. 그럼 시작해 봅시다!
Shader "Unlit/SkyReflection Per Pixel"
{
    Properties {
        // normal map texture on the material,
        // default to dummy "flat surface" normalmap
        _BumpMap("Normal Map", 2D) = "bump" {}
    }
    SubShader
    {
        Pass
        {
            CGPROGRAM
            #pragma vertex vert
            #pragma fragment frag
            #include "UnityCG.cginc"

            struct v2f {
                float3 worldPos : TEXCOORD0;
                // these three vectors will hold a 3x3 rotation matrix
                // that transforms from tangent to world space
                half3 tspace0 : TEXCOORD1; // tangent.x, bitangent.x, normal.x
                half3 tspace1 : TEXCOORD2; // tangent.y, bitangent.y, normal.y
                half3 tspace2 : TEXCOORD3; // tangent.z, bitangent.z, normal.z
                // texture coordinate for the normal map
                float2 uv : TEXCOORD4;
                float4 pos : SV_POSITION;
            };

            // vertex shader now also needs a per-vertex tangent vector.
            // in Unity tangents are 4D vectors, with the .w component used to
            // indicate direction of the bitangent vector.
            // we also need the texture coordinate.
            v2f vert (float4 vertex : POSITION, float3 normal : NORMAL, float4 tangent : TANGENT, float2 uv : TEXCOORD0)
            {
                v2f o;
                o.pos = mul(UNITY_MATRIX_MVP, vertex);
                o.worldPos = mul(_Object2World, vertex).xyz;
                half3 wNormal = UnityObjectToWorldNormal(normal);
                half3 wTangent = UnityObjectToWorldDir(tangent.xyz);
                // compute bitangent from cross product of normal and tangent
                half tangentSign = tangent.w * unity_WorldTransformParams.w;
                half3 wBitangent = cross(wNormal, wTangent) * tangentSign;
                // output the tangent space matrix
                o.tspace0 = half3(wTangent.x, wBitangent.x, wNormal.x);
                o.tspace1 = half3(wTangent.y, wBitangent.y, wNormal.y);
                o.tspace2 = half3(wTangent.z, wBitangent.z, wNormal.z);
                o.uv = uv;
                return o;
            }

            // normal map texture from shader properties
            sampler2D _BumpMap;

            fixed4 frag (v2f i) : SV_Target
            {
                // sample the normal map, and decode from the Unity encoding
                half3 tnormal = UnpackNormal(tex2D(_BumpMap, i.uv));
                // transform normal from tangent to world space
                half3 worldNormal;
                worldNormal.x = dot(i.tspace0, tnormal);
                worldNormal.y = dot(i.tspace1, tnormal);
                worldNormal.z = dot(i.tspace2, tnormal);

                // rest the same as in previous shader
                half3 worldViewDir = normalize(UnityWorldSpaceViewDir(i.worldPos));
                half3 worldRefl = reflect(-worldViewDir, worldNormal);
                half4 skyData = UNITY_SAMPLE_TEXCUBE(unity_SpecCube0, worldRefl);
                half3 skyColor = DecodeHDR (skyData, unity_SpecCube0_HDR);
                fixed4 c = 0;
                c.rgb = skyColor;
                return c;
            }
            ENDCG
        }
    }
}
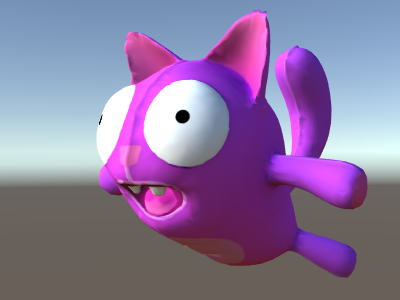
휴, 굉장히 복잡한 과정이었습니다. 하지만 보세요, 노멀 맵을 사용한 반사입니다!
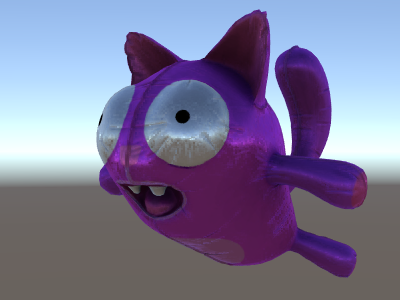
Adding More Textures
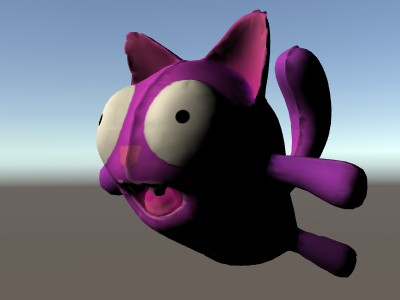
노멀 매핑된 하늘을 반사하는 위 셰이더에 더 많은 텍스처를 추가해 봅시다. 맨 처음의 언릿 예제에서 보았던 베이스 컬러 텍스처를 추가하고 움푹한 곳을 더 어둡게 표현하도록 오클루전 맵을 추가합니다.
Shader "Unlit/More Textures"
{
    Properties {
        // three textures we'll use in the material
        _MainTex("Base texture", 2D) = "white" {}
        _OcclusionMap("Occlusion", 2D) = "white" {}
        _BumpMap("Normal Map", 2D) = "bump" {}
    }
    SubShader
    {
        Pass
        {
            CGPROGRAM
            #pragma vertex vert
            #pragma fragment frag
            #include "UnityCG.cginc"

            // exactly the same as in previous shader
            struct v2f {
                float3 worldPos : TEXCOORD0;
                half3 tspace0 : TEXCOORD1;
                half3 tspace1 : TEXCOORD2;
                half3 tspace2 : TEXCOORD3;
                float2 uv : TEXCOORD4;
                float4 pos : SV_POSITION;
            };
            v2f vert (float4 vertex : POSITION, float3 normal : NORMAL, float4 tangent : TANGENT, float2 uv : TEXCOORD0)
            {
                v2f o;
                o.pos = mul(UNITY_MATRIX_MVP, vertex);
                o.worldPos = mul(_Object2World, vertex).xyz;
                half3 wNormal = UnityObjectToWorldNormal(normal);
                half3 wTangent = UnityObjectToWorldDir(tangent.xyz);
                half tangentSign = tangent.w * unity_WorldTransformParams.w;
                half3 wBitangent = cross(wNormal, wTangent) * tangentSign;
                o.tspace0 = half3(wTangent.x, wBitangent.x, wNormal.x);
                o.tspace1 = half3(wTangent.y, wBitangent.y, wNormal.y);
                o.tspace2 = half3(wTangent.z, wBitangent.z, wNormal.z);
                o.uv = uv;
                return o;
            }

            // textures from shader properties
            sampler2D _MainTex;
            sampler2D _OcclusionMap;
            sampler2D _BumpMap;

            fixed4 frag (v2f i) : SV_Target
            {
                // same as from previous shader...
                half3 tnormal = UnpackNormal(tex2D(_BumpMap, i.uv));
                half3 worldNormal;
                worldNormal.x = dot(i.tspace0, tnormal);
                worldNormal.y = dot(i.tspace1, tnormal);
                worldNormal.z = dot(i.tspace2, tnormal);
                half3 worldViewDir = normalize(UnityWorldSpaceViewDir(i.worldPos));
                half3 worldRefl = reflect(-worldViewDir, worldNormal);
                half4 skyData = UNITY_SAMPLE_TEXCUBE(unity_SpecCube0, worldRefl);
                half3 skyColor = DecodeHDR (skyData, unity_SpecCube0_HDR);
                fixed4 c = 0;
                c.rgb = skyColor;

                // modulate sky color with the base texture, and the occlusion map
                fixed3 baseColor = tex2D(_MainTex, i.uv).rgb;
                fixed occlusion = tex2D(_OcclusionMap, i.uv).r;
                c.rgb *= baseColor;
                c.rgb *= occlusion;

                return c;
            }
            ENDCG
        }
    }
}
고양이 풍선이 보기 좋아졌습니다!
Texturing Shader Examples
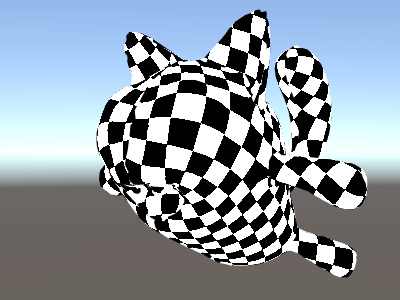
Procedural Checkerboard Pattern
다음은 메시의 텍스처 좌표에 기반한 체커보드 패턴을 출력하는 셰이더입니다.
Shader "Unlit/Checkerboard"
{
    Properties
    {
        _Density ("Density", Range(2,50)) = 30
    }
    SubShader
    {
        Pass
        {
            CGPROGRAM
            #pragma vertex vert
            #pragma fragment frag

            struct v2f
            {
                float2 uv : TEXCOORD0;
                float4 vertex : SV_POSITION;
            };

            float _Density;

            v2f vert (float4 pos : POSITION, float2 uv : TEXCOORD0)
            {
                v2f o;
                o.vertex = mul(UNITY_MATRIX_MVP, pos);
                o.uv = uv * _Density;
                return o;
            }

            fixed4 frag (v2f i) : SV_Target
            {
                float2 c = i.uv;
                c = floor(c) / 2;
                float checker = frac(c.x + c.y) * 2;
                return checker;
            }
            ENDCG
        }
    }
}
The density slider in the Properties block controls how dense the checkerboard is. In the vertex shader, the mesh UVs are multiplied by the density value to take them from a range of 0 to 1 to a range of 0 to density. Let’s say the density was set to 30 - this will make i.uv input into the fragment shader contain floating point values from zero to 30 for various places of the mesh being rendered.
Then the fragment shader code takes only the integer part of the input coordinate using HLSL’s built-in floor function, and divides it by two. Recall that the input coordinates were numbers from 0 to 30; this makes them all be “quantized” to values of 0, 0.5, 1, 1.5, 2, 2.5, and so on. This was done on both the x and y components of the input coordinate.
Next up, we add these x and y coordinates together (each of them only having possible values of 0, 0.5, 1, 1.5, …) and only take the fractional part using another built-in HLSL function, frac. Result of this can only be either 0.0 or 0.5. We then multiply it by two to make it either 0.0 or 1.0, and output as a color (this results in black or white color respectively).
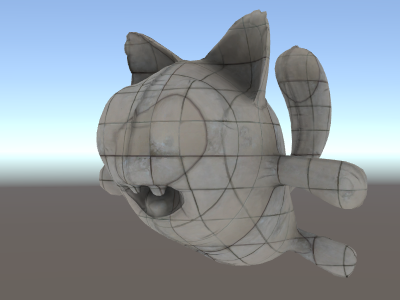
Tri-planar Texturing
복잡한 메시 또는 절차적 메시의 경우에는 일반 UV 좌표를 사용하여 텍스처링하는 것보다는 때로는 세 주방향으로부터 오브젝트 위에 텍스처를 “투사”하는 것이 유용합니다. 즉 표면 노멀을 사용하여 세 텍스처 방향에 가중치를 줍니다. 다음이 바로 그 셰이더입니다.
Shader "Unlit/Triplanar"
{
    Properties
    {
        _MainTex ("Texture", 2D) = "white" {}
        _Tiling ("Tiling", Float) = 1.0
        _OcclusionMap("Occlusion", 2D) = "white" {}
    }
    SubShader
    {
        Pass
        {
            CGPROGRAM
            #pragma vertex vert
            #pragma fragment frag

            struct v2f
            {
                half3 objNormal : TEXCOORD0;
                float3 coords : TEXCOORD1;
                float2 uv : TEXCOORD2;
                float4 pos : SV_POSITION;
            };

            float _Tiling;

            v2f vert (float4 pos : POSITION, float3 normal : NORMAL, float2 uv : TEXCOORD0)
            {
                v2f o;
                o.pos = mul(UNITY_MATRIX_MVP, pos);
                o.coords = pos.xyz * _Tiling;
                o.objNormal = normal;
                o.uv = uv;
                return o;
            }

            sampler2D _MainTex;
            sampler2D _OcclusionMap;

            fixed4 frag (v2f i) : SV_Target
            {
                // use absolute value of normal as texture weights
                half3 blend = abs(i.objNormal);
                // make sure the weights sum up to 1 (divide by sum of x+y+z)
                blend /= dot(blend,1.0);
                // read the three texture projections, for x,y,z axes
                fixed4 cx = tex2D(_MainTex, i.coords.yz);
                fixed4 cy = tex2D(_MainTex, i.coords.xz);
                fixed4 cz = tex2D(_MainTex, i.coords.xy);
                // blend the textures based on weights
                fixed4 c = cx * blend.x + cy * blend.y + cz * blend.z;
                // modulate by regular occlusion map
                c *= tex2D(_OcclusionMap, i.uv);
                return c;
            }
            ENDCG
        }
    }
}
Calculating Lighting
일반적으로 Unity의 조명 파이프라인에서 동작하는 셰이더를 원한다면 표면 셰이더를 작성하게 됩니다. 표면 셰이더는 대부분의 “힘든 일”을 처리해 주며 셰이더 코드에는 단지 표면 프로퍼티만 정의해 주면 됩니다.
그러나 표준 표면 셰이더 경로를 우회하고 싶을 경우도 있습니다. 단지 성능을 위해 전체 조명 파이프라인의 일부 제한된 서브셋을 지원하고자 하는 이유일 수도 있고 또는 “표준 조명”에 별로 가깝지 않은 자신만의 무엇인가를 만들고 싶을 수도 있습니다. 다음 예는 수동으로 작성한 버텍스 및 프래그먼트 셰이더에서 조명 데이터를 얻는 방법을 보여줍니다. 표면 셰이더가 생성한 코드를 살펴보는 것(셰이더 인스펙터를 통해) 역시 좋은 학습 방법입니다.
Simple Diffuse Lighting
The first thing we need to do is to indicate that our shader does in fact need lighting information passed to it. Unity’s rendering pipeline supports various ways of rendering, here we’ll be using the default forward rendering one.
We’ll start by only supporting one directional light. Forward rendering in Unity works by rendering the main directional light, ambient, lightmaps and reflections in a single pass called ForwardBase. In the shader, this is indicated by adding a pass tag: Tags {"LightMode"="ForwardBase"}. This will make directional light data be passed into shader via some built-in variables.
다음은 버텍스마다 단순 산란광을 계산하고 하나의 메인 텍스처를 사용하는 셰이더입니다:
Shader "Lit/Simple Diffuse"
{
    Properties
    {
        [NoScaleOffset] _MainTex ("Texture", 2D) = "white" {}
    }
    SubShader
    {
        Pass
        {
            // indicate that our pass is the "base" pass in forward
            // rendering pipeline. It gets ambient and main directional
            // light data set up; light direction in _WorldSpaceLightPos0
            // and color in _LightColor0
            Tags {"LightMode"="ForwardBase"}

            CGPROGRAM
            #pragma vertex vert
            #pragma fragment frag
            #include "UnityCG.cginc" // for UnityObjectToWorldNormal
            #include "UnityLightingCommon.cginc" // for _LightColor0

            struct v2f
            {
                float2 uv : TEXCOORD0;
                fixed4 diff : COLOR0; // diffuse lighting color
                float4 vertex : SV_POSITION;
            };

            v2f vert (appdata_base v)
            {
                v2f o;
                o.vertex = mul(UNITY_MATRIX_MVP, v.vertex);
                o.uv = v.texcoord;
                // get vertex normal in world space
                half3 worldNormal = UnityObjectToWorldNormal(v.normal);
                // dot product between normal and light direction for
                // standard diffuse (Lambert) lighting
                half nl = max(0, dot(worldNormal, _WorldSpaceLightPos0.xyz));
                // factor in the light color
                o.diff = nl * _LightColor0;
                return o;
            }

            sampler2D _MainTex;

            fixed4 frag (v2f i) : SV_Target
            {
                // sample texture
                fixed4 col = tex2D(_MainTex, i.uv);
                // multiply by lighting
                col *= i.diff;
                return col;
            }
            ENDCG
        }
    }
}
이렇게 하면 오브젝트가 광원 방향에 대해 반응합니다. 광원을 향하는 부분은 빛나게 되고 반대 방향을 향하는 부분은 전혀 빛나지 않게 됩니다.
Diffuse Lighting with Ambient
The example above does not take any ambient lighting or light probes into account. Let’s fix this!
It turns out we can do this by adding just a single line of code. Both ambient and light probe data is passed to shaders in Spherical Harmonics form, and ShadeSH9 function from UnityCG.cginc include file does all the work of evaluating it, given a world space normal.
Shader "Lit/Diffuse With Ambient"
{
    Properties
    {
        [NoScaleOffset] _MainTex ("Texture", 2D) = "white" {}
    }
    SubShader
    {
        Pass
        {
            Tags {"LightMode"="ForwardBase"}

            CGPROGRAM
            #pragma vertex vert
            #pragma fragment frag
            #include "UnityCG.cginc"
            #include "UnityLightingCommon.cginc"

            struct v2f
            {
                float2 uv : TEXCOORD0;
                fixed4 diff : COLOR0;
                float4 vertex : SV_POSITION;
            };

            v2f vert (appdata_base v)
            {
                v2f o;
                o.vertex = mul(UNITY_MATRIX_MVP, v.vertex);
                o.uv = v.texcoord;
                half3 worldNormal = UnityObjectToWorldNormal(v.normal);
                half nl = max(0, dot(worldNormal, _WorldSpaceLightPos0.xyz));
                o.diff = nl * _LightColor0;

                // the only difference from previous shader:
                // in addition to the diffuse lighting from the main light,
                // add illumination from ambient or light probes
                // ShadeSH9 function from UnityCG.cginc evaluates it,
                // using world space normal
                o.diff.rgb += ShadeSH9(half4(worldNormal,1));
                return o;
            }

            sampler2D _MainTex;

            fixed4 frag (v2f i) : SV_Target
            {
                fixed4 col = tex2D(_MainTex, i.uv);
                col *= i.diff;
                return col;
            }
            ENDCG
        }
    }
}
셰이더는 사실 빌트인 레거시 디퓨즈 셰이더와 매우 유사한 결과를 내기 시작했습니다!
Implementing Shadow Casting
Our shader currently can not either receive nor cast shadows. Let’s implement shadow casting first.
In order to cast shadows, a shader has to have a ShadowCaster pass type in any of its subshaders or any fallback. The ShadowCaster pass is used to render the object into the shadowmap, and typically it is fairly simple - the vertex shader only needs to evaluate the vertex position, and the fragment shader pretty much does not do anything. The shadowmap is only the depth buffer, so even the color output by the fragment shader does not really matter.
즉 대부분의 셰이더에 있어 섀도우 캐스터 패스는 거의 똑같을 것이라는 의미입니다(단 오브젝트에 커스텀 버텍스 셰이더 기반 변형이 있거나 알파 컷아웃/반투명 부분이 있을 경우 제외). 섀도우 캐스터 패스를 가져오는 가장 쉬운 방법은 UsePass 셰이더 명령을 사용합니다:
Pass
{
    // regular lighting pass
}
// pull in shadow caster from VertexLit built-in shader
UsePass "Legacy Shaders/VertexLit/SHADOWCASTER"
그러나 셰이더는 학습을 위한 것이므로 말하자면 “손으로” 동일한 작업을 해 봅시다. 코드 길이를 줄이기 위해 조명 패스(“ForwardBase”)를 텍스처화되지 않은(untextured) 앰비언트만 적용하는 코드로 대체하였습니다. 그 아래에는 오브젝트가 섀도우 캐스팅을 지원하도록 만드는 “ShadowCaster” 패스가 있습니다.
Shader "Lit/Shadow Casting"
{
    SubShader
    {
        // very simple lighting pass, that only does non-textured ambient
        Pass
        {
            Tags {"LightMode"="ForwardBase"}
            CGPROGRAM
            #pragma vertex vert
            #pragma fragment frag
            #include "UnityCG.cginc"
            struct v2f
            {
                fixed4 diff : COLOR0;
                float4 vertex : SV_POSITION;
            };
            v2f vert (appdata_base v)
            {
                v2f o;
                o.vertex = mul(UNITY_MATRIX_MVP, v.vertex);
                half3 worldNormal = UnityObjectToWorldNormal(v.normal);
                // only evaluate ambient
                o.diff.rgb = ShadeSH9(half4(worldNormal,1));
                o.diff.a = 1;
                return o;
            }
            fixed4 frag (v2f i) : SV_Target
            {
                return i.diff;
            }
            ENDCG
        }

        // shadow caster rendering pass, implemented manually
        // using macros from UnityCG.cginc
        Pass
        {
            Tags {"LightMode"="ShadowCaster"}

            CGPROGRAM
            #pragma vertex vert
            #pragma fragment frag
            #pragma multi_compile_shadowcaster
            #include "UnityCG.cginc"

            struct v2f {
                V2F_SHADOW_CASTER;
            };

            v2f vert(appdata_base v)
            {
                v2f o;
                TRANSFER_SHADOW_CASTER_NORMALOFFSET(o)
                return o;
            }

            float4 frag(v2f i) : SV_Target
            {
                SHADOW_CASTER_FRAGMENT(i)
            }
            ENDCG
        }
    }
}
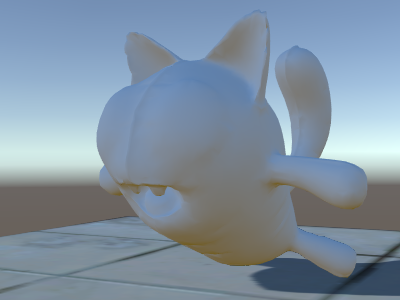
이제 아래쪽에는 일반 빌트인 디퓨즈 셰이더를 사용한 평면이 있어서 섀도우가 동작하는 모습을 볼 수 있습니다(기억하세요. 현재 셰이더는 섀도우를 받는 것은 아직 지원하지 않습니다!).
We’ve used the #pragma multi_compile_shadowcaster directive. This causes the shader to be compiled into several variants with different preprocessor macros defined for each (see
multiple shader variants page for details). When rendering into the shadowmap, the cases of point lights vs other light types need slightly different shader code, that’s why this directive is needed.
Receiving Shadows
Implementing support for receiving shadows will require compiling the base lighting pass into
several variants, to handle cases of “directional light without shadows” and “directional light with shadows” properly. #pragma multi_compile_fwdbase directive does this (see
multiple shader variants for details). In fact it does a lot more:
it also compiles variants for the different lightmap types, realtime GI being on or off etc. Currently we don’t need all that, so we’ll explicitly skip these variants.
Then to get actual shadowing computations, we’ll #include "AutoLight.cginc" shader include file and use SHADOW_COORDS, TRANSFER_SHADOW, SHADOW_ATTENUATION macros from it.
다음은 셰이더입니다.
Shader "Lit/Diffuse With Shadows"
{
    Properties
    {
        [NoScaleOffset] _MainTex ("Texture", 2D) = "white" {}
    }
    SubShader
    {
        Pass
        {
            Tags {"LightMode"="ForwardBase"}
            CGPROGRAM
            #pragma vertex vert
            #pragma fragment frag
            #include "UnityCG.cginc"
            #include "Lighting.cginc"

            // compile shader into multiple variants, with and without shadows
            // (we don't care about any lightmaps yet, so skip these variants)
            #pragma multi_compile_fwdbase nolightmap nodirlightmap nodynlightmap novertexlight
            // shadow helper functions and macros
            #include "AutoLight.cginc"

            struct v2f
            {
                float2 uv : TEXCOORD0;
                SHADOW_COORDS(1) // put shadows data into TEXCOORD1
                fixed3 diff : COLOR0;
                fixed3 ambient : COLOR1;
                float4 pos : SV_POSITION;
            };
            v2f vert (appdata_base v)
            {
                v2f o;
                o.pos = mul(UNITY_MATRIX_MVP, v.vertex);
                o.uv = v.texcoord;
                half3 worldNormal = UnityObjectToWorldNormal(v.normal);
                half nl = max(0, dot(worldNormal, _WorldSpaceLightPos0.xyz));
                o.diff = nl * _LightColor0.rgb;
                o.ambient = ShadeSH9(half4(worldNormal,1));
                // compute shadows data
                TRANSFER_SHADOW(o)
                return o;
            }

            sampler2D _MainTex;

            fixed4 frag (v2f i) : SV_Target
            {
                fixed4 col = tex2D(_MainTex, i.uv);
                // compute shadow attenuation (1.0 = fully lit, 0.0 = fully shadowed)
                fixed shadow = SHADOW_ATTENUATION(i);
                // darken light's illumination with shadow, keep ambient intact
                fixed3 lighting = i.diff * shadow + i.ambient;
                col.rgb *= lighting;
                return col;
            }
            ENDCG
        }

        // shadow casting support
        UsePass "Legacy Shaders/VertexLit/SHADOWCASTER"
    }
}
보세요, 이제 섀도우가 생겼습니다!
Other Shader Examples
안개(Fog)
Shader "Custom/TextureCoordinates/Fog" {
    SubShader {
        Pass {
            CGPROGRAM
            #pragma vertex vert
            #pragma fragment frag

            //Needed for fog variation to be compiled.
            #pragma multi_compile_fog

            #include "UnityCG.cginc"

            struct vertexInput {
                float4 vertex : POSITION;
                float4 texcoord0 : TEXCOORD0;
            };

            struct fragmentInput{
                float4 position : SV_POSITION;
                float4 texcoord0 : TEXCOORD0;

                //Used to pass fog amount around number should be a free texcoord.
                UNITY_FOG_COORDS(1)
            };

            fragmentInput vert(vertexInput i){
                fragmentInput o;
                o.position = mul (UNITY_MATRIX_MVP, i.vertex);
                o.texcoord0 = i.texcoord0;

                //Compute fog amount from clip space position.
                UNITY_TRANSFER_FOG(o,o.position);
                return o;
            }

            fixed4 frag(fragmentInput i) : SV_Target {
                fixed4 color = fixed4(i.texcoord0.xy,0,0);

                //Apply fog (additive pass are automatically handled)
                UNITY_APPLY_FOG(i.fogCoord, color);

                //to handle custom fog color another option would have been
                //#ifdef UNITY_PASS_FORWARDADD
                //  UNITY_APPLY_FOG_COLOR(i.fogCoord, color, float4(0,0,0,0));
                //#else
                //  fixed4 myCustomColor = fixed4(0,0,1,0);
                //  UNITY_APPLY_FOG_COLOR(i.fogCoord, color, myCustomColor);
                //#endif

                return color;
            }
            ENDCG
        }
    }
}
위 예제를 여기서 압축 파일로 다운로드할 수 있습니다.