ShaderLab: 블렌딩
블렌딩은 투명 오브젝트를 만드는 데 사용됩니다.
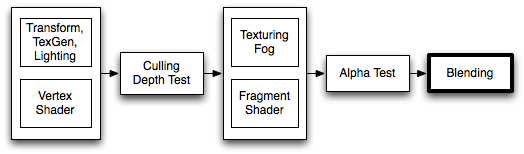
When graphics are rendered, after all shaders have executed and all textures have been applied, the pixels are written to the screen. How they are combined with what is already there is controlled by the Blend command.
구문
Blend Off : 블렌딩을 끕니다(기본값).
Blend SrcFactor DstFactor: 블렌딩을 설정하고 활성화합니다. 생성된 컬러는 SrcFactor로 곱합니다. 화면의 기존 컬러를 DstFactor로 곱한 후 둘을 더합니다.
Blend SrcFactor DstFactor, SrcFactorA DstFactorA: 위와 동일하지만 알파 채널 블렌딩에 다른 팩터를 사용합니다.
BlendOp BlendOp: Instead of adding blended colors together, do a different operation on them.
BlendOp OpColor, OpAlpha: 위와 동일하지만 컬러(RGB) 및 알파(A)채널에 다른 블렌드 연산을 사용합니다.
AlphaToMask On: Turns on alpha-to-coverage. When MSAA is used, alpha to coverage modifies multisample coverage mask proportionally to the pixel shader result alpha value. This is typically used for less aliased outlines than regular alpha-test; useful for vegetation and other alpha tested shaders.
블렌드 연산
다음 블렌드(Blend) 연산을 사용할 수 있습니다.
| Add | 소스와 대상을 더합니다. |
| Sub | 소스에서 대상을 뺍니다. |
| RevSub | 대상에서 소스를 뺍니다. |
| Min | 소스와 대상 중 더 작은 것을 사용합니다. |
| Max | 소스와 대상 중 더 큰 것을 사용합니다. |
| LogicalClear | 논리 연산: Clear (0) DX11.1에만 해당 |
| LogicalSet | 논리 연산: Set (1) DX11.1에만 해당 |
| LogicalCopy | 논리 연산: Copy (s) DX11.1에만 해당 |
| LogicalCopyInverted | 논리 연산: Copy inverted (!s) DX11.1에만 해당 |
| LogicalNoop | 논리 연산: Noop (d) DX11.1에만 해당 |
| LogicalInvert | 논리 연산: Invert (!d) DX11.1에만 해당 |
| LogicalAnd | 논리 연산: And (s & d) DX11.1에만 해당 |
| LogicalNand | 논리 연산: Nand !(s & d) DX11.1에만 해당 |
| LogicalOr | Logical operation: Or (s | d) DX11.1 only. |
| LogicalNor | Logical operation: Nor !(s | d) DX11.1 only. |
| LogicalXor | 논리 연산: Xor (s ^ d) DX11.1에만 해당 |
| LogicalEquiv | 논리 연산: Equivalence !(s ^ d) DX11.1에만 해당 |
| LogicalAndReverse | 논리 연산: Reverse And (s & !d) DX11.1에만 해당 |
| LogicalAndInverted | 논리 연산: Inverted And (!s & d) DX11.1에만 해당 |
| LogicalOrReverse | Logical operation: Reverse Or (s | !d) DX11.1 only. |
| LogicalOrInverted | Logical operation: Inverted Or (!s | d) DX11.1 only. |
블렌드 인자
다음 프로퍼티는 모두 Blend 커맨드에서 SrcFactor와 DstFactor에 대해 유효합니다. Source는 계산된 컬러를 말하고 Destination은 이미 화면에 표시된 컬러입니다. 블렌드 인자는 BlendOp에서 논리 연산을 사용하는 경우 무시됩니다.
| One | 1값입니다. 소스 또는 대상 컬러가 완전히 표시되도록 하려면 이 값을 사용합니다. |
| Zero | 0값입니다. 소스 또는 대상 값을 제거하려면 이 값을 사용합니다. |
| SrcColor | 스테이지 값을 소스 컬러 값으로 곱합니다. |
| SrcAlpha | 스테이지 값을 소스 알파 값으로 곱합니다. |
| DstColor | 스테이지 값을 프레임 버퍼 소스 컬러 값으로 곱합니다. |
| DstAlpha | 스테이지 값을 프레임 버퍼 소스 알파 값으로 곱합니다. |
| OneMinusSrcColor | 스테이지 값을 (1 - 소스 컬러)로 곱합니다. |
| OneMinusSrcAlpha | 스테이지 값을 (1 - 소스 알파)로 곱합니다. |
| OneMinusDstColor | 스테이지 값을 (1 - 대상 컬러)로 곱합니다. |
| OneMinusDstAlpha | 스테이지 값을 (1 - 대상 알파)로 곱합니다. |
세부 정보
다음은 가장 일반적인 블렌드 타입입니다.
Blend SrcAlpha OneMinusSrcAlpha // Traditional transparency
Blend One OneMinusSrcAlpha // Premultiplied transparency
Blend One One // Additive
Blend OneMinusDstColor One // Soft Additive
Blend DstColor Zero // Multiplicative
Blend DstColor SrcColor // 2x Multiplicative
Alpha Blending, Alpha Testing, Alpha To Coverage
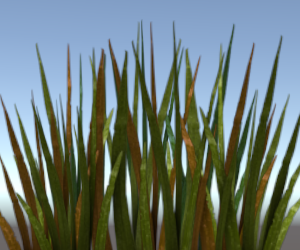
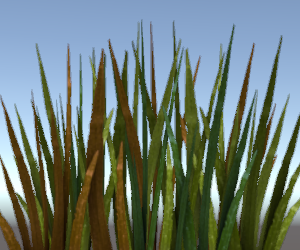
For drawing mostly fully opaque or fully transparent objects, where transparency is defined by texture’s alpha channel (e.g. leaves, grass, chain fences etc.), several approaches are commonly used:
Alpha Blending
Often this means that objects have to be considered as “semitransparent”, and thus can’t use some of the rendering features (deferred shading; can’t receive shadows etc.). Concave or overlapping alpha blended objects often also have draw ordering issues.
Most often alpha blended shaders also set transparent render queue, and turn off depth writes. So the shader code looks like:
// inside SubShader
Tags { "Queue"="Transparent" "RenderType"="Transparent" "IgnoreProjector"="True" }

// inside Pass
ZWrite Off
Blend SrcAlpha OneMinusSrcAlpha
Alpha Testing / Cutout
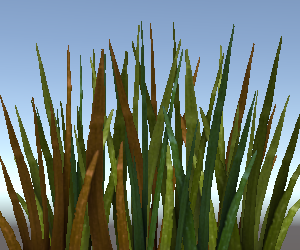
By using clip() HLSL instruction in the pixel shader, a pixel can be “discarded” or not based on some criteria. This means that object can still be considered as fully opaque, and has no draw ordering issues. However, this means that all pixels are fully opaque or transparent, leading to aliasing (“jaggies”).
Most often alpha tested shaders also set cutout render queue. So the shader code looks like:
// inside SubShader
Tags { "Queue"="AlphaTest" "RenderType"="TransparentCutout" "IgnoreProjector"="True" }

// inside CGPROGRAM in the fragment shader:
clip(textureColor.a - alphaCutoffValue);
Alpha to Coverage
When using multisample anti-aliasing (MSAA, see QualitySettings), it is possible to improve alpha testing approach by using “alpha to coverage” GPU functionality. This improves edge appearance, depending on the MSAA level used.
이 기능은 대부분 불투명하거나 투명한 텍스처와 매우 얇은 “부분 투명” 영역(풀, 나뭇잎 등)에 가장 효과적입니다.
Most often alpha-to-coverage shaders also set cutout render queue. So the shader code looks like:
// inside SubShader
Tags { "Queue"="AlphaTest" "RenderType"="TransparentCutout" "IgnoreProjector"="True" }

// inside Pass
AlphaToMask On
예제
Here is a small example shader that adds a texture to whatever is on the screen already:
Shader "Simple Additive" {
    Properties {
        _MainTex ("Texture to blend", 2D) = "black" {}
    }
    SubShader {
        Tags { "Queue" = "Transparent" }
        Pass {
            Blend One One
            SetTexture [_MainTex] { combine texture }
        }
    }
}