- Unity 매뉴얼
- 애니메이션
- 애니메이션 클립
- 애니메이션 창 가이드
- Using the Animation View
Using the Animation View
The Animation View can be used to preview and edit Animation Clips for animated Game Objects in Unity. The Animation View can be opened from the Window->Animation menu.
Viewing Animations on a GameObject
The Animation View is tightly integrated with the Hierarchy View, the Scene View, and the Inspector. Similar to the Inspector, the Animation View will show the timeline and keyframes of the animation for the currently selected Game Object. You can select a Game Object using the Hierarchy View or the Scene View. (If you select a Prefab in the Project View you can inspect its animation timeline as well, but you have to drag the Prefab into the Scene View in order to be able to edit the animation.)
The Animated Properties List

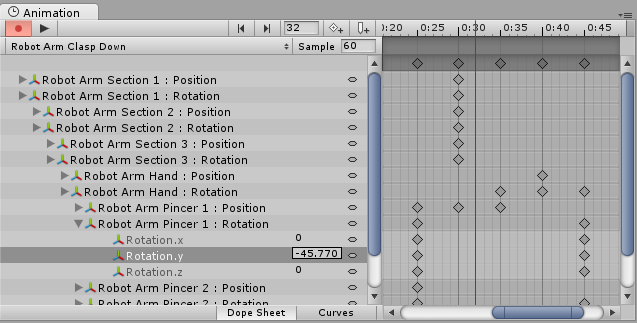
At the left side of the Animation View is a list of the animated properties. In a newly created clip where no animation has yet been recorded, this list will be empty. When you begin to animate various properties within this clip, the animated properties will appear here. If the animation controls multiple child objects, the list will also include a hierarchical list of each child object’s animated properties. In the example above, various parts of the Robot Arm hierarchy are all animated within the same animation clip, and each animated GameObject is shown according to its hierarchical position in relation to the root object which has the Animator component attached.
Each property can be folded and unfolded to reveal the exact values recorded at each keyframe. The value fields will show the interpolated value if the playback head (the red line) is in-between keyframes. These fields can be edited directly. If changes are made when the playback head is over a keyframe, the keyframe’s values will be modified. If changes are made when the playback head is between keyframes (and therefore the value shown was an interpolated value), a new keyframe will be created at that point with the new value that you entered.
The Animation Timeline
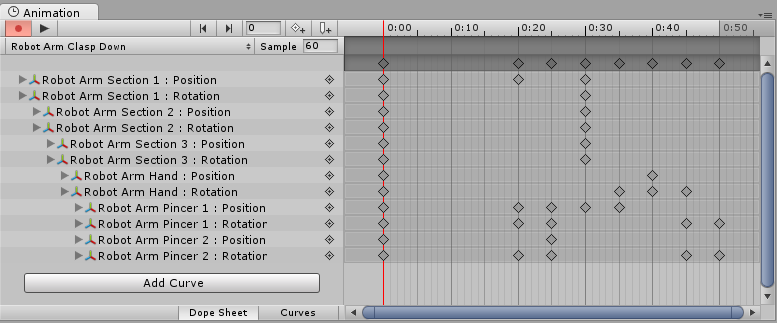
On the right side of the Animation View is the timeline for the current clip. The keyframes for each animated property appear in this timeline. The timeline view has two modes, “Dope Sheet” and “Curves”. You can toggle between these modes by clicking the respective buttons at the bottom of the animated property list area:

These offer two alternate views of the animation timeline and keyframe data, with each mode having its own benefits.
Dope Sheet Timeline Mode
The Dope Sheet mode offers a more compact view, allowing you to view each property’s keyframe seqence in an individual horizontal track. This allows you have a simple overview of the keyframe timing for multiple properties or objects.
Curves Timeline Mode
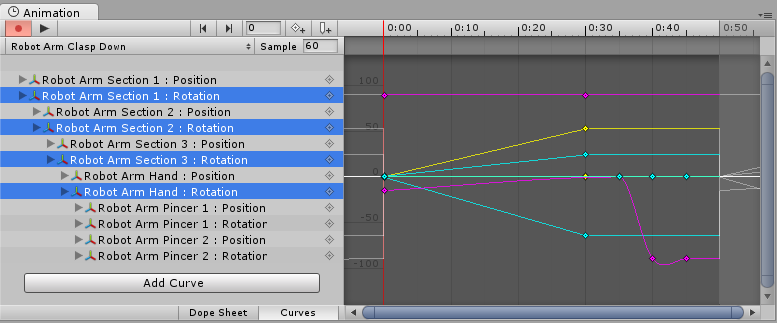
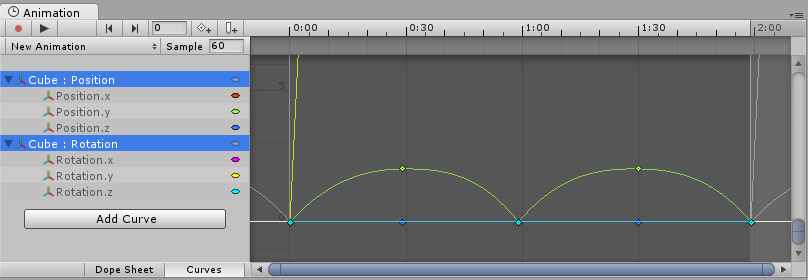
Curves mode offers a view of how the values for each animated property changes over time in a resizable graph. All selected properties appear overlaid within the same graph view. This mode allows you to have great control over viewing and editing the values, and how they are interpolated between.
When using curves mode to view your animation it’s important to understand that sometimes the various ranges for each property may differ greatly. For example, consider a simple animation clip for a spinning bouncing cube. The bouncing Y position value may vary between the range 0 to 2 (meaning the cube bounces 2 units high during the animation), however the rotation value will go from 0 to 360. When viewing these two curves at the same time, the position animation curves will be very difficult to make out because the view will be zoomed out to fit the 0–360 range within the window:
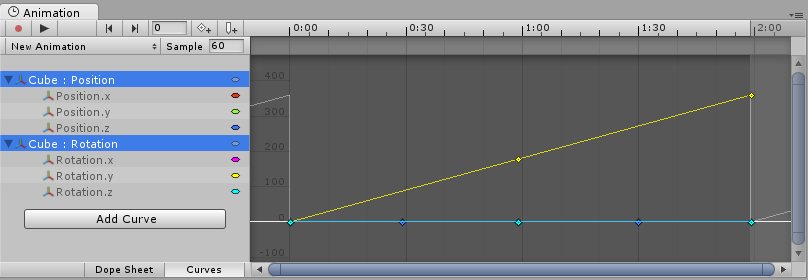
You can click on individual properties in the list to automatically re-scale the curves view to fit the range for that value, or you can manually adjust the zoom of the curves window by using the special drag handles at each end of the view’s scrollbar sliders.
Creating a New Animation Clip
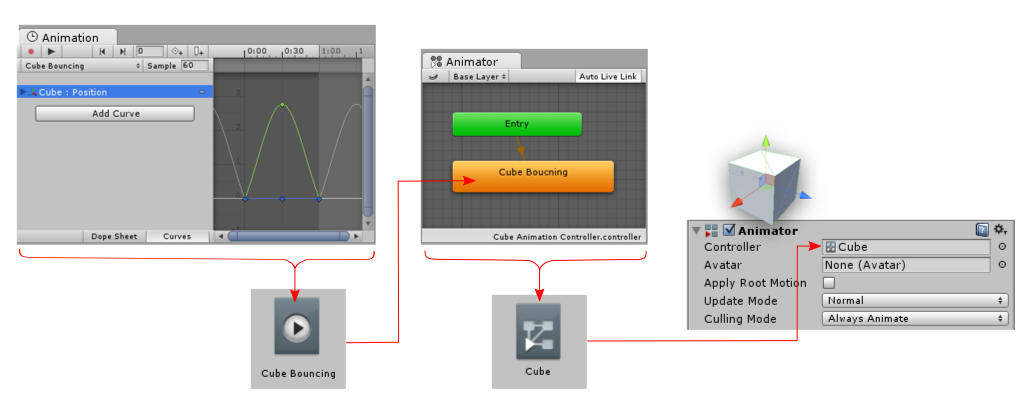
To animate Game Objects in Unity, the object or objects need an Animator Component attached. This Animator Component must reference an Animator Controller, which in turn contains references to one or more Animation Clips.
When using the Animation View to begin animating a GameObject in Unity, these items will be automatically created, attached and set-up for you.
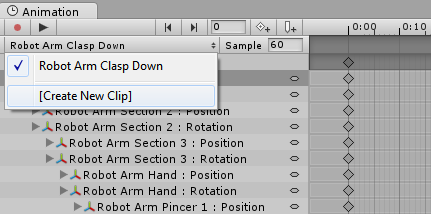
To create a new Animation Clip for the selected Game Object, click the selection box at the upper right of the Animation View and select [Create New Clip]. You will then be prompted to save an Animation Clip somewhere in your Assets folder. If the Game Object already has an Animator Component attached, with an Animator Controller assigned, the new clip will be added as a state in the existing Animator Controller.
If the Game Object doesn’t have an Animator Component already at this stage, a number of things happen automatically:
- 새로운 애니메이터 컨트롤러 에셋을 생성합니다.
- 애니메이터 컨트롤러에 새 클립을 디폴트 상태로 생성 및 추가합니다.
- 애니메이션화되는 게임 오브젝트에 Animator 컴포넌트를 추가합니다.
- Animator 컴포넌트는 새로운 Animator 컨트롤러를 할당합니다.
The result of this automatic sequence is that you can begin the animation process of a new object by clicking the record button or selecting [Create New Clip], and all the required elements of the animation system are set up for you.
아래 다이어그램은 새로운 애니메이션 클립이 애니메이션 윈도우에서 생성된 이후, 어떻게 이들이 할당되는지를 보여줍니다.
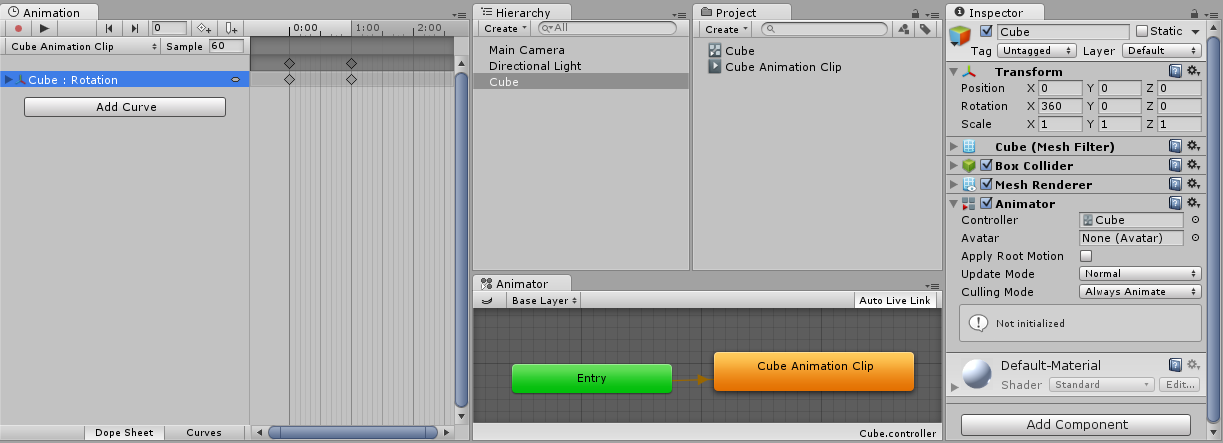
In the image below, you can see a game object selected that is not animated. We have just a simple cube, with no Animator component. The Animation, Hierarchy, Project and Inspector windows are arranged side-by-side for clarity.

By pressing the record button in the Animation view (left), or choosing “[Create New Clip]” from the selection box in the Animation view, a new animation clip is created. Unity will ask to pick the name & location to save this new Animation Clip. Unity also creates an Animator Controller asset with the same name as the selected GameObject, adds an Animator component to the GameObject, and connects the assets up appropriately.
Animating a Game Object
Once you have saved the new animation clip asset, you are ready to begin adding keyframes to the clip. To begin editing an Animation Clip for the selected Game Object, click on the Animation Record button. This will enter Animation Record Mode, where changes to the Game Object are recorded into the Animation Clip.

Animation Mode __ 버튼을 다시 클릭하여 언제든지 Animation Record Mode__를 중지할 수 있습니다. 이렇게하면 __Game Object__가 애니메이션 모드로 들어가기 전의 상태로 되돌아갑니다.
게임 오브젝트에 대한 변경은 붉은 라인으로 애니메이션 창에 나타난 현재의 키프레임에 레코드됩니다.
애니메이션 레코드 모드에서 오브젝트를 조작하는 것으로 오브젝트의 모든 프로퍼티를 애니메이션화할 수 있습니다. 오브젝트의 이동, 회전이나 스케일링은 애니메이션 클립에 프로퍼티에 맞는 키프레임을 추가합니다. 오브젝트의 인스펙터에서 값을 직접적으로 조정하는 것 역시 레코드 모드에서 키프레임을 추가합니다. 숫자 값, 체크박스, 컬러, 다른 값 등 모든 인스펙터 안의 프로퍼티에 적용됩니다.
게임 오브젝트의 애니메이션화 프로퍼티는 애니메이션 창의 왼쪽에 있는 프로퍼티 리스트에 나타나 있습니다. 애니메이션화되지 않은 프로퍼티는 이 창에 나와 있지 않습니다. 자식 오브젝트의 프로퍼티를 포함하여 사용자가 애니메이션화하는 새로운 프로퍼티는 애니메이션화하는 즉시 프로퍼티 리스트 영역에 추가됩니다.
Transform 프로퍼티는 .x, y 및 z 프로퍼티가 연결되어 있으므로 한 번에 커브가 3개씩 추가된다는 점에서 특별합니다.
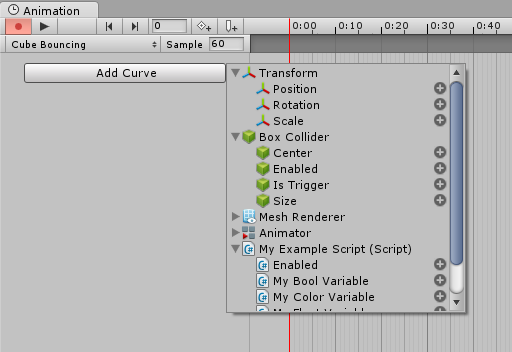
You can also browse all animatable properties on the current GameObject (and its children) by clicking the Add Curve button.
Any property can be animated by selecting it from the “Add Curves” button popup menu.
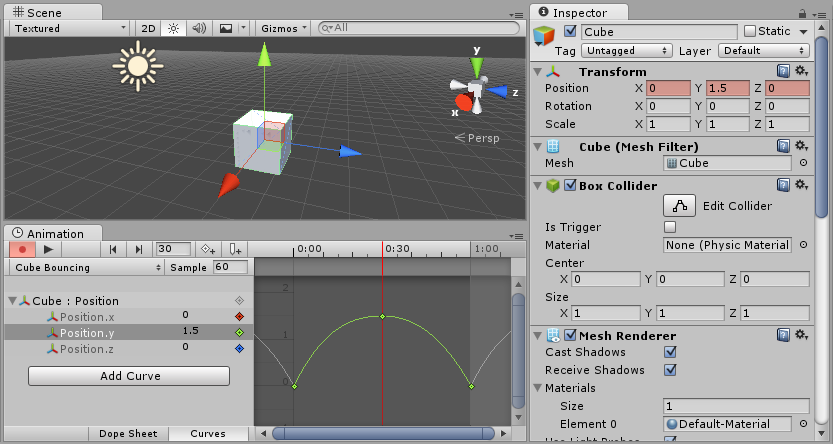
Animation Mode__에 있는 경우 빨간색 수직선은 현재 Animation Clip__의 어떤 프레임이 미리보기되어 있는지 보여줍니다. Inspector__와 Scene View__는 애니메이션의 해당 프레임에 게임 오브젝트를 표시합니다. 해당 프레임에서 애니메이션 프로퍼티의 값은 프로퍼티 이름의 오른쪽 열에도 표시됩니다.
애니메이션 모드에서 표시되는 빨간색 수직선은 현재의 미리보기 프레임을 나타냅니다.
타임라인(Time Line)
Time Line__에서 아무 곳이나 클릭하여 애니메이션 클립 프레임을 미리 보거나 변경할 수 있습니다. Time Line__의 숫자는 초와 프레임으로 표시되므로 1:30은 1초와 30프레임을 의미합니다.

Frame Navigation
You can also use the following keyboard shortcuts to navigate between frames:
- 쉼표 (,)를 눌러 이전 프레임으로 이동합니다.
- 마침표(.)를 눌러 다음 프레임으로 이동합니다.
- Alt+__쉼표(,)를 눌러 이전 키프레임__으로 이동합니다.
- Alt+__마침표(.)를 눌러 다음 키프레임__으로 이동합니다.

애니메이션 모드(Animation Mode)
Animation Mode__에서는 Scene View__에서 Game Object__를 이동, 회전 또는 확장할 수 있습니다. Animation Clip__의 포지션, 회전 및 스케일 프로퍼티에 대해 Animation Curves__가 미리 존재하지 않으면 자동으로 생성되며 변경된 Transform__ 값을 저장하기 위해 현재 미리보기된 프레임에 해당 애니메이션 커브의 키가 자동으로 생성됩니다.
You can also use the Inspector to modify any of the animatable properties of the Game Object. This too will create Animation Curves as needed, and create keys on those Animation Curves at the currently previewed frame to store your changed values.
키프레임(Keyframe) 생성
Add Keyframe__을 이용하여 Keyframe__ 을 수동으로 생성할 수 있습니다. 이렇게 하면 __Animation View__에서 현재 선택된 모든 프로퍼티에 대한 키가 생성됩니다. 이는 특정한 프로퍼티에만 선택적으로 키를 추가할 때 유용합니다.

Playback
The Animation Clip can be played back at anytime by clicking the Play button in the Animation View.

Locking The Window
You can lock the animation editor window so that it will not automatically switch to reflect the currently selected Game Object in the hierarchy or scene. Locking the window is useful if you want to focus on the animation for one particular object, while being able to select and manipulate other objects in the scene.

More Information
To learn more about navigating the Curve View, see the section on Using Animation Curves.