IMGUI レイアウトモード
固定レイアウトと自動レイアウト
IMGUI システムを使用している時に UI の配置と整理を行うには、固定と自動の 2 つの方法があります。本ガイドでは、すべての例において固定レイアウトを使用してきました。自動レイアウトを使用するには、コントロール関数を呼び出す際に、GUI の代わりに、GUILayout を記述します。他方に対して、1 つのレイアウトモードを使用する必要はありませんが、同じ OnGUI() 関数で一度に両方のモードを使用することができます。
固定レイアウトは、事前に設計されたインターフェースで作業する場合に使用します。自動レイアウトは、前もって必要な要素の数が分からない場合、または各コントロールの配置について気にしたくない場合に使用します。例えば、Save Game ファイルに基づいて、各種ボタンを作成している場合、描画するボタンの数が分からないとします。この場合、自動レイアウトを使用する方が便利です。ゲームの設計とどのようにインターフェースを表示したいかに強く依存しています。
自動レイアウトを使用した場合、2 つの大きな差があります。
- GUI の代わりに GUILayout を使用します。
- 自動レイアウトコントロールには、Rect() 関数が不要です。
/* Two key differences when using Automatic Layout */


// JavaScript
function OnGUI () {
    // Fixed Layout
    GUI.Button (Rect (25,25,100,30), "I am a Fixed Layout Button");

    // Automatic Layout
    GUILayout.Button ("I am an Automatic Layout Button");
}


// C#
using UnityEngine;
using System.Collections;

public class GUITest : MonoBehaviour {

    void OnGUI () {
        // Fixed Layout
        GUI.Button (new Rect (25,25,100,30), "I am a Fixed Layout Button");

        // Automatic Layout
        GUILayout.Button ("I am an Automatic Layout Button");
    }

}
コントロールの配置
使用しているレイアウトモードに応じて、コントロールを配置する場所やグループ化する方法をコントロールするための各種仕掛けがあります。固定レイアウトでは、各種コントロールを Groups に分けることができます。自動レイアウトでは、各種コントロールを Areas 、Horizontal Groups および Vertical Groups に分けることができます。
固定レイアウト - グループ
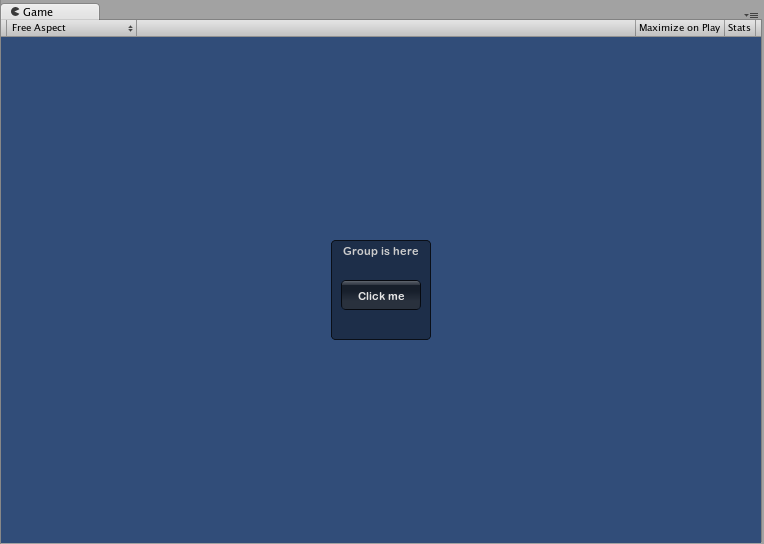
グループを固定レイアウトモードで利用できる手法です。これにより、複数のコントロールを含む画面のエリアを定義できます。GUI.BeginGroup() および GUI.EndGroup() 関数を使用することで、グループ内に置くコントロールを定義できます。グループ内にあるすべてのコントロールは、画面の左上ではなく、グループの左上に基づいて配置されます。このように、ランタイム時にグループを最配置する場合、グループ内のすべてのコントロールの相対位置は維持されます。
例として、画面上で複数のコントロールを中心に置くと非常に簡単です。
/* Center multiple Controls on the screen using Groups */


// JavaScript
function OnGUI () {
    // Make a group on the center of the screen
    GUI.BeginGroup (Rect (Screen.width / 2 - 50, Screen.height / 2 - 50, 100, 100));
    // All rectangles are now adjusted to the group. (0,0) is the topleft corner of the group.

    // We'll make a box so you can see where the group is on-screen.
    GUI.Box (Rect (0,0,100,100), "Group is here");
    GUI.Button (Rect (10,40,80,30), "Click me");

    // End the group we started above. This is very important to remember!
    GUI.EndGroup ();
}


// C#
using UnityEngine;
using System.Collections;

public class GUITest : MonoBehaviour {

    void OnGUI () {
        // Make a group on the center of the screen
        GUI.BeginGroup (new Rect (Screen.width / 2 - 50, Screen.height / 2 - 50, 100, 100));
        // All rectangles are now adjusted to the group. (0,0) is the topleft corner of the group.

        // We'll make a box so you can see where the group is on-screen.
        GUI.Box (new Rect (0,0,100,100), "Group is here");
        GUI.Button (new Rect (10,40,80,30), "Click me");

        // End the group we started above. This is very important to remember!
        GUI.EndGroup ();
    }

}
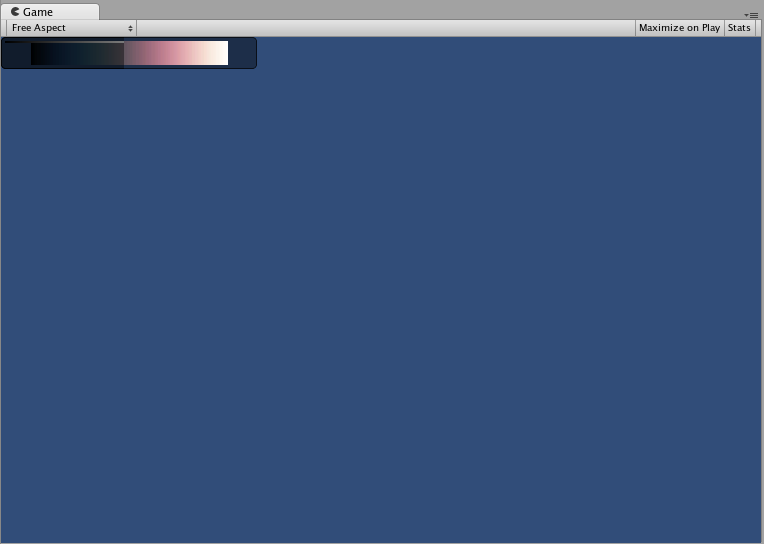
それぞれの内部で複数のグループをネストすることもできます。これを行うと、各グループは、その内容をその親の空間に対して、切り取らせます。
/* Using multiple Groups to clip the displayed Contents */


// JavaScript
var bgImage : Texture2D; // background image that is 256 x 32
var fgImage : Texture2D; // foreground image that is 256 x 32
var playerEnergy = 1.0; // a float between 0.0 and 1.0

function OnGUI () {
    // Create one Group to contain both images
    // Adjust the first 2 coordinates to place it somewhere else on-screen
    GUI.BeginGroup (Rect (0,0,256,32));

    // Draw the background image
    GUI.Box (Rect (0,0,256,32), bgImage);

    // Create a second Group which will be clipped
    // We want to clip the image and not scale it, which is why we need the second Group
    GUI.BeginGroup (Rect (0,0,playerEnergy * 256, 32));

    // Draw the foreground image
    GUI.Box (Rect (0,0,256,32), fgImage);

    // End both Groups
    GUI.EndGroup ();
    GUI.EndGroup ();
}


// C#
using UnityEngine;
using System.Collections;

public class GUITest : MonoBehaviour {

    // background image that is 256 x 32
    public Texture2D bgImage;

    // foreground image that is 256 x 32
    public Texture2D fgImage;

    // a float between 0.0 and 1.0
    public float playerEnergy = 1.0f;

    void OnGUI () {
        // Create one Group to contain both images
        // Adjust the first 2 coordinates to place it somewhere else on-screen
        GUI.BeginGroup (new Rect (0,0,256,32));

        // Draw the background image
        GUI.Box (new Rect (0,0,256,32), bgImage);

            // Create a second Group which will be clipped
            // We want to clip the image and not scale it, which is why we need the second Group
            GUI.BeginGroup (new Rect (0,0,playerEnergy * 256, 32));

            // Draw the foreground image
            GUI.Box (new Rect (0,0,256,32), fgImage);

            // End both Groups
            GUI.EndGroup ();

        GUI.EndGroup ();
    }

}
自動レイアウト - エリア
エリアは、自動レイアウトでのみ使用されます。GUILayout コントロールを含ませるための画面の制限された部分を定義するため、機能は固定レイアウトに似ています。自動レイアウトの性質上、ほとんど常にエリアを使用することになります。
自動レイアウトモードでは、コントロールがコントロールレベルで描画される画面のエリアを定義しません。コントロールは自動的に含んでいるエリアの左上に配置されます。これは画面の場合があります。自身で手動配置されたエリアを作成することもできます。エリア内の GUILayout コントロールは、エリアの左上に配置されます。
/* A button placed in no area, and a button placed in an area halfway across the screen. */


// JavaScript
function OnGUI () {
    GUILayout.Button ("I am not inside an Area");
    GUILayout.BeginArea (Rect (Screen.width/2, Screen.height/2, 300, 300));
    GUILayout.Button ("I am completely inside an Area");
    GUILayout.EndArea ();
}


// C#
using UnityEngine;
using System.Collections;

public class GUITest : MonoBehaviour {

    void OnGUI () {
        GUILayout.Button ("I am not inside an Area");
        GUILayout.BeginArea (new Rect (Screen.width/2, Screen.height/2, 300, 300));
        GUILayout.Button ("I am completely inside an Area");
        GUILayout.EndArea ();
    }

}
エリア内で、ボタンやボックスのような表示要素は、その幅をエリアの全体の長さにまで延長します。
自動レイアウト - 水平と垂直グループ
自動レイアウトを使用すると、コントロールはデフォルトで次々と上から下に表示されます。コントロールを配置する場所および配置方法をより繊細にコントロールする必要がある場合が多くあります。自動レイアウトモードを使用している場合、水平および垂直グループのオプションがあります。
その他のレイアウトコントロール同様、個々の関数を呼び出して、これらのグループを開始または終了できます。この関数は、GUILayout.BeginHoriztontal()、GUILayout.EndHorizontal()、GUILayout.BeginVertical() および GUILayout.EndVertical() です。
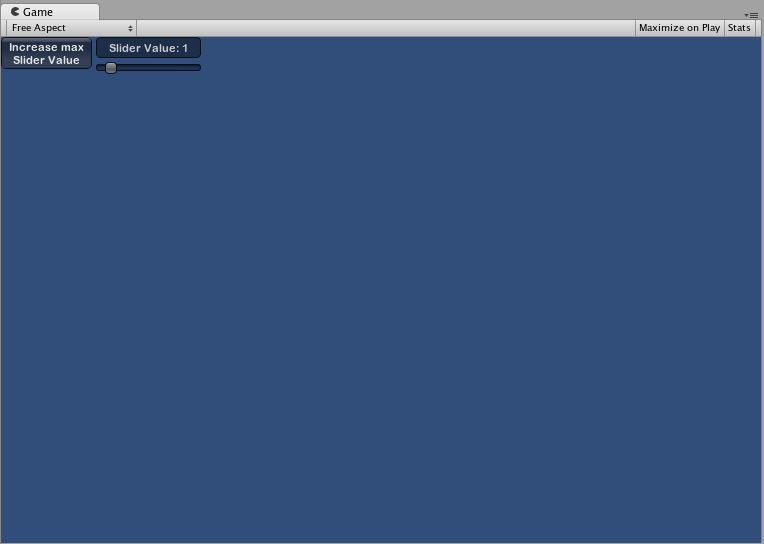
水平グループ内のコントロールは常に水平に配置されます。垂直グループ内のコントロールは常に垂直に配置されます。これは、グループをそれぞれの内部でネスト化するまでは簡単に聞こえます。これにより、想像できる構成で、任意の数のコントロールを配置できます。
/* Using nested Horizontal and Vertical Groups */


// JavaScript
var sliderValue = 1.0;
var maxSliderValue = 10.0;

function OnGUI()
{
    // Wrap everything in the designated GUI Area
    GUILayout.BeginArea (Rect (0,0,200,60));

    // Begin the singular Horizontal Group
    GUILayout.BeginHorizontal();

    // Place a Button normally
    if (GUILayout.RepeatButton ("Increase max\nSlider Value"))
    {
        maxSliderValue += 3.0 * Time.deltaTime;
    }

    // Arrange two more Controls vertically beside the Button
    GUILayout.BeginVertical();
    GUILayout.Box("Slider Value: " + Mathf.Round(sliderValue));
    sliderValue = GUILayout.HorizontalSlider (sliderValue, 0.0, maxSliderValue);

    // End the Groups and Area
    GUILayout.EndVertical();
    GUILayout.EndHorizontal();
    GUILayout.EndArea();
}


// C#
using UnityEngine;
using System.Collections;

public class GUITest : MonoBehaviour {

    private float sliderValue = 1.0f;
    private float maxSliderValue = 10.0f;

    void OnGUI()
    {
        // Wrap everything in the designated GUI Area
        GUILayout.BeginArea (new Rect (0,0,200,60));

        // Begin the singular Horizontal Group
        GUILayout.BeginHorizontal();

        // Place a Button normally
        if (GUILayout.RepeatButton ("Increase max\nSlider Value"))
        {
            maxSliderValue += 3.0f * Time.deltaTime;
        }

        // Arrange two more Controls vertically beside the Button
        GUILayout.BeginVertical();
        GUILayout.Box("Slider Value: " + Mathf.Round(sliderValue));
        sliderValue = GUILayout.HorizontalSlider (sliderValue, 0.0f, maxSliderValue);

        // End the Groups and Area
        GUILayout.EndVertical();
        GUILayout.EndHorizontal();
        GUILayout.EndArea();
    }

}
一部のコントロールを制御するための GUILayoutOption の使用
GUILayoutOptions を使用して、自動レイアウトパラメーターの一部を無効にできます。これは、GUILayout コントロールの最終パラメーターを渡すことで行います。
上記の例のエリアでは、ボタンはその幅をエリアの最大幅に延長します。必要な場合はこれを無効にできます。
/* Using GUILayoutOptions to override Automatic Layout Control properties */


//JavaScript
function OnGUI () {
    GUILayout.BeginArea (Rect (100, 50, Screen.width-200, Screen.height-100));
    GUILayout.Button ("I am a regular Automatic Layout Button");
    GUILayout.Button ("My width has been overridden", GUILayout.Width (95));
    GUILayout.EndArea ();
}


// C#
using UnityEngine;
using System.Collections;

public class GUITest : MonoBehaviour {

    void OnGUI () {
        GUILayout.BeginArea (new Rect (100, 50, Screen.width-200, Screen.height-100));
        GUILayout.Button ("I am a regular Automatic Layout Button");
        GUILayout.Button ("My width has been overridden", GUILayout.Width (95));
        GUILayout.EndArea ();
    }

}
考えられる GUILayoutOption の完全なリストに関しては、GUILayoutOption を参照してください。