アイソメトリックタイルマップ用のスプライトのインポートと準備
テクスチャを Assets フォルダーに置くことで、アイソメトリックタイルマップの個々のタイルやタイルシートの画像を Unity プロジェクトに インポート します。インポートした画像を選択すると、テクスチャインポーター 設定が Inspector ウィンドウに表示されます。
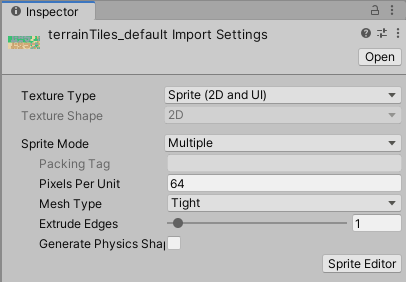
アイソメトリックタイルマップで使用するためのスプライトをインポートするときは、以下の推奨する設定を使用してください。各設定の詳細は、Texture Type: Sprite (2D and UI) を参照してください。
- Texture Type - これを Sprite (2D and UI) に設定します。その他のテクスチャタイプはタイルマップではサポートされていません。
- Sprite Mode - テクスチャにスプライト 1 つのみが含まれている場合は Single に設定します。スプライトテクスチャが複数含まれる場合 (例えば複数のタイルテクスチャ持つスプライトシートなど) は Multiple に設定します。
- Pixels Per Unit (PPU) - この値は、選択されたスプライトの 1 Unity ユニットを構成するピクセル数です。スプライトがタイルマップ上にレンダリングされる際のサイズを決定します。この値は、タイルマップを含む Grid の Cell Size の設定にも影響され、1 つのセルを構成する Unity ユニットの数を決定します。以下の例では、PPU 値と Grid の Cell Size の設定がどのように相互作用するかを示しています。
- Mesh Type - Tight に設定すると、タイルメッシュがインポートされたスプライトの輪郭に沿わせ、タイルはタイルマップに一斉に描画されます。ほとんどのアイソメトリックタイルは一般的に菱形のため、これを Full Rect に設定すると、アイソメトリックタイルの隅に無駄な透明なスペースが描画される場合があります。そのため、Full Rect はお勧めしません。
- Generate Physics Shape - タイルが Physics2D と相互作用する必要がない場合は、このオプションをオフにします。このオプションを有効のままにすると、Tilemap Collider コンポーネントで使用するために、タイルスプライトの形状に基づいて物理形状を生成できます。そうでなく、生成された物理形状をタイルマップのセルにマッチさせるには、タイルアセットを選択し、その Collider Type プロパティを Grid に設定します。
以下の例では、インポートされたスプライトは 256x128 の画像であり、アイソメトリックタイルマップは Unity ユニット (XYZ: 1、0.5、1) の Cell Size を持ちます。スプライトをタイルマップの 1 つのセルに正確に当てはめるには、その PPU 値 (1 ユニットのピクセル数) を 256 に設定します。その全体の幅は 1 Unity ユニットに当たり、1 つのセルの幅 (X 値: 1) と等しくなります。
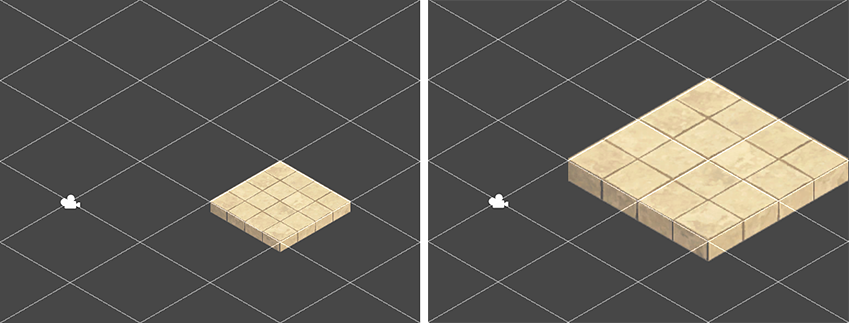
スプライトが PPU 値 128 に設定されている場合、幅は 2 (256px/128) Unity ユニットになります。これにより、スプライトがタイルマップ上でペイントされたときに視覚的に、幅では 2 つのセルを覆うように見えます。ただし、タイルの元のセルの位置に変化はありません。
スプライトがインポートされたら、各スプライトのスプライトエディターを開き、スプライトのアウトライン を 編集 します。アイソメトリックタイルマップのスプライトの場合、スプライトの ピボット を設定し、“地面” がスプライトに相対的になるようにします。
テクスチャを Sprite Mode を Multiple に設定してインポートし、複数のスプライトを含む場合は、スプライトエディターで各スプライトの輪郭を編集します。
- アイソメトリックタイルマップは2018.3で追加 NewIn20183