Using the Animation view
Use the Animation view to preview and edit Animation Clips for animated GameObjects in Unity. To open the Animation view in Unity, go to Window > Animation.
Viewing Animations on a GameObject
The Animation window is linked to the Hierarchy window, the Project window, the Scene view, and the Inspector window. Like the Inspector, the Animation window shows the timeline and keyframes of the Animation for the currently selected GameObject or Animation Clip Asset. You can select a GameObject using the Hierarchy window or the Scene View, or select an Animation Clip Asset using the Project Window.
The Animated Properties list
下の画像では、左の Animation ウインドウは、現在選択されているゲームオブジェクトで使用されるアニメーションを表示しています。子オブジェクトもそのアニメーションで制御されている場合には、子オブジェクトも表示します。右の Scene ビューと Hierarchy ビューは、Animation ウィンドウに、現在選択中のオブジェクトに設定されたアニメーションが表示されている様子を示しています。

Animation ウインドウの左側にはアニメーションしているプロパティのリストが表示されます。新しく作成されたクリップにはまだ、アニメーションが登録されておらず、リストは空です。

クリップでいろいろなプロパティをアニメーションさせると、アニメーションにしたプロパティのリストが、ここに現れます。同じアニメーションに制御される複数の子オブジェクトをアニメーションさせる場合、リストは、各子オブジェクトのアニメーションしたプロパティすべてを含む、階層構造のリストになります。上の例では、ロボットアームのゲームオブジェクトのさまざまな部分の階層がすべて、同じアニメーションクリップで動いています。そして、アニメーションしているゲームオブジェクトはすべて、同じアニメーションクリップ内でアニメーションしています。
このように 1 つのクリップ内で階層構造になったゲームオブジェクトをアニメーションにするときは、階層構造のルートのゲームオブジェクトにアニメーションを作成するよう注意してください。
各プロパティは、各キーフレームにレコードした正確な値を見やすくするために、折り畳みと展開が可能です。再生ヘッド (赤いライン) が中間フレームにあるとき、値のフィールドには、補間された値が表示されます。フィールドは、直接編集することが可能です。再生ヘッドがキーフレーム上にあるときに値を変更すると、キーフレームの値は変更されます。再生ヘッドが中間フレームにある場合 (したがって、表示されている値が補完された値である場合) は、新しい値を入力した位置に新規キーフレームが作成されます。

The Animation Timeline
On the right side of the Animation View is the timeline for the current clip. The keyframes for each animated property appear in this timeline. The timeline view has two modes, Dopesheet and Curves. To toggle between these modes, click Dopesheet or Curves at the bottom of the animated property list area:

アニメーションのタイムラインとキーフレームデータを表示する異なる2種類のモードには、それぞれの利点があります。
Dopesheet mode
Dopesheet mode offers a more compact view, allowing you to view each property’s keyframe sequence in an individual horizontal track. This allows you to view a simple overview of the keyframe timing for multiple properties or GameObjects.

詳しくはマニュアルの ドープシートモードの主要操作 を参照してください。
Curves mode
Curves mode displays a resizable graph containing a view of how the values for each animated property changes over time. All selected properties appear overlaid within the same graph view. This mode allows you to have great control over viewing and editing the values, and how they are interpolated between.

Fitting your selection to the window
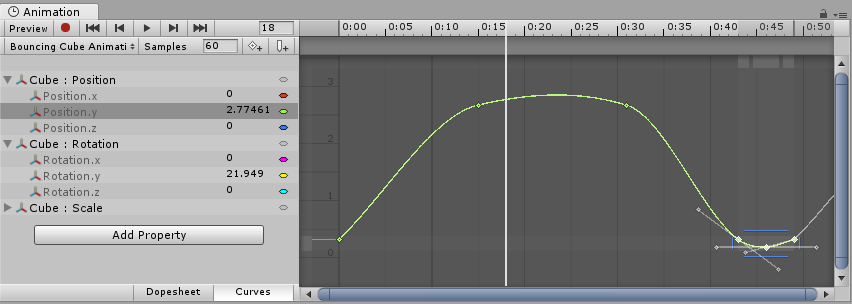
When using Curves mode to view your Animation, it’s important to understand that sometimes the various ranges for each property can differ greatly. For example, consider a simple Animation clip for a spinning bouncing cube. The bouncing Y position value may vary between the range 0 to 2 (meaning the cube bounces 2 units high during the animation); however, the rotation value goes from 0 to 360 (representing its degrees of rotation). When viewing these two curves at the same time, the animation curves for the position values will be very difficult to make out because the view will be zoomed out to fit the 0–360 range of the rotation values within the window:

Press F on the keyboard to zoom the view to the currently selected keyframes. This is useful as a quick way to focus and re-scale the window on a portion of your Animation timeline for easier editing.
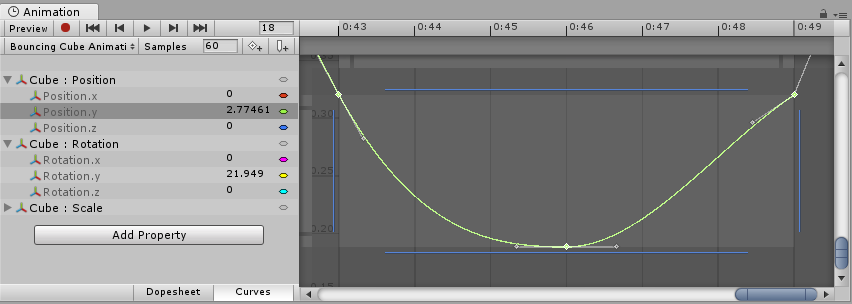
Click on individual properties in the list and press F on the keyboard to automatically re-scale the view to fit the range for that value. You can also manually adjust the zoom of the Curves window by using the drag handles at each end of the view’s scrollbar sliders. In the image below, the Animation Window is zoomed in to view the bouncing Y position Animation. The start of the yellow rotation curve is still visible, but now extends way off the top of the view:

Press A on the keyboard to fit and re-scale the window to show all the keyframes in the clip, regardless of which ones are selected. This is useful if you want to view the whole timeline while preserving your current selection:
Playback and frame navigation controls
To control playback of the Animation Clip, use the Playback Controls at the top left of Animation view.

左から右に向かって
- Preview mode (toggle on/off).
- Record mode (toggle on/off). Note: Preview mode is on when record mode is on.
- Move playback head to the beginning of the clip.
- Move playback head to the previous keyframe.
- Play Animation.
- Move playback head to the next keyframe.
- Move playback head to the end of the clip.
また、以下のキーボードショートカットで再生ヘッドを制御することができます。
- Press Comma (,) to go to the previous frame.
- Press Period (.) to go to the next frame.
- Hold Alt (macOS: Option) and press Comma (,) to go to the previous keyframe.
- Hold Alt (macOS: Option) and press Period (.) to go to the next keyframe.
Locking the window
Hierarchy や Sceneで、ゲームオブジェクトを選択した際に、その選択を反映して表示が自動的に切り替わってしまわないように、アニメーションエディターのウィンドウをロックすることができます。シーン内にある何か別のオブジェクトを選択して操作している間も、ある特定オブジェクトのアニメーションを注視していたい場合には、ウィンドウのロックが便利です。

Curve ビュー の使い方についてもっと詳しく知りたい場合は、アニメーションカーブの使用 セクションを参照してください。