WebGL テンプレートの使用
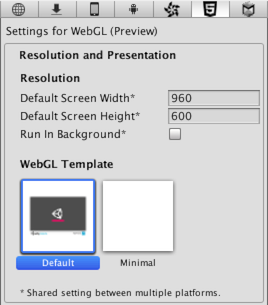
WebGL プロジェクトをビルドしたときには、Web ブラウザでプレイできるように HTML ページにプレイヤーが埋め込まれます。デフォルトのページではグレー色の Canvas にローディングバーを付けたシンプルな白色背景になります。また、Player 設定 (Edit > Project Settings の順に移動し、Player カテゴリを選択) で、WebGL を実行する最低限のコードのみを含む Minimal テンプレートを選択することもできます。
ビルトインの HTML ページは最低限のプレイヤーをテストしたり表示したりするには適していますが、 リリースのためには、将来実際にデプロイするページでプレイヤーを確認するほうが良い場合があります。例えば、Unity のコンテンツが外部呼び出しインターフェースを通してページの他の要素と相互作用する場合は、それらの相互作用する要素を提供するページでテストすることが必要です。Unity では、 WebGL テンプレート を使うことによって、プレイヤーをホストする独自のページを設定できます。
WebGL テンプレートの構造
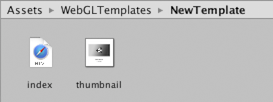
Assets フォルダーに「WebGLTemplates」という名前のフォルダーを作成すると、カスタムテンプレートがプロジェクトに加えられます。各テンプレートフォルダーには、画像やスタイルシートなど、そのページに必要なその他のリソースとともに index.html ファイルが含まれます。
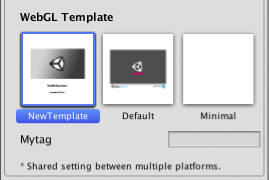
いったん作成されると、テンプレートは Player 設定のオプション内に表示されます。テンプレート名は、フォルダー名と同じになります。必須でない選択で、そのフォルダーに thumbnail.png という名で寸法が 128x128 ピクセルのファイルを包含することができます。サムネイル画像はインスペクターに表示され、完成したページがどのように見えるかを示します。
html ファイルには少なくとも以下の要素を含む必要があります。
Unity WebGL ローダーのスクリプトタグ:
<script src="%UNITY_WEBGL_LOADER_URL%"></script>Script for instantiating Unity:
<script> var unityInstance = UnityLoader.instantiate("unityContainer", "%UNITY_WEBGL_BUILD_URL%");</script>A
<div>tag, which has an id that is used in the instantiation function. The contents of this div will be replaced with the Unity instance.
UnityLoader.instantiate(container, url, override)
UnityLoader.instantiate はコンテンツの新しいインスタンスを作成します。
container can be either a DOM element (normally a
<div>element) or an id of a DOM element. If the DOM element is provided, then the Unity runtime will be instantiated immediately. If an id of a DOM element is provided, then the Unity runtime will be instantiated after the whole document is parsed (which means you can provide an id of a DOM element which has not yet been created at the time of UnityLoader.instantiate() call).url では json ファイルのアドレスを指定します。それにはビルド情報が含まれます (ビルド時に自動的に解決される %UNITY_WEBGL_BUILD_URL% 変数の使用も可能)。
override is an optional parameter which can be used to override the default properties of the instance. For example, you can override the compatibilityCheck, onProgress and popup functions, as those are properties of the instance. Note that Module is a property of the instance as well, so the properties of the Module can be overridden at instantiation time too. Consider the following example:
UnityLoader.instantiate("MyContainer", "%UNITY_WEBGL_BUILD_URL%", {
  compatibilityCheck: function (unityInstance, onsuccess, onerror) {
    if (!UnityLoader.SystemInfo.hasWebGL) {
      unityInstance.popup("Your browser does not support WebGL",
        [{text: "OK", callback: onerror}]);
    } else if (UnityLoader.SystemInfo.mobile) {
      unityInstance.popup("Please note that Unity WebGL is not currently supported on mobiles. Press OK if you wish to continue anyway.",
        [{text: "OK", callback: onsuccess}]);
    } else if (["Edge", "Firefox", "Chrome", "Safari"].indexOf(UnityLoader.SystemInfo.browser) == -1) {
      unityInstance.popup("Please note that your browser is not currently supported for this Unity WebGL content. Press OK if you wish to continue anyway.",
        [{text: "OK", callback: onsuccess}]);
    } else {
      onsuccess();
    }
  },
  onProgress: MyProgressFunction,
  Module: {
    onRuntimeInitialized: MyInitializationCallbackFunction,
  },
});
テンプレートタグ
ビルドプロセス中、Unity はページテキスト内の特別なタグの文字列を探し、それらをエディターが提供する値に置き換えます。 これらには、名前、画面上の寸法、およびプレイヤーに関するその他の有用な情報が含まれます。
タグは、ページソース内でパーセント記号 (%) で区別されています。 例えば、Player 設定でプロダクト名が MyPlayer と定義されているとします。
<title>%UNITY_WEB_NAME%</title>
テンプレートのインデックスファイル内のこのタグは、
<title>MyPlayer</title>
ビルド用に生成されたホストページではこのタグに置き換えられます。すべてのタグは以下のとおりです。
UNITY_WEB_NAME: プレイヤー名
UNITY_WEBGL_LOADER_URL: UnityLoader.js スクリプトの URL。ビルドのインスタンス化を実行します。
UNITY_WEBGL_BUILD_URL: JSON ファイルの URL。ビルドに関するすべての必要情報が含まれます。
UNITY_WIDTH and UNITY_HEIGHT: プレイヤーのスクリーン上の幅、高さ (ピクセル)。
UNITY_CUSTOM_SOME_TAG: タグを
UNITY_CUSTOM_XXXの形式でインデックスファイルに加えると、テンプレートを選択するときにこのタグが Player 設定に表示されます。例えば、<title>Unity Player | %UNITY_CUSTOM_MYTAG%</title>をソースに加えると、Player 設定の表示は以下のようになります。
ビルド中に、カスタムタグは、タグ名のとなりのテキストフィールド内のテキストに置き換えられます。
例
以下はテンプレートタグの使用例で、 Unity が最低限の WebGL テンプレートのために使用している HTML ソースです。
<!DOCTYPE html>
<html lang="en-us">

  <head>
    <meta charset="utf-8">
    <meta http-equiv="Content-Type" content="text/html; charset=utf-8">
    <title>Unity WebGL Player | %UNITY_WEB_NAME%</title>
    <script src="%UNITY_WEBGL_LOADER_URL%"></script>
    <script>
    var unityInstance = UnityLoader.instantiate("unityContainer", "%UNITY_WEBGL_BUILD_URL%");
    </script>
  </head>

  <body>
    <div id="unityContainer" style="width: %UNITY_WIDTH%px; height: %UNITY_HEIGHT%px; margin: auto"></div>
  </body>

</html>
Minimal と Default 両方のテンプレートが Unity インストールフォルダーに含まれています。場所は Windows では Editor\Data\PlaybackEngines\WebGLSupport\BuildTools\WebGLTemplates 、Mac では /PlaybackEngines/WebGLSupport/BuildTools/WebGLTemplates です。
プログレスバーを加える
Unity WebGL コンテンツは、ロードされるときに自動的にデフォルトのプログレスバーを描画します。独自のプログレス関数を追加パラメーターとして提供することによってデフォルトのプログレスバーのオーバーライドが可能です。以下はその例です。
var unityInstance = UnityLoader.instantiate("unityContainer", "%UNITY_WEBGL_BUILD_URL%", {onProgress: UnityProgress});
where UnityProgress is a function of 2 arguments: unityInstance (identifies the unity instance the progressbar belongs to) and progress (a value from 0.0 to 1.0, providing information about the current loading progress).
例えば、デフォルト WebGL テンプレートのプログレス関数は以下の通りです。
var unityInstance = UnityLoader.instantiate("unityContainer", "%UNITY_WEBGL_BUILD_URL%", {onProgress: UnityProgress});
例えば、デフォルト WebGL テンプレートのプログレス関数は以下の通りです。
function UnityProgress(unityInstance, progress) {
  if (!unityInstance.Module)
    return;
  if (!unityInstance.logo) {
    unityInstance.logo = document.createElement("div");
    unityInstance.logo.className = "logo " + unityInstance.Module.splashScreenStyle;
    unityInstance.container.appendChild(unityInstance.logo);
  }
  if (!unityInstance.progress) {
    unityInstance.progress = document.createElement("div");
    unityInstance.progress.className = "progress " + unityInstance.Module.splashScreenStyle;
    unityInstance.progress.empty = document.createElement("div");
    unityInstance.progress.empty.className = "empty";
    unityInstance.progress.appendChild(unityInstance.progress.empty);
    unityInstance.progress.full = document.createElement("div");
    unityInstance.progress.full.className = "full";
    unityInstance.progress.appendChild(unityInstance.progress.full);
    unityInstance.container.appendChild(unityInstance.progress);
  }
  unityInstance.progress.full.style.width = (100 * progress) + "%";
  unityInstance.progress.empty.style.width = (100 * (1 - progress)) + "%";
  if (progress == 1)
    unityInstance.logo.style.display = unityInstance.progress.style.display = "none";
}
これは、そのまま使用することも、独自のテンプレートの参照として使用することもできます。 プログレスバーは完全に JavaScript で実装されているので、進捗を表示したいものなら何にでもカスタマイズしたり置き換えたりすることができます。
2018–10–18 修正されたページ
バージョン 5.6 で更新
WebGL は、2019.1 に
gameInstanceからunityInstanceへ名前変更NewIn20191