プログレッシブ GPU ライトマッパー (プレビュー版)
ノート: これはプレビュー機能であり、変更されることもあります。この機能を使用するシーンは、将来のリリースで更新が必要になる場合があります。この機能がプレビュー版である間は、本格的な制作に使用しないでください。
The GPU Lightmapper gives you an interactive workflow when you’re setting up and tweaking the lighting in your Scene. Because this lightmapper uses the GPU in your computer to generate baked lightmaps and Light probes, it’s a faster alternative to the CPU Progressive Lightmapper. Sampling and noise patterns look slightly different than those produced by the CPU lightmapper, because the sampling algorithm is different.
設定
To use the Progressive GPU (Preview) Lightmapper, go to Window > Rendering > Lighting Settings, navigate to Lightmapping Settings, and set Lightmapper to Progressive GPU (Preview). See Lightmapping Settings for more information about this window.

| プロパティー | 説明 | |
|---|---|---|
| Prioritize View | これを有効にすると、プログレッシブライトマッパーは、現在シーンビューに表示されているテクセルに変更を適用し、それから、ビューに表示されていないテクセルに変更を適用します。 | |
| Multiple Importance Sampling | これを有効にすると、環境をサンプリングするのに多重重点的サンプリングを使用するかどうかを指定します。通常、これはライトマップを生成するときの収束を早めますが、ある低周波数環境ではノイズの多い結果になる可能性があります。この機能は、デフォルトでは無効になっています。 | |
| Direct Samples | 各テクセルからのサンプル (パス) の数。この設定は、プログレッシブライトマッパーが直接ライティングの計算に使用するサンプル数を制御します。この値を大きくすると、ライトマップの質は向上しますが、ベイク処理に要する時間が長くなります。 | |
| Indirect Samples | 各テクセルからのサンプル (パス) の数。この設定は、プログレッシブライトマッパーが間接ライティングの計算に使用するサンプル数を制御します。一部のシーン、特に屋外のシーンでは、100 サンプルで十分です。エミッシブジオメトリのある屋内シーンでは、望む結果が得られるまで値を増やします。 | |
| Environment Samples | Define the number of samples the lightmapper uses for environment lighting calculations. Higher values can improve the quality of the lightmaps, but increase the time required for baking to complete. This is set to 500 by default. | |
| Bounces | この値を使用して、パスを追跡するときの間接的な反射の数を指定します。大抵のシーンで 2 つの反射で十分です。室内の状況で、それよりも多く必要な場合があります。 | |
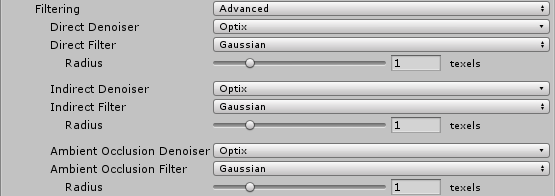
| Filtering | Configure the way the Progressive Lightmapper applies post-processing to lightmaps to limit noise. For lightmap post-processing, the lightmap is split into Direct, Indirect and Ambient Occlusion targets that Unity applies post-processing to individually, before it composites them together into a single lightmap. - Direct: Any light that arrives directly from a Light to a sensor (usually the Camera). - Indirect: Any light that arrives indirectly from a Light to a sensor. This most commonly applies to light that reflects off other GameObjects. - Ambient Occlusion: Any ambient light that the lighting system calculates. See Ambient Occlusion for more information. The Progressive Lightmapper supports the NVIDIA OptiX AI-Accelerated Denoiser, which reduces perceptible noise in the lightmap without causing blurring. It requires an NVIDIA GPU with 4GB+ VRAM and driver version 390+. It is not supported for the NVIDIA Series 20x GPUs (Turing RTX). It is only supported on the Windows platform. |
|
| 圧縮なし | ライトマップにフィルターやノイズ除去を使用しない場合に選択します。 | |
| Auto | ライトマップのポストプロセスにプラットフォーム依存のプリセットを使用する場合に選択します。 開発マシンが OptiX (NVIDIA OptiX AI-Accelerated Denoiser を実行するための要件を満たす場合、プログレッシブライトマッパーは、すべてのターゲットに対して半径 1 テクセルの ガウシアン (Gaussian) フィルターを備えたノイズ除去を使用します。 開発マシンが OptiX を実行できない場合、プログレッシブライトマッパーは、Direct に 1 テクセル半径、Indirect に 5 テクセル半径、Ambient Occlusion に 2 テクセル半径の ガウシアンフィルターを使用します。 |
|
| Advanced | 各タイプのライトマップターゲットのオプションを手動で設定する場合に、Advanced を選択します。ターゲットのタイプは Direct、Indirect、Ambient Occlusion です。詳細については、以下の フィルタリングの詳細設定 を参照してください。 | |
高度なフィルタリング設定
| 設定 | 説明 | |
|---|---|---|
| Advanced | Set Filtering to Advanced to manually configure options for each type of lightmap target. The target types are: - Direct: Any light that arrives directly from a Light to a sensor (usually the Camera). - Indirect: Any light that arrives indirectly from a Light to a sensor. This most commonly applies to light that reflects off other GameObjects. - Ambient Occlusion: Any ambient light that the lighting system calculates. See Ambient Occlusion for more information. |
|
| Denoiser | Select a denoiser to use for the lightmap target: - Optix: If your development machine fulfils the requirements to support the NVIDIA OptiX AI-Accelerated Denoiser, you can select it here. If your system cannot run it, this option is greyed out and set to None by default. - None: Select this to use no denoising for the lightmap target. |
|
| Filter | ライトマップターゲットに使用するフィルターを選択します。 - Gaussian: ライトマップターゲットにガウシアンフィルターを使用します。ガウシアンフィルターは、ライトマップにバイラテラルガウシアンフィルターを適用します。これにより、ライトマップがぼやけ、目に見えるノイズが減少します。 - A-Trous: ライトマップターゲットに A-Trous フィルターを使用します。A-Trous フィルターは、ライトマップの目に見えるノイズを取り除き、ぼかしの量を最小限に抑えます。 - None*: ライトマップターゲットのすべてのフィルタリングを無効にします。 |
|
| Radius | このオプションは、Filter が Gaussian に設定されている場合にのみ使用できます。Radius 値を使用して、ガウシアンフィルターのカーネルの半径をテクセル単位で設定します。Radius を大きくすると、ぼかしの強さが増し認識できるノイズが減少しますが、ライティングのディテールが失われる場合があります。 | |
| Sigma | このオプションは、Filter が A-Trous に設定されている場合にのみ使用できます。Sigma の値を使用して、ディテールを維持する量やライティングをぼかす量を調整します。Sigma の値を高くするとぼかしの強さが増し、認識できるノイズが減少しますが、ライティングのディテールが失われる場合があります。 | |
ハードウェアとソフトウェアの要件
プログレッシブ GPU ライトマッパーを使用するには、コンピューターに以下が必要です。
- OpenCL 1.2 をサポートする少なくとも 1 つの GPU
- 少なくとも 2GB の専用 GPU メモリ
- SSE4.1 命令をサポートする CPU
If your computer has more than one GPU, Unity selects the same GPU that the Editor uses. It is possible to choose one GPU for rendering and a different GPU for light baking. For information on how to change this, see the section below, Configure which GPU to use.
Note: If the baking process uses more than the available GPU memory, the process can fall back to the CPU Lightmapper. Some graphics drivers with virtual memory support swap to CPU memory instead, which makes the baking process slower.
使用する GPU の設定
It is possible to select one GPU for rendering the Scene and another GPU for baking lighting. If the automatic GPU assignment don’t fit your needs, you can specify which graphics card to use for baking.
To see which GPU Unity currently uses for baking, in the Editor: In your Project, open the Lighting window. Next to Bake Performance, you can see the GPU.
マシン上で使用可能な GPU を確認する方法は、以下の通りです。
- Make sure you’ve selected the Progressive GPU lightmapper in the Editor.
- シーンでライトを生成します。
- ファイルエクスプローラーを開き、以下のパスに移動します。C:\Users\USER\AppData\Local\Unity\Editor. Open the file called Editor.log
- ファイルで Listing OpenCL platforms を検索します。これによって、OpenCL デバイスに関する情報のログ部分にジャンプします。ここでは、利用可能な GPU と対応するプラットフォームとデバイスのインデックスを見ることができます。
ベイクのために特定の GPU を選択するには、コマンドラインに以下のコマンドを入力します (platform と device index を適切な数に置き換えます)。
Unity.exe "-OpenCL-PlatformAndDeviceIndices" <platform> <device index>
シーンで作業する間、割り当ての選択はニーズに応じて異なります。最も強い GPU をいずれかのアクティビティに割り当てると、他のアクティビティにパフォーマンスの影響が発生する可能性があります。問題が発生した場合は、GPU の再割り当てを試みてください。
Progressive GPU limitations
プログレッシブ GPU ライトマッパーは以下をサポートしません。
- Baked LOD
- A-Trous filtering (it only uses Gaussian filtering)
- カスタムのベイク API (実験的)
- Submeshes (the lightmapper uses Material properties on the first submesh)