Blending clips
Blend two clips on the same track to create a smooth transition between two Animation clips, two Audio clips, or two Playable clips. To blend two clips, select the Mix Clip Edit mode and position or trim one clip until it overlaps an adjacent clip.
In a blend, the first clip is referred to as the outgoing clip and the second clip is referred to as the incoming clip. The area where the outgoing clip transitions to the incoming clip is referred to as the blend area. The blend area sets the duration of the transition.
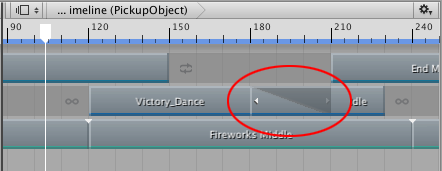
Although the Clips view represents a blend area as a single linear curve, the transition between clips is actually comprised of two blend curves. The blend curve for the outgoing clip is referred to as the Blend Out curve. The blend curve for the incoming clip is referred to as the Blend In curve. By default, each blend curve is automatically set to an ease-in and ease-out curve.
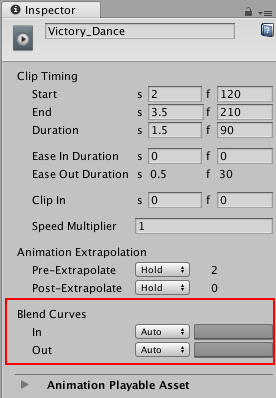
Use the Blend Curves in the Inspector window to change the shape for either the Blend In or Blend Out curve of the selected clip. However, the Inspector window only allows you to edit the properties of one clip at a time. You cannot simultaneously customize both blend curves from the same blend area.
To customize the Blend Curves for the transition between two clips:
Select the outgoing clip to customize its Blend Out curve (labelled Out).
Select the incoming clip to customize its Blend In curve (labelled In).
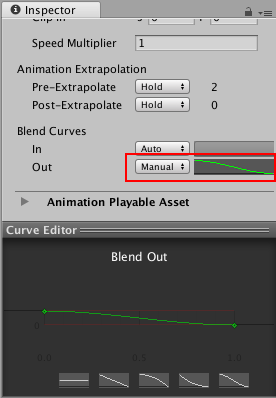
To customize either the Blend Out curve or Blend In curve, use the drop-down menu to switch from Auto to Manual. With Manual selected, the Inspector window shows a preview of the blend curve. Click the curve preview to open the Curve Editor below the Inspector window.
Curve Editor を使用して、ブレンドカーブの形状をカスタマイズします。デフォルトでは、ブレンドカーブの開始と終了にキーがあります。Curve Editor では、以下のさまざまな方法でブレンドカーブを修正できます。
Select the key at the start or end of the blend curve and use the tangent handles to adjust the interpolation between keys.
キーを加え補間ポイントを増やして、ブレンドカーブの形状を変更します。Curve Editor でキーを追加する方法は、カーブビューのキーの追加 と同じです。
Right-click a key to delete or edit the key. Editing keys in the Curve Editor is the same as editing keys in the Curves view. Note that you cannot delete the first and last keys.
Curve Editor の下にある形状テンプレートを選択します。
Curve Editor には、ブレンドインカーブまたはブレンドアウトカーブのどちらを変更するかによって、適当な形状テンプレートも含まれています。形状テンプレートを選択すると、ブレンドカーブを選択したテンプレートの形状に変更します。
- 2019–08–20 限られた 編集レビュー でパブリッシュされたページ