プログレッシブ GPU ライトマッパー (プレビュー版)
ノート: これはプレビュー機能であり、変更されることもあります。この機能を使用するシーンは、将来のリリースで更新が必要になる場合があります。この機能がプレビュー版である間は、本格的な制作に使用しないでください。
The GPU Lightmapper gives you an interactive workflow when you’re setting up and tweaking the lighting in your Scene. Because this lightmapper uses the GPU in your computer to generate baked lightmaps and Light probes, it’s a faster alternative to the CPU Progressive Lightmapper.
設定
To use the Progressive GPU (Preview) Lightmapper, go to Window > Rendering > Lighting Settings, navigate to Lightmapping Settings, and set Lightmapper to Progressive GPU (Preview). See Lightmapping Settings for more information about this window.
| Setting | Description | |
|---|---|---|
| Lightmapper | Use this to specify which internal lighting calculation software to use to calculate lightmaps in the Scene. The options are: Progressive CPU Progressive GPU Enlighten (deprecated) The default value is Progressive CPU. |
|
| Prioritize View | Enable this to make the Progressive Lightmapper apply changes to the texels that are currently visible in the Scene View, then apply changes to the out-of-view texels. | |
| Multiple Importance Sampling | Enable this to use multiple importance sampling for sampling the environment. This generally leads to faster convergence when generating lightmaps, but can lead to noisier results in certain low frequency environments. This is disabled by default. | |
| Direct Samples | The number of samples (paths) shot from each texel. This setting controls the number of samples Progressive Lightmapper uses for direct lighting calculations. Increasing this value can improve the quality of lightmaps, but increases the baking time. | |
| Indirect Samples | The number of samples (paths) shot from each texel. This setting controls the number of samples Progressive Lightmapper uses for indirect lighting calculations. For some Scenes, especially outdoor Scenes, 100 samples should be enough. For indoor Scenes with emissive geometry, increase the value until you see the result you want. | |
| Environment Samples | Define the number of samples the lightmapper uses for environment lighting calculations. Higher values can improve the quality of the lightmaps, but increase the time required for baking to complete. This is set to 500 by default. | |
| Light Probe Sample Multiplier | Controls how many samples are used for Light Probes as a multiplier of the sample values above. Higher values improve the quality of Light Probes, but they will take longer to bake. To enable this feature, go to Project Settings > Editor and disable Use legacy Light Probe sample counts. The default value is 4. | |
| Bounces | Use this value to specify the number of indirect bounces to do when tracing paths. For most Scenes, two bounces is enough. For some indoor Scenes, more bounces might be necessary. | |
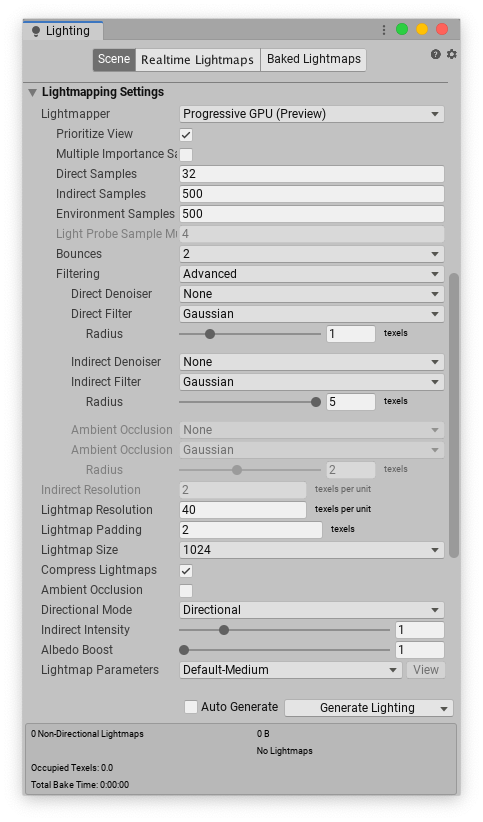
| Filtering | Configure the way the Progressive Lightmapper applies post-processing to lightmaps to limit noise. For lightmap post-processing, the lightmap is split into Direct, Indirect and Ambient Occlusion targets that Unity applies post-processing to individually, before it composites them together into a single lightmap. - Direct: Any light that arrives directly from a Light to a sensor (usually the Camera). - Indirect: Any light that arrives indirectly from a Light to a sensor. This most commonly applies to light that reflects off other GameObjects. - Ambient Occlusion: Any ambient light that the lighting system calculates. See Ambient Occlusion for more information. |
|
| None | Select this to use no filter or denoising for the lightmap. | |
| Auto | Select this to use a platform-dependent preset for post-processing the lightmap. If your development machine fulfils the requirements to run OptiX (the NVIDIA OptiX AI-Accelerated Denoiser), the Progressive Lightmapper uses the denoiser with a Gaussian filter that has a 1-texel radius for all targets. If your development machine cannot run OptiX, the Progressive Lightmapper uses a Gaussian filter that has a 1-texel radius for Direct, 5-texel radius for Indirect, and 2-texel radius for Ambient Occlusion. |
|
| Advanced | Select Advanced to manually configure options for each type of lightmap target. The targets types are Direct, Indirect and Ambient Occlusion. For more information, see Advanced Filtering settings, below. | |
| Indirect Resolution | Use this to specify the number of samples the lightmapper uses for indirect lighting calculations. Higher values can improve the quality of the lightmaps, but increase the time it takes to bake them. | |
| Lightmap Resolution | Use this to specify the number of texels per unit to use for lightmaps. Increasing this value improves lightmap quality, but also increases bake times. Note that doubling this value causes the number of texels to quadruple (because the value refers to both the height and width of the lightmap). See the Occupied texels count in the statistics area at the bottom of the Lighting window. | |
| Lightmap Padding | Use this to specify the separation (in texel units) between separate shapes in the baked lightmap. The default value is 2. | |
| Lightmap Size | The size (in pixels) of the full lightmap texture, which incorporates separate regions for the individual GameObject textures. The default value is 1024. | |
| Compress Lightmaps | A compressed lightmap requires less storage space, but the compression process can introduce unwanted visual effects into the texture. Tick this checkbox to compress lightmaps, or untick it to keep them uncompressed. The checkbox is ticked by default. | |
| Ambient Occlusion | Tick this checkbox to open a group of settings which allow you to control the relative brightness of surfaces in ambient occlusion. Higher values indicate a greater contrast between the occluded and fully lit areas. This only applies to the indirect lighting calculated by the GI system. This setting is enabled by default. | |
| Max Distance | Set a value to control how far the lighting system casts rays in order to determine whether or not to apply occlusion to an object. A larger value produces longer rays and contributes more shadows to the lightmap, while a smaller value produces shorter rays that contribute shadows only when objects are very close to one another. A value of 0 casts an infinitely long ray that has no maximum distance. The default value is 1. | |
| Indirect Contribution | Use the slider to scale the brightness of indirect light as seen in the final lightmap (that is, ambient light, or light bounced and emitted from objects) from a value between 0 and 10. The default value is 1. Values less than 1 reduce the intensity, while values greater than 1 increase it. | |
| Direct Contribution | Use the slider to scale the brightness of direct light from a value between 0 and 10. The default value is 0. The higher this value is, the greater the contrast applied to the direct lighting. | |
| Directional Mode | You can set the lightmap up to store information about the dominant incoming light at each point on the objects’ surfaces. See documentation on Directional Lightmapping for further details. The default mode is Directional. | |
| Directional | In Directional mode, Unity generates a second lightmap to store the dominant direction of incoming light. This allows diffuse normal mapped materials to work with the GI. Directional mode requires about twice as much storage space for the additional lightmap data. Directional lightmaps cannot be decoded on SM2.0 hardware or when using GLES2.0. They fall back to Non-Directional lightmaps. | |
| Non-directional | Non-directional mode disables Unity’s ability to generate a second lightmap to store the dominant direction of incoming light. | |
| Indirect Intensity | Use this slider to control the brightness of indirect light stored in realtime and baked lightmaps, from a value between 0 and 5. A value above 1 increases the intensity of indirect light while a value of less that 1 reduces indirect light intensity. The default value is 1. | |
| Albedo Boost | Use this slider to control the amount of light Unity bounces between surfaces, from a value between 1 and 10. To do this, Unity intensifies the albedo of materials in the Scene. Increasing this draws the albedo value towards white for indirect light computation. The default value of 1 is physically accurate. | |
| Lightmap Parameters | Unity uses a set of general parameters for the lightmapping in addition to properties of the Lighting window. A few defaults are available from the menu for this property but you can also create your own lightmap parameter file using the Create New option. See the Lightmap Parameters page for further details. The default value is Default-Medium. | |
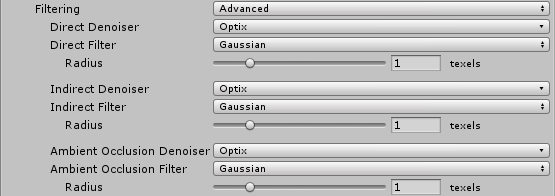
高度なフィルタリング設定
| 設定 | 説明 | |
|---|---|---|
| Advanced | Set Filtering to Advanced to manually configure options for each type of lightmap target. The target types are: - Direct: Any light that arrives directly from a Light to a sensor (usually the Camera). - Indirect: Any light that arrives indirectly from a Light to a sensor. This most commonly applies to light that reflects off other GameObjects. - Ambient Occlusion: Any ambient light that the lighting system calculates. See Ambient Occlusion for more information. |
|
| Denoiser | ライトマップターゲットに使用するノイズ除去を選択します。オプションは以下の通りです。 Optix: NVIDIA Optix は、ベイク処理されたライトマップのノイズを削減する AI 加速ノイズ消去です。4GB 以上の VRAM かつ、ドライバーバージョン 390 以上の NVIDIA GPU が必要であり、Windows プラットフォームでのみサポートされます。 RadeonPro: RadeonPro は、ベイク処理されたライトマップのノイズを削減する AI 加速ノイズ消去です。4GB 以上の VRAM を備えた OpenCL 対応の GPU が必要です。 - OpenImageDenoise: Intel Open Image は、ベイク処理されたライトマップのノイズを削減する AI 加速デノイザーです。 - None: ノイズ消去を使用しません。 |
|
| Filter | ライトマップターゲットに使用するフィルターを選択します。 - Gaussian: ライトマップターゲットにガウシアンフィルターを使用します。ガウシアンフィルターは、ライトマップにバイラテラルガウシアンフィルターを適用します。これにより、ライトマップがぼやけ、目に見えるノイズが減少します。 - A-Trous: ライトマップターゲットに A-Trous フィルターを使用します。A-Trous フィルターは、ライトマップの目に見えるノイズを取り除き、ぼかしの量を最小限に抑えます。 - None*: ライトマップターゲットのすべてのフィルタリングを無効にします。 |
|
| Radius | このオプションは、Filter が Gaussian に設定されている場合にのみ使用できます。Radius 値を使用して、ガウシアンフィルターのカーネルの半径をテクセル単位で設定します。Radius を大きくすると、ぼかしの強さが増し認識できるノイズが減少しますが、ライティングのディテールが失われる場合があります。 | |
| Sigma | このオプションは、Filter が A-Trous に設定されている場合にのみ使用できます。Sigma の値を使用して、ディテールを維持する量やライティングをぼかす量を調整します。Sigma の値を高くするとぼかしの強さが増し、認識できるノイズが減少しますが、ライティングのディテールが失われる場合があります。 | |
ハードウェアとソフトウェアの要件
プログレッシブ GPU ライトマッパーを使用するには、コンピューターに以下が必要です。
- OpenCL 1.2 をサポートする少なくとも 1 つの GPU
- 少なくとも 2GB の専用 GPU メモリ
- SSE4.1 命令をサポートする CPU
コンピューターに複数の GPU がある場合、Unity はエディターが使用するのと同じ GPU を選択します。レンダリング用に 1 つのGPUを選択し、ライトベイク用にもう 1 つの GPU を選択することもできます。これを変更する方法については、このページの 使用する GPU の設定 セクションを参照してください。
ノート: ベイク処理に可能な GPU メモリを超えて使用すると、処理が CPU ライトマッパーにフォールバックする可能性があります。仮想メモリをサポートするグラフィックスドライバーの中には、代わりに CPU メモリにスワップするものがあるため、ベイク処理の速度が遅くなります。
使用する GPU の設定
1 つの GPU をシーンのレンダリングに、別の GPU をライティングのベイクに使用することができます。自動 GPU 割り当てがニーズに合わない場合は、ベイクに使用するグラフィックスカードを指定できます。
現在、エディターでどの GPU がベイクに使用されているかを確認する方法は以下の通りです。
- プロジェクトで Lighting ウィンドウを開きます (Window > Rendering > Lighting Settings)。Bake Performance の横に GPU があります。
マシン上で使用可能な GPU を確認する方法は、以下の通りです。
- Lighting Settings ウィンドウで Progressive GPU (Preview) ライトマッパーを選択します。
- シーンでライトを生成します。
- ファイルエクスプローラーを開き、以下のパスに移動します。C:\Users\USER\AppData\Local\Unity\Editor. Open the file called Editor.log
- ファイルで Listing OpenCL platforms を検索します。これによって、OpenCL デバイスに関する情報のログ部分にジャンプします。ここでは、利用可能な GPU と対応するプラットフォームとデバイスのインデックスを見ることができます。
ベイクのために特定の GPU を選択するには、コマンドラインに以下のコマンドを入力します (platform と device index を適切な数に置き換えます)。
Unity.exe "-OpenCL-PlatformAndDeviceIndices" <platform> <device index>
シーンで作業する間、割り当ての選択はニーズに応じて異なります。最も強い GPU をいずれかのアクティビティに割り当てると、他のアクティビティにパフォーマンスの影響が発生する可能性があります。問題が発生した場合は、GPU の再割り当てを試みてください。
Progressive GPU limitations
プログレッシブ GPU ライトマッパーは以下をサポートしません。
- Baked LOD
- A-Trous filtering (it only uses Gaussian filtering)
- カスタムのベイク API (実験的)