Build your Web application
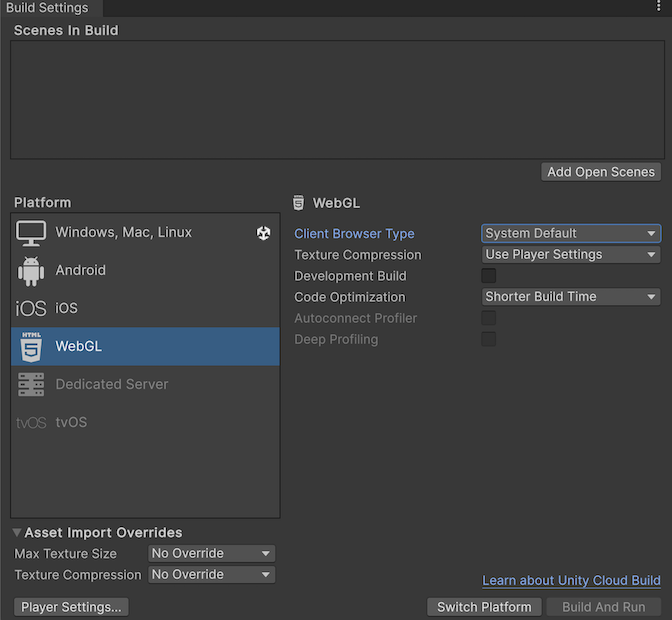
To create a build for the Web platform, go to File > Build Settings from Unity’s main menu. In the Platform list, select Web and then click Switch Platform.
When you have configured the Build Settings, choose from one the following options:
- Build はアプリケーションをプレイヤーにビルドします。 Build and Run はアプリケーションをプレイヤーに ビルドし、ターゲットプラットフォームで開きます。
The Unity build system for Web supports the following settings:
| 設定 | 機能 | |
|---|---|---|
| Client Browser Type | Select the browser client that you want your application to launch at runtime. For example, if you choose System Default, then your application launches the default browser, and removes the Path to Client Browser setting. The available options are: | |
| System Default | This is the default setting. Select this option to launch the application in the default browser. | |
| Microsoft Edge | Select this option to launch the application in Edge browser. | |
| Mozilla Firefox | Select this option to launch the application in Firefox. | |
| Google Chrome | Select this option to launch the application in Chrome. | |
| Safari | Select this option to launch the application in Safari. | |
| Path to Client Browser | Specify the path to the browser client that you want your application to launch at runtime. Note: This option is only visible if the Client Browser Type isn’t set to the default browser. | |
| Texture Compression | The texture compression format to use for the build. For more information, refer to Web texture compression. The available options are: | |
| Use Player Settings | これはデフォルトの選択です。Player 設定 ウィンドウで設定したテクスチャ圧縮形式を使用します。 | |
| ETC2 | モバイル機器で広くサポートされている ETC2 形式を使用。 | |
| ASTC | モバイル機器で広くサポートされている ASTC 形式を使用。 | |
| DXT | デスクトップデバイスで広くサポートされている DXT 形式を使用。 | |
| Development Build | この設定を有効にすると、ビルドにスクリプトデバッグシンボルとプロファイラーが加えられます。この設定を有効にすると、DEVELOPMENT_BUILD スクリプト定義が設定されます。開発ビルドではコンテンツが縮小されないため、配布するにはサイズが大きくなるため、アプリケーションをテストしたい場合にのみ、このオプションを使用してください。 |
|
| Code Optimization | Select the optimization mode to use for compiling the Web code. | |
| Shorter Build Time | This is the default setting. Select this option to generate WebGL code that takes the least amount of time to build. | |
| Runtime Speed | Select this option to generate WebGL code that’s optimized for runtime performance, at the expense of taking a longer time to build. | |
| Runtime Speed with LTO | This is the same as Runtime Speed, but with an additional Link Time Optimizations (LTO) stage (sometimes called Whole Program Optimization). Enable LTO when compiling Master shipping builds for deployment to end users. | |
| Disk Size | Select this option to favor optimizations that minimize build size, at the expense of taking a longer time to build. The recommended best practice is to select this option when targeting mobile web browsers, that may have limits on the size of WebAssembly files that can be loaded. Smaller disk sizes generally result in shorter page startup times. | |
| Disk Size with LTO | This is the same as Disk Size, but enables additional Link Time Optimizations (LTO) stage (sometimes called Whole Program Optimization). Select this option when compiling Master shipping builds for deployment to end users. | |
| Autoconnect Profiler | Typically, when enabled, this setting allows you to automatically connect the Unity Profiler to your build. However for Web, as you can’t connect the Profiler to a running build, use this option to connect the content to the Unity Editor instead. This is because the Profiler connection is handled using WebSockets on Web, but a web browser only allows outgoing connections from the content. For this setting to be available, you must enable the Development Build option. | |
| Deep Profiling | プロファイラーで ディーププロファイリング をアクティブにするには、この設定を有効にします。これにより、プロファイラーはアプリケーションのすべての関数呼び出しを検査し、より詳細なプロファイリングデータを返します。Deep Profiling Support を有効にすると、スクリプトの実行が遅くなる場合があります。このオプションは Development Build を有効にしている場合にのみ使用できます。 | |
| Build | それを使ってアプリケーションをビルドします。 | |
| Build And Run | Use it to view the Web Player locally. Unity uses a local web server to host your build, and opens it from a localhost URL. Alternatively, you can use a custom local web server with properly configured response headers. For more information, refer to Compressed builds and server configuration. | |
Asset Import Overrides の設定変更については、Build Settings を参照してください。
Build folder structure
When you build your Web application, Unity creates a Build folder with the name you specify in the Build Settings window. The Build folder has the following files, where [ExampleBuild] represents the name of the target build folder.
| ファイル名 | 説明 |
|---|---|
[ExampleBuild].loader.js |
Unity のコンテンツをロードするためにウェブページが必要とする JavaScript のコード。 |
[ExampleBuild].framework.js |
JavaScript runtime and plug-ins. |
[ExampleBuild].wasm |
WebAssembly バイナリ。 |
[ExampleBuild].mem |
プレイヤーのヒープメモリを初期化するためのバイナリイメージ。Unity はマルチスレッドの WebAssembly ビルドのみに対してこのファイルを生成します。 |
[ExampleBuild].data |
アセットデータとシーン。 |
[ExampleBuild].symbols.json |
エラーのスタックトレースを解除するのに必要なデバッグシンボル名。このファイルは、Debug Symbols オプション (File > Build Settings > Player Settings) を有効にする場合、リリースビルドに対してのみ生成されます。 |
[ExampleBuild].jpg |
A background image, which displays while the build is loading. This file is only generated when a Background Image is available in the Player Settings (File > Build Settings > Player Settings > Splash Image). For more information, refer to Splash Screen. |
ビルドに対して Compression Method を有効にする場合、Unity は圧縮方法に対応する拡張子を識別し、Build サブフォルダー内のファイル名にこの拡張子を追加します。Decompression Fallback を有効にする場合、Unity はビルドのファイル名に .unityweb という拡張子を追加します。それ以外の場合、Unity は、Gzip 圧縮方式の場合は .gz、Brotli圧縮方式の場合は .br という拡張子を加えます。
詳細については、圧縮ビルドとサーバー設定 を参照してください。
Player 設定 内の Name Files As Hashes を有効にすると、Unity はデフォルトのファイル名の代わりに、ファイルコンテンツのハッシュを使用します。これは、ビルドフォルダー内の各ファイルに適用されます。このオプションにより、ゲームビルドの更新版をサーバー上の同じフォルダーにアップロードし、ビルドの反復の間に変更されたファイルのみをアップロードすることができます。
ノート: ファイルシステムから直接プレイヤーを開くと、ブラウザーによっては動作しないことがあります。これは、ローカルファイルの URL に適用されるセキュリティ制限によるものです。
例外を有効にする
Use Enable Exceptions to specify how to handle unexpected code behavior (also known as errors) at runtime.
To access Enable Exceptions, go to the Web Player Settings > Publishing Settings section.
-
In the Enable Exceptions option, choose from the following options:
None: Select this if you don’t need any exception support. This gives the best performance and smallest builds. With this option, any exception thrown causes your content to stop with an error.
Explicitly Thrown Exceptions Only (default): Select this to capture exceptions which are explicitly specified from a
throwstatement in your scripts and to also to make surefinallyblocks are called. Note that selecting this option makes the generated JavaScript code from your scripts longer and slower; This might only be an issue if scripts are the main bottleneck in your project.-
Full Without Stacktrace: Select this option to capture:
- Exceptions which are explicitly specified from
throwstatements in your scripts (the same as in the Explicitly Thrown Exceptions Only option) - Null 参照
- 範囲外の配列アクセス
- Exceptions which are explicitly specified from
Full With Stacktrace: This option is similar to the earlier option, but it also captures Stack traces. Unity generates these exceptions by embedding checks for them in the code, so this option decreases performance and increases browser memory usage. Only use this for debugging, and always test in a 64-bit browser.