Linux Player 設定
Use the Linux Unity Player settings (menu: Edit > Project Settings > Player) to determine how Unity builds and displays your Linux application. For a description of the general Player settings, refer to Player Settings.

以下のセクションのプロパティが説明されています。
- Icon (アイコン)
- Resolution and Presentation (解像度と表示)
- Splash Image (スプラッシュ画像)
- Other Settings (その他の設定)
Icon
デスクトップゲームにカスタムアイコンを割り当てるには、Override for Windows, Mac, Linux 設定を有効にします。それぞれの四角に合ったさまざまなサイズのアイコンをアップロードできます。
Resolution and Presentation
Use the Resolution and Presentation section to customize aspects of the screen’s appearance in Resolution and Standalone Player Options.
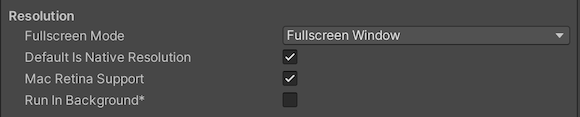
Resolution
Use this section to customize the screen mode and default size.
| プロパティ | 説明 | |
|---|---|---|
| Fullscreen Mode | 全画面のモードを選択します。起動時のデフォルトの画面モードを定義します。 | |
| Fullscreen Window | アプリケーションのウィンドウを、全画面ネイティブディスプレイ解像度に設定し、画面全体を覆うようにします。このモードは、ボーダレスフルスクリーンとも呼ばれます。Unity は、アプリケーションのコンテンツを、スクリプトで設定された解像度 (あるいは、何も設定されていない場合はネイティブディスプレイの解像度) でレンダリングし、ウィンドウいっぱいになるようにスケール (拡大縮小) します。スケール時には、コンテンツが引き伸ばされないように、ディスプレイのアスペクト比に合わせてレンダリング出力に黒帯が追加されます。この処理は レターボックス と呼ばれます。OS のオーバーレイ UI はフルスクリーンウィンドウの上に表示されます (IME 入力ウィンドウなど)。このモードは全てのプラットフォームでサポートされています。 | |
| Exclusive Fullscreen (Windows only) | Set your app to maintain sole full-screen use of a display. Unlike Fullscreen Window, this mode changes the OS resolution of the display to match the app’s chosen resolution. This option is only supported on Windows. | |
| Maximized Window (Mac only) | アプリケーションのウィンドウを、オペレーティングシステムの Maximized の定義に合わせて設定します。macOS では、これは通常、フルスクリーンウィンドウで、メニューバーとドックが非表示の状態です。このオプションは macOS でのみサポートされています。他のプラットフォームでは Fullscreen Window がデフォルト設定です。 | |
| Windowed | アプリケーション画面を、標準の、全画面表示ではない移動可能なウィンドウに設定します。ウィンドウサイズはアプリケーションの解像度に依存します。このモードでは、ウィンドウはデフォルトでサイズ変更可能になっています。Resizable Window 設定でこれを無効にできます。この全画面モードは、全てのデスクトッププラットフォームでサポートされています。 | |
| Default Is Native Resolution | Enable this option to make the game use the default resolution used on the target machine. This option isn’t available if the Fullscreen Mode is set to Windowed. | |
| Default Screen Width | Set the default width of the game screen in pixels. This option is only available if the Fullscreen Mode is set to Windowed. | |
| Default Screen Height | Set the default height of the game screen in pixels. This option is only available if the Fullscreen Mode is set to Windowed. | |
| Mac Retina Support | Mac で高 DPI (Retina) 画面をサポートするには、このオプションを有効にしてください。Unity はこれをデフォルトで有効に設定します。有効にすると Retina ディスプレイのプロジェクトの質が向上しますが、リソースの負荷が若干高くなります。 | |
| Run In background | このオプションを有効にすると、アプリケーションがフォーカスを失った場合に、ゲームが一時停止せず、実行され続けます。 | |
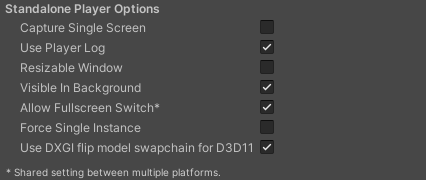
Standalone Player Options
このセクションでは、画面をカスタマイズする設定を行えます。例えば、ユーザーが画面のサイズを変更できるようにするオプションを設定したり、同時に実行可能なインスタンスの数を指定したりすることができます。
| プロパティ | 機能 |
|---|---|
| Capture Single Screen | これを有効にすると、全画面モード のデスクトップゲームで、マルチモニター設定時に補助モニターが暗くならないようにします。Mac OS X ではサポートされていません。 |
| Use Player Log | Enable this option to write a log file with debugging information. Defaults to enabled. Warning: If you plan to submit your application to the Mac App Store, leave this option disabled. For more information, refer to publishing to the Mac App Store. |
| Resizable Window | Enable this option to allow resizing of the Player window. Note: If you disable this option, your application can’t use the Windowed Fullscreen Mode. |
| Visible in Background | これを有効にすると、Windows で Fullscreen Mode オプションの Windowed が使用されている場合に、アプリケーションを背景で表示します。 |
| Allow FullScreen Switch | これを有効にすると、デフォルトの全画面キーを押して全画面のモードと Windowed モードを切り替えることができます。 |
| Force Single Instance | これを有効にすると、デスクトッププレイヤーを 1 つの同時実行インスタンスに制限できます。 |
| Use DXGI flip model swap chain for D3D11 | Use the flip model to ensure best performance for presenting your application. Every time a frame needs to be displayed, Unity makes a copy of the swap chain surface and blits it to the screen buffer. This setting affects the D3D11 graphics API. Disable this option to fall back to the Windows 7-style BitBlt model. When run in Windowed (borderless) full-screen mode, Unity displays the application swap chain directly on the screen, which reduces input latency by one frame and eliminates desktop composition done by the Desktop Window Manager in the same way that exclusive full-screen does. This optimization is known as “Independent Flip.” For more information, refer to PlayerSettings.useFlipModelSwapchain. |
Splash Image
Use the Virtual Reality Splash Image setting to select a custom splash image for Virtual Reality displays. For common Splash Screen settings, visit the Splash Screen page.

Other Settings
Other Settings のセクションでは、以下のグループに分類されたさまざまなオプションをカスタマイズできます。
- Rendering (レンダリング)
- Vulkan Settings (Vulkan 設定)
- Mac App Store Options (Mac App Store オプション)
- Configuration (設定)
- Shader Variant Loading (シェーダーバリアントのロード)
- Shader Variant Loading Settings (シェーダーバリアントのローディング設定)
- Script Compilation (スクリプトのコンパイル)
- Optimization (最適化)
- Stack Trace (スタックトレース)
- Legacy (古い機能)
Rendering
これらの設定を使用して、デスクトップ (Windows、Mac、Linux) プラットフォーム向けにゲームをレンダリングする方法をカスタマイズします。
| Property | Description | |
|---|---|---|
| Color Space | Choose which color space to use for rendering. For more information, refer to Linear rendering overview. | |
| Gamma | Gamma color space is typically used for calculating lighting on older hardware restricted to 8 bits per channel for the framebuffer format. Even though monitors today are digital, they might still take a gamma-encoded signal as input. | |
| Linear | Linear color space rendering gives more precise results. When you select to work in linear color space, the Editor defaults to using sRGB sampling. If your Textures are in linear color space, you need to work in linear color space and deactivate sRGB sampling for each Texture. | |
| Auto Graphics API for Windows | Enable this option to use the best Graphics API for the Windows machine the application runs on. Disable it to add and remove supported Graphics APIs. | |
| Auto Graphics API for Mac | Enable this option to use the best Graphics API for the macOS machine the application runs on. Disable it to add and remove supported Graphics APIs. | |
| Auto Graphics API for Linux | Enable this option to use the best Graphics API for the Linux machine the application runs on. Disable it to add and remove supported Graphics APIs. | |
| color-gamut for Mac | This setting doesn’t apply to Linux. | |
| Static Batching | Enable this option to use static batching. | |
| GPU Skinning | Enable the use of shaders to calculate mesh skinning and blend shapes on the GPU. | |
| Graphics Jobs | Offload graphics tasks (render loops) to worker threads running on other CPU cores. This option reduces the time spent in Camera.Render on the main thread, which can be a bottleneck. |
|
| Lightmap Encoding | Defines the encoding scheme and compression format of the lightmaps. You can choose from Low Quality, Normal Quality, or High Quality |
|
| HDR Cubemap Encoding | Defines the encoding scheme and compression format of the HDR Cubemaps. You can choose from Low Quality, Normal Quality, or High Quality. For more information, refer to Lightmaps: Technical information. |
|
| Lightmap Streaming | Enable this option to use Mipmap Streaming for lightmaps. Unity applies this setting to all lightmaps when it generates them. Note: To use this setting, you must enable the Texture Streaming Quality setting. |
|
| Streaming Priority | Sets the priority for all lightmaps in the Mipmap Streaming system. Unity applies this setting to all lightmaps when it generates them. Positive numbers give higher priority. Valid values range from –128 to 127. |
|
| Frame Timing Stats | Enable this option to gather CPU/GPU frame timing statistics. | |
| Allow HDR Display Output | Activate HDR mode output when the application runs. This only works on displays that support this feature. If the display doesn’t support HDR mode, the game runs in standard mode. | |
| Allow HDR Display Output | Activate HDR mode output when the application runs. This only works on displays that support this feature. If the display doesn’t support HDR mode, the game runs in standard mode. | |
| Use HDR Display Output | Checks if the main display supports HDR, and if it does, swaps to HDR output when the application launches. Note: This option is available only when Allow HDR Display Output is active. |
|
| Virtual Texturing (Experimental) | Enable this option to reduce GPU memory usage and texture loading times if your Scene has many high resolution textures. For more information, refer to Virtual Texturing. Note: The Unity Editor requires a restart for this setting to take effect. |
|
| 360 Stereo Capture | Indicates whether Unity can capture stereoscopic 360 images and videos. For more information, refer to Stereo 360 Image and Video Capture. | |
| Load/Store Action Debug Mode | Highlights undefined pixels that might cause rendering problems on mobile platforms. This affects the Unity Editor Game view, and your built application if you select Development Build in Build Settings. Refer to LoadStoreActionDebugModeSettings for more information. | |
Vulkan Settings
| Property | Description | |
|---|---|---|
| SRGB Write Mode | Enable this option to let the Graphics.SetSRGBWrite() renderer toggle the sRGB write mode during runtime. Use this to deactivate Linear-to-sRGB write color conversion. | |
| Number of swapchain buffers | Set this option to 2 for double-buffering, or 3 for triple-buffering to use with the Vulkan renderer. This setting might help with latency on some platforms, but usually you shouldn’t change this from the default value of 3. Double-buffering might have a negative impact on performance. | |
| Acquire swapchain image late as possible | Enable this to get the backbuffer after the frame renders to an offscreen staging image. Enabling this setting adds an extra blit when presenting the backbuffer. This setting, in combination with double-buffering, can improve performance. However, it also can cause performance issues as the additional blit uses extra bandwidth. | |
| Recycle command buffers | Enable this option to recycle CommandBuffers after Unity executes them. | |
Mac App Store Options
The properties in this section are only relevant to macOS. For more information, refer to macOS Player Settings.
Configuration
| Property | Description | |
|---|---|---|
| Scripting Backend | 使用したいスクリプティングバックエンドを選択します。スクリプティングバックエンドは、Unity がプロジェクトで C# コードをどのようにコンパイルおよび実行するかを決定します。 | |
| Mono | C# コードを .NET 共通中間言語 (CIL) にコンパイルし、その CIL を Common Language Runtime (共通言語ランタイム) を使用して実行します。詳細は Mono を参照してください。 | |
| IL2CPP | C# コードを CIL にコンパイルし、CIL を C++ に変換し、その C++ をネイティブのマシンコードにコンパイルし、これがランタイムで直接実行されます。詳細は IL2CPP を参照してください。 | |
| API Compatibility Level | Choose which .NET APIs you can use in your project. This setting can affect compatibility with third-party libraries. However, it has no effect on Editor-specific code (code in an Editor directory, or within an Editor-specific Assembly Definition). Tip: If you are having problems with a third-party assembly, you can try the suggestion in the API Compatibility Level section below. |
|
| .Net Framework | Compatible with the .NET Framework 4 (which includes everything in the .NET Standard 2.0 profile plus additional APIs). Choose this option when using libraries that access APIs not included in .NET Standard 2.0. Produces larger builds and any additional APIs available aren’t necessarily supported on all platforms. For more information, refer to Referencing additional class library assemblies. | |
| .Net Standard 2.1 | Produces smaller builds and has full cross-platform support. | |
| IL2CPP Code Generation | This setting doesn’t apply for Linux. | |
| C++ Compiler Configuraion | This setting doesn’t apply for Linux. | |
| Use incremental GC | インクリメンタルガベージコレクターを使用します。これは、ガベージコレクションを数フレームにわたって分散させ、フレーム中におけるガベージコレクション関連のスパイクを減らします。詳細は 自動メモリ管理 を参照してください。 | |
| Allow downloads over HTTP | HTTP によるコンテンツのダウンロードを許可するかどうか指定します。デフォルトのオプションは Not allowed です。これは、推奨されるプロトコルが、より安全な HTTPS であるためです。 | |
| Not Allowed | HTTP によるダウンロードを一切許可しません。 | |
| Allowed in Development Builds | HTTP によるダウンロードを、開発ビルドの場合にのみ許可します。 | |
| Always Allowed | 開発ビルドとリリースビルドの両方で、HTTP によるダウンロードを許可します。 | |
| Active Input Handling | Choose how to handle input from users. | |
| Input Manager (Old) | Uses the traditional Input settings. | |
| Input System Package (New) | Uses the Input system. This option requires you to install the InputSystem package. | |
| Both | Use both systems. | |
API Compatibility Level
全てのターゲットに関して Mono の API 互換性レベルを選択できます。サードパーティ製 .NET ライブラリは、.NET 互換性レベル外の機能を使用することもあります。そのような場合に、何が起きているかを理解し、最善の修正方法を把握するためには、以下を試みてください。
- Windows 用 ILSpy をインストールします。
- 問題のある API 互換性レベルの .NET アセンブリを ILSpy にドラッグします。これらは
Frameworks/Mono/lib/mono/YOURSUBSET/の下にあります。 - サードパーティ製のアセンブリをドラッグします。
- サードパーティ製のアセンブリを右クリックし、Analyze を選択します。
- 分析レポートの中で、Depends on セクションを調べます。サードパーティ製品依存でありながら、選択した .NET 互換性レベルで対応しないものはすべてここで赤字でハイライトされます。
Mac Configuration
This section is only relevant to macOS. For more information, refer to macOS Player Settings.
Shader Settings
| プロパティ | 説明 | |
|---|---|---|
| Shader Precision Model | Select the default precision of samplers and the definition of half used in shaders. Select Unified to set the default sampler precision to full precision, and to enable 16-bit floating point operations in shaders on macOS. For more information, refer to ShaderPrecisionModel. |
|
| Strict shader variant matching | シェーダーバリアントがない場合に、エラーシェーダーを使用して、コンソールにエラーを表示します。 | |
| Keep Loaded Shaders Alive | ロードされた全てのシェーダーを保持し、アンロードを防ぎます。 | |
Shader Variant Loading Settings
これらの設定を使用して、ランタイムにシェーダーが使用するメモリの量を制御します。
| プロパティ | 説明 |
|---|---|
| Default chunk size (MB) | 全てのプラットフォームに対して、ビルドされたアプリケーション内に Unity が保存する圧縮シェーダーバリアントデータチャンクの最大サイズを設定します。デフォルトは 16 です。詳細は シェーダーロード を参照してください。 |
| Default chunk count | 全てのプラットフォームに対して、Unity がメモリに保持する解凍チャンク数のデフォルト制限を設定します。デフォルトは 0 で、これは制限がないことを意味します。 |
| Override | このビルドターゲットの Default chunk size と Default chunk count のオーバーライドを有効にします。 |
| Chunk size (MB) | このビルドターゲットの Default chunk size (MB) の値をオーバーライドします。 |
| Chunk count | このビルドターゲットの Default chunk count の値をオーバーライドします。 |
Script Compilation
| プロパティ | 説明 |
|---|---|
| Scripting Define Symbols | カスタムコンパイルフラグを設定します。 詳細は 条件付きコンパイル を参照してください。 |
| Additional Compiler Arguments | 追加的な引数を Roslyn コンパイラーに渡すために、このリストにエントリーを追加します。追加の引数それぞれに対して新しいエントリーを 1 つ使用します。 新しいエントリーを作成するには、Add (+) をクリックしてください。エントリーを削除するには Remove (-) をクリックしてください。 全ての引数を追加し終えたら、Apply をクリックして追加的な引数を未来のコンパイルに含めます。Revert をクリックすると、このリストが最後に適用された状態にリセットされます。 |
| Suppress Common Warnings | C# の警告 CS0169 および CS0649 を表示するかどうかを示します。 |
| Allow ‘unsafe’ Code | 事前に定義されたアセンブリ (例えば Assembly-CSharp.dll) の ‘unsafe’ C# コード をコンパイルするサポートを有効にします。アセンブリ定義ファイル ( .asmdef) の場合、.asmdef ファイルの 1 つをクリックし、表示されたインスペクターウィンドウでオプションを有効にします。 |
| Use Deterministic Compilation | Indicates whether to prevent compilation with the -deterministic C# flag. With this setting enabled, compiled assemblies are byte-for-byte the same each time they’re compiled. For more information, refer to C# Compiler Options that control code generation. |
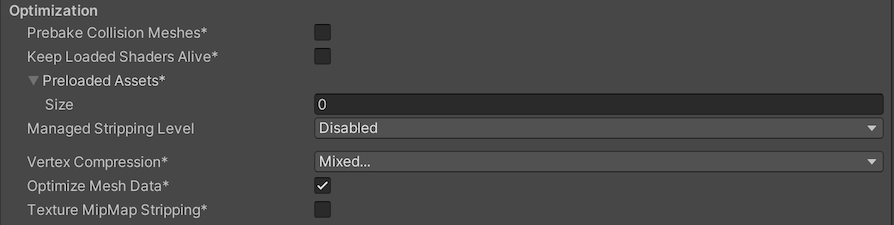
Optimization
| Property | Description | |
|---|---|---|
| Prebake Collision Meshes | Adds collision data to Meshes at build time. | |
| Preloaded Assets | Sets an array of Assets for the player to load on startup. To add new Assets, increase the value of the Size property and then set a reference to the Asset to load in the new Element box that appears. |
|
| Managed Stripping Level | Chooses how aggressively Unity strips unused managed (C#) code. When Unity builds your app, the Unity Linker process can strip unused code from the managed DLLs your Project uses. Stripping code can make the resulting executable smaller, but can sometimes remove code that’s in use. For more information about these options and bytecode stripping with IL2CPP, refer to ManagedStrippingLevel. |
|
| Minimal | Use this to strip class libraries, UnityEngine, Windows Runtime assemblies, and copy all other assemblies. | |
| Low | Remove unreachable managed code to reduce build size and Mono/IL2CPP build times. | |
| Medium | Run UnityLinker to reduce code size beyond what Low can achieve. You might need to support a custom link.xml file, and some reflection code paths might not behave the same. | |
| High | UnityLinker will strip as much code as possible. This will further reduce code size beyond what Medium can achieve but managed code debugging of some methods might no longer work. You might need to support a custom link.xml file, and some reflection code paths might not behave the same. | |
| Vertex Compression | Sets vertex compression per channel. This affects all the meshes in your project. Typically, Vertex Compression is used to reduce the size of mesh data in memory, reduce file size, and improve GPU performance. For more information on how to configure vertex compression and limitations of this setting, refer to Compressing mesh data. |
|
| Optimize Mesh Data | Enable this option to strip unused vertex attributes from the mesh used in a build. This option reduces the amount of data in the mesh, which can help reduce build size, loading times, and runtime memory usage. Warning: If you have this setting enabled, don’t change material or shader settings at runtime. For more information, refer to PlayerSettings.stripUnusedMeshComponents. |
|
| Texture MipMap Stripping | Enables mipmap stripping for all platforms. It strips unused mipmaps from Textures at build time. Unity determines unused mipmaps by comparing the value of the mipmap against the quality settings for the current platform. If a mipmap value is excluded from every quality setting for the current platform, then Unity strips those mipmaps from the build at build time. If QualitySettings.masterTextureLimit is set to a mipmap value that has been stripped, Unity will set the value to the closest mipmap value that hasn’t been stripped. |
|
Stack Trace
各 Log Type に対応するオプションを有効にして、希望のログタイプを選択します。
| プロパティ | 説明 |
|---|---|
| None | ログが記録されません。 |
| ScriptOnly | スクリプト実行時のみログが記録されます。 |
| Full | 常にログが記録されます。 |
詳細は スタックトレースのログ を参照してください。
Legacy
| プロパティ | 機能 |
|---|---|
| Clamp BlendShapes (Deprecated) | Enable this option to clamp the range of blend shape weights in SkinnedMeshRenderers. |
| Capture Startup Logs | Enable this option to retain startup log output for processing by the Logging package, if needed. |