- Unity ユーザーマニュアル
- Unity サービス
- IAP Promo
- Promotions
Promotions
IAP Promotions use ad Placements to target players with precise purchase opportunities tailored to their unique situations. There are three aspects of a Promotion:
- Products (IAP Promo Product Catalogs のドキュメント参照)
- Associated Placements (see documentation on Placements)
- Business logic filters (detailed below)
Create and manage Promotions exclusively from the Developer Dashboard.
Promotion の作成
Create IAP Promotions from the Operate page of the Developer Dashboard. Your active Project appears in the top-left corner. To create a Promotion:
- Select Monetization > IAP Promotions from the left navigation bar. Any existing Promotions appear here.
- Click the ADD NEW PROMOTION button in the top-right corner.

- Enter a Promotion Name, then select SAVE AND CONTINUE to configure it.

Promotion を設定
設定プロセス中は、いつでも作成タイムラインを使って設定したいステップを選択できます。
Product を加える
Click the second step on the creation timeline (Select Product ID(s)) to include Products for your Promotion. Your Project’s Product Catalog appears here. To include a Product, it must have an associated creative asset. Select the eligible Product(s) you wish to include, then click SAVE AND CONTINUE to confirm your selections.

For more information on configuring Products, see documentation on IAP Promo Products.
Note: Placement requests discover a list of all potential Products to show. Selected Products that lack creative assets are ineligible for promotion, and get filtered out. See the Machine learning section of the IAP Promo overview for more information.
Placement の設定
Click the third step on the creation timeline (Select Placement(s)) to choose which Placements can show your Promotion. Your Project’s Placements appear here. To include a Placement, it must be configured to show IAP content. Select the eligible Placement(s) you wish to include, then click SAVE AND CONTINUE to confirm your selections.

ノート: 複数の Placement が 1 つの Promotion をターゲットとすることができ、その逆も可能です。
ビジネスロジックを定義する
Click the fourth step on the creation timeline (Set up Targeting and Scheduling) to define the logic your Promotion uses to target customers.
Specify an active period for the Promotion to run. Check Begin Immediately and No End Date for an indefinite duration, or select the calendar icons to specify a start and end date.

その他のオプション
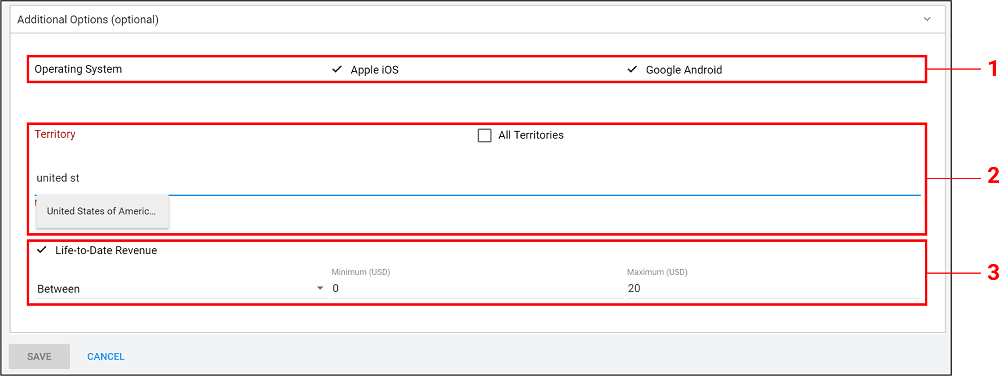
さらにターゲットを絞ったプロモーション戦略については Additional Options メニューを開いてください。
- Operating System は iOS または Android 端末のプレイヤーをフィルタリングします。
- Territory はプレイヤーを国または地域でフィルタリングします。
-
Life-to-Date Revenue filters targeted players by the amount they have spent on in-app purchases for their life-to-date in the game (for example, a Promotion can target non-payers, or players who have spent in excess of $100).
Note: This lever exists

SAVE を選択して、Promotion の設定は完了です。

You can view each Promotion’s number of Attached Products, Attached Placements, Schedule, and Status from the IAP Promotions page. Edit a Promotion at any time by clicking on it.

- 2019–04–11 編集レビュー を行って修正されたページ