- Unity ユーザーマニュアル
- グラフィックス
- グラフィックスの概要
- プロシージャルジオメトリ
- サンプル - ビルボード平面の作成
サンプル - ビルボード平面の作成
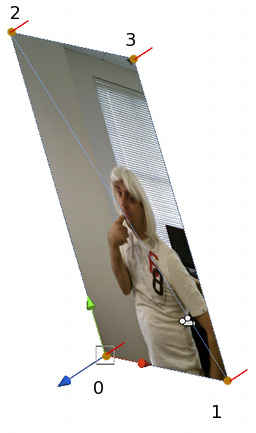
Unity はプリミティブの Plane および Quad オブジェクトにより平面を表現できます(詳細については プリミティブとプレースホルダーオブジェクト のページを参照してください)。ですが、知識として最小限の平面メッシュの作成方法を理解しておくと後々役に立つことがあります。例えば、最小の平面は 4 つの頂点により二つの三角形とその角から構成されます。
最初に頂点の配列を指定します。平面が X 軸 および Y 軸にあるとして、幅と高さをパラメーター変数により決定できるようにします。頂点は、左下、右下、左上、右上の順に指定します。

var vertices: Vector3[] = new Vector3[4];

vertices[0] = new Vector3(0, 0, 0);
vertices[1] = new Vector3(width, 0, 0);
vertices[2] = new Vector3(0, height, 0);
vertices[3] = new Vector3(width, height, 0);

mesh.vertices = vertices;
(メッシュデータプロパティーは裏でコードを実行するため、データを独自の配列の中で指定してプロパティーに割り当てるほうが、配列を要素ごとにアクセスするよりも効率的です。)
次は三角形の順番です。2 つの三角形が必要であり、各々 3 つの整数から定義され、三角形の配列は合計 6 つの要素を持つことになります。角を定義する際に時計回りに並べるルールなので、左下の三角形は 0、2、1 を頂点のインデックスとしてもち、右上の三角形は 2、3、1 になります。
var tri: int[] = new int[6];

//  左下の三角
tri[0] = 0;
tri[1] = 2;
tri[2] = 1;

//  右上の三角
tri[3] = 2;
tri[4] = 3;
tri[5] = 1;

mesh.triangles = tri;
頂点と三角形でセットアップしたメッシュはエディターで見れるようになりますが、法線で正しくシェーディングしないと見栄えは悪くなります。平面の法線は非常に簡単です。頂点と三角形の法線についての考え方は同じであり、法線は平面のローカル座標で負の Z 方向を向きます。法線を追加すると平面は正しくシェーディングされますが、シーンにライトがないとその効果が見られません。
var normals: Vector3[] = new Vector3[4];

normals[0] = -Vector3.forward;
normals[1] = -Vector3.forward;
normals[2] = -Vector3.forward;
normals[3] = -Vector3.forward;

mesh.normals = normals;
最後に、メッシュにテクスチャ座標を追加することでマテリアルを正しく表示します。平面に画像全体を表示すると、UV 値はテクスチャの角に対応してすべて 0 または 1 となります。
var uv: Vector2[] = new Vector2[4];

uv[0] = new Vector2(0, 0);
uv[1] = new Vector2(1, 0);
uv[2] = new Vector2(0, 1);
uv[3] = new Vector2(1, 1);

mesh.uv = uv;
スクリプト全体の例:
var width: float;
var height: float;

function Start() {
    var mf: MeshFilter = GetComponent.<MeshFilter>();
    var mesh = new Mesh();
    mf.mesh = mesh;

    var vertices: Vector3[] = new Vector3[4];

    vertices[0] = new Vector3(0, 0, 0);
    vertices[1] = new Vector3(width, 0, 0);
    vertices[2] = new Vector3(0, height, 0);
    vertices[3] = new Vector3(width, height, 0);

    mesh.vertices = vertices;

    var tri: int[] = new int[6];

    tri[0] = 0;
    tri[1] = 2;
    tri[2] = 1;

    tri[3] = 2;
    tri[4] = 3;
    tri[5] = 1;

    mesh.triangles = tri;

    var normals: Vector3[] = new Vector3[4];

    normals[0] = -Vector3.forward;
    normals[1] = -Vector3.forward;
    normals[2] = -Vector3.forward;
    normals[3] = -Vector3.forward;

    mesh.normals = normals;

    var uv: Vector2[] = new Vector2[4];

    uv[0] = new Vector2(0, 0);
    uv[1] = new Vector2(1, 0);
    uv[2] = new Vector2(0, 1);
    uv[3] = new Vector2(1, 1);

    mesh.uv = uv;
}
もしコードが一回 Start 関数で実行されるとメッシュはゲーム中には変化しないことに注意してください。一方で、Update 関数の中にコードを入れてメッシュを毎フレームごとに変更することも容易です(ただし、CPU オーバーヘッドを著しく増加させます)。