- Unity ユーザーマニュアル
- 2D
- 2D 物理演算リファレンス
- 2D ジョイント
- Slider Joint 2D
Slider Joint 2D
Joint コンポーネントによりゲームオブジェクトが、例えばドアのスライドのように空間上で直線上をスライドする物理挙動に制御されます。オプションによりオブジェクトは受動的に衝突や力の作用によって線上を動くようにできます。さらに能動的にモーターの力によって動かし、直線の一部に位置を制限することもできます。

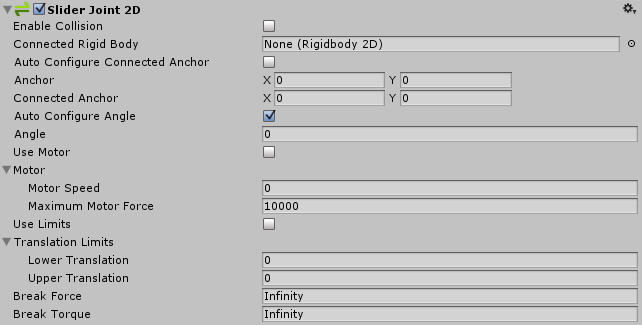
| プロパティ | 機能 |
|---|---|
| Enable Collision | 接続された 2 つのオブジェクトが互いに衝突する場合は、チェックを入れます。 |
| Connected Rigid Body | このジョイントと接続するオブジェクトを指定します。ここを None にすると、Connected Anchor 設定による定義で、ジョイントの一方の端が空間に固定されます。入力欄の右側にあるサークルを選択すると、接続先オブジェクトのリストを見ることができます。 |
| Auto Configure Connected Anchor | 他のオブジェクトとこのジョイントを接続したときに、自動的に位置を固定する場合は、チェックを入れます。 (チェックを入れるのは Connected Anchor とまったく同じ事になります。) |
| Anchor | The place (in terms of X, Y co-ordinates on the RigidBody) where the end point of the joint connects to this object. |
| Connected Anchor | The place (in terms of X, Y co-ordinates on the RigidBody) where the end point of the joint connects to the other object. |
| Auto Configure Angle | Check this box to automtically detect the angle between the two objects and set it as the angle that the joint keeps between the two objects. (By selecting this, you don’t need to manually specify the angle.) |
| Angle | Enter the the angle that the joint keeps between the two objects. |
| Use Motor | Use the sliding motor? Check the box for yes. |
| Motor | |
| Motor Speed | Target motor speed (m/sec). |
| Maximum Motor Force | The maximum force the motor can apply while attempting to reach the target speed. |
| Use Limits | Should there be limits to the linear (straight line) force? Check the box for yes. |
| Translation Limits | |
| Lower Translation | The minimum distance the object can be from the connected anchor point. |
| Upper Translation | The maximum distance the object can be from the connected anchor point. |
| Break Force | Specify the linear (straight line) force level needed to break and so delete the joint. Infinity means it is unbreakable. |
| Break Torque | Specify the torque (rotation) level needed to break and so delete the joint. Infinity means it is unbreakable. |
詳細
有用なすべての 2D ジョイントの背景情報の詳細とヒントは Joints 2D を参照してください。
このジョイントを使用するとオブジェクトをスライドさせることができます。このジョイントの目的は無限にも設定可能な線上の2点の位置を維持することです。その2点は2つの Rigidbody2D コンポーネントにすることも、1つを Rigidbody2D に、もう1つを空間上の固定された位置にすることもできます。( Connected Rigidbody を None にすることで固定された位置に接続します).
ジョイントは繋がっているリジッドボディの両方を線上に維持するために、どちらにもリニアの力を適用します。また、リジッドボディオブジェクトを線に沿って動かすためのリニアの力を適用する疑似リニアモーターも有しています。モーターはオンにもオフにもできます。線は無限ですが、Translation Limits オプションを用いて線分を指定することもできます。
このジョイントには以下のとおり、3つの連立制限が用意されています。
- 2つのリジッドボディオブジェクトからなるアンカーポイント2点で指定される線との相対的な直線距離を維持する。
- 2つのリジッドボディオブジェクトからなる、指定された線に沿った2つのアンカーポイント間の直線速度を維持する(速度は maximum force を用いて制限されます)。
- 指定された線に沿った2点間の直線距離を維持する。
例
このジョイントを用いて、線上で繋がっているかのように反応する必要がある物理オブジェクトを構築することができます。以下はその一例です。
- 上下に移動する床を用意します。床は何かが着地しているときは下に移動しますが、横には移動しません。このジョイントを使えば床が一定の範囲外に出ないようにできます。床を上に動かすにはモーターを使います。
Copyright © 2019 Unity Technologies. Publication 2018.4