Upgrading to Unity 2020.1
ノート: このセクションのアドバイスには、リリース順に従ってください。例えば、プロジェクトを 2018 年から 2020 年にアップグレードする必要がある場合、2020 年のアップグレードガイドを読む前に、2019 年のアップグレードガイドを読んで変更すべき点がないかどうかを確認します。
This page lists changes in the Unity 2020.1 version which might affect existing projects when you upgrade from a 2019 version to 2020.1.
すべてのメッシュの頂点は、UV アンラップのために変換されます
Unity は、プロジェクトにインポートした 3D オブジェクトの Mesh UV を変更する場合があります。
Unity transforms the positions of all imported Mesh vertices to scale in Unity units automatically.
From Unity 2020.1, Unity generates lightmap UVs using the transformed Mesh vertices, if you’ve enabled Generate Lightmap UVs. Previous to Unity 2020.1, Unity generated lightmap UV maps using the original imported Mesh vertex positions, before the automatic position transformation.
UVs generated after the vertex transformation are more accurate to the original shape and scale of your imported object.
アセットバンドルハッシュはすべて異なるため、すべてのバンドルがビルドされます
From Unity 2020.1, Unity generates a different hash for all asset bundles in your project. This ensures all bundles are built, including the ones with the same content but with different loadable paths.
プロジェクトのアップグレードで、multiplayer HLAPI パッケージは自動的にインストールされません
Unity 2020.1 からは、アップグレードするプロジェクトに multiplayer HLAPI を使用するスクリプトがある場合、Package Manager から multiplayer HLAPI パッケージをインストールします。
From Unity 2019.1 to 2019.4, Unity automatically installed the multiplayer HLAPI package when you upgraded a project created in Unity 2018.4 or earlier.
プログレッシブライトマッパーによる LOD ベイクの改善
Unity のプログレッシブライトマッパーは、CPU ライトマッパーと GPU ライトマッパーで構成されています。
Unity 2020.1 から、GPU ライトマッパーは LOD ベイクをサポートします。
The CPU lightmapper uses the same baking algorithm and this allows Unity to fully use all available CPU cores for faster baking times in Scenes with LOD values above 0.
シーンの LOD をアップグレードするには、ベイクされたライトマップを消去して、再生成します。以下のようにこれを行います。
- In the Unity Editor, Open Window > Rendering > Lighting Settings.
- In Debug Settings, click the drop-down menu on the Generate Lighting button, then click Clear Baked Data.
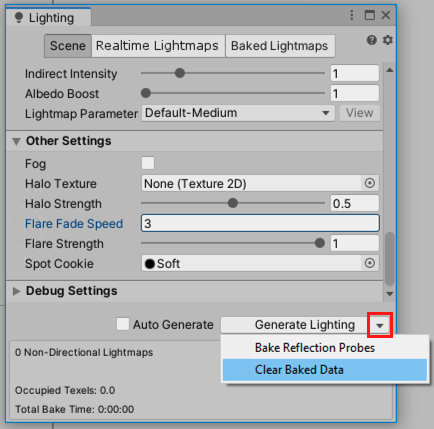
- Click Generate Lighting.
AR/VR Platforms Support
このドキュメントは、Unity 2020 リリースより前のバージョンの Unity を使用する既存の AR/VR プロジェクトをアップグレードするためのガイドを提供します。
プロジェクト設定で AR/VR を有効にする
既存のプロジェクトを Unity 2020 リリース以降にアップグレードする場合、非推奨の XR インテグレーション (以前は Player/XR Settings にあった) は無効になったと通知されます。

AR/VR を有効にするには、Project Settings の XR Plug-in Management を使用し、ターゲットプラットフォームを選択します。

VR
| プラットフォーム | ビルドターゲット | プラグインプロバイダー |
|---|---|---|
| Oculus Quest | Android | Oculus |
| Oculus Rift & Rift S | デスクトップ | Oculus |
| Windows Mixed Reality VR | UWP | Windows Mixed Reality |
拡張現実 (AR)
| プラットフォーム | ビルドターゲット | プラグインプロバイダー |
|---|---|---|
| ARCore デバイス | Android | ARCore |
| ARKit デバイス | iOS | ARKit |
| HoloLens | UWP | Windows Mixed Reality |
| Magic Leap One | Lumin | Magic Leap |
最適なプレイヤー設定を使用する
プロジェクトのレンダリングと品質設定が最適であることを確認してください。以下の表は、ターゲットプラットフォーム別の推奨設定の詳細です。
VR
| プラットフォーム | グラフィックス API | ステレオレンダリングモード |
|---|---|---|
| Oculus Quest | OpenGL ES 3.0 | Multiview |
| Oculus Rift & Rift S | DX11 | シングルパスでインスタンス化 |
| Windows Mixed Reality VR | DX11 | シングルパスでインスタンス化 |
拡張現実 (AR)
| プラットフォーム | グラフィックス API | ステレオレンダリングモード |
|---|---|---|
| ARCore デバイス | OpenGL ES 3.0 | 該当なし |
| ARKit デバイス | Metal | 該当なし |
| HoloLens | DX11 | シングルパスでインスタンス化 |
| Magic Leap One | OpenGL ES 3.2 | シングルパスでインスタンス化 |
ノート: “Single Pass” はレンダリングモードオプションではなくなりました。なぜなら、“Single Pass Instanced” の方がパフォーマンスが高いためです。“シングルパス” から “シングルパスインスタンシング” にアップグレードする場合、プロジェクト内のカスタムシェーダーの更新が必要な場合があります。
レンダーパイプライン
2020.1 では、ビルトインレンダーパイプライン、ユニバーサルレンダーパイプライン、HD レンダーパイプラインがすべてサポートされています。最新のスクリプタブルレンダーパイプラインを使用するメリットはありますが、このアップグレードプロセスでは必須条件ではありません。
Note: If you are using 3rd-party assets and/or custom shaders, you may need to update assets with shaders compatible with “single passed instanced”.
シーンのカメラ
XR Interaction Toolkit を使用する場合、カメラトラッキングの変更は必要ありません。
If you are using a 3rd-party toolkit for camera tracking (OVRCameraRig, etc), make sure you have updated to the latest version. Note that upgrading to latest versions of 3rd-party tools might cause script errors, please reference 3rd-party documentation.
カメラトラッキングに Tracked Pose Driver を使用している場合は、移行に関するガイド を参照してください。
Upgrading 3rd-Party Toolkits
If you are using any toolkits developed by our supported platforms (Oculus Integration package, MRTK, MLTK), make sure you’re using the latest version. Note that upgrading to the latest versions of 3rd-party tools might cause upgrade-related script errors, and you may need to reference corresponding documentation of those toolkits.
よくある質問
Project Settings で XR Plug-in Management をインストールできないのはなぜですか
You may have upgrade-related script errors that need to be fixed before installing XR Plug-in Management.
XR Plug-in Management に OpenVR と Google Cardboard がないのはなぜですか
OpenVR と Google Cardboard XR Plug-in は、それぞれ Valve と Google によって開発保守されています。両プラットフォームのインストール手順のリンクは、Unity の ドキュメント に表示されています。
Unity の入力方式はサポートされていますか
はい、サポートされたプラットフォームのインテグレーションは、Unity の入力システムと互換性があります。
ユニバーサルレンダーパイプラインと HD レンダーパイプラインはサポートされていますか
はい、サポートされたプラットフォームのインテグレーションは、ユニバーサルレンダーパイプラインと HD レンダーパイプラインの両方に対応しています。
Package Manager で XR Interaction Toolkit を表示できないのはなぜですか
The XR Interaction Toolkit is still in preview. To view preview packages in 2020.1, you must enable it using the Package Manager tab in Project Settings. Once enabled, preview packages will be displayed in the Unity Registry of the Package Manager.
私のプロバイダーでは、なぜ Play in Editor が機能しないのですか
Play in Editor への対応は、スタンドアロンサポートがあるプロバイダーに対してのみ機能します。もし、プロバイダーが XR Plug-in Management のプロバイダー選択 UI のスタンドアロンセクションにリストされていない場合、Play in Editor は動作しません。プロバイダーが Play in Editor サポートを行う他の方法をサポートしている可能性がありますので、プロバイダーのドキュメントを確認してください。
“シングルパス”レンダリングモードが使えないのはなぜですか
“シングルパスインスタンシング” のほうがパフォーマンスが高いため、“シングルパス” は 2020.1 ではサポートされなくなりました。プロジェクトで “シングルパス” レンダリングを使用していた場合は、プロジェクトのシェーダーの更新が必要な場合があります。“シングルパス” 用のカスタムシェーダーを使用するサードパーティのライブラリも更新が必要な場合があります。“シングルパス” から “マルチパス” へのアップグレードを選択するとシェーダーは動作します。ただし、最大のパフォーマンスを得るために “シングルパスインスタンシング” をターゲットにすることをお勧めします。
グラフィックス API の設定方法を教えてください
Graphics API is configured in Player settings (“Edit” → “Project Settings” → “Player”).
ステレオレンダリングモードの設定方法を教えてください
レンダリングモードは、Project Settings の XR Plug-in Management でプロバイダー別に設定できます。
XR Settings API を使用した renderScale でエラーが発生するのはなぜですか
renderScale has been removed and replaced with eyeTextureResolutionScale but that has been a script updater task since 2019.3. If you are upgrading from a Unity version prior to 2019.3, you will have to manually replace renderScale with eyeTextureResolutionScale.
XR Interaction Toolkit でコントローラーからの入力 (例えば、ボタン押下) が認識されないのはなぜですか
The headset needs to be detected before any device inputs can be detected. One common issue when testing, is that many people let their headsets rest on a table while debugging their interactions. The controllers won’t get recognized until you wear the headset (or the proximity sensor inside the headset gets activated). If you don’t get any input from your device, put on your headset after starting the app, or cover the proximity sensor.
iPhone の広角カメラは、AR Foundation アプリケーションで使用できますか
ARKit は、カメラの FOV を変更するオプションを提供していません。