- Unity マニュアル (2017.4)
- Unity サービス
- IAP Promo
- IAP Promo のインテグレーション
IAP Promo のインテグレーション
概要
注意: IAP Promo を使用するには、Unity Ads を初期化する前に Unity IAP を初期化する必要があります。
このインテグレーションガイドは 4 つの主要な手順を説明します。
Unity エディター内のプロジェクトの準備
Unity Services の設定
IAP Promo を利用するには、次の設定が必要です。
- プロジェクトの Unity Services の設定
- プロジェクトの Unity IAP SDK (1.2+) と Unity Ads SDK (2.3+) を有効化
Unity IAP の設定
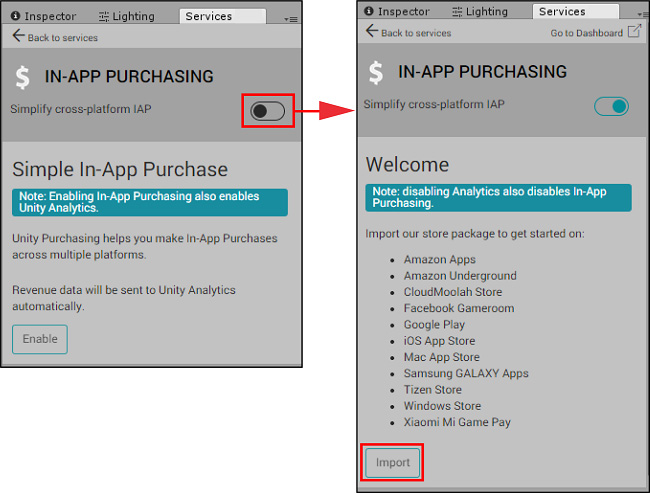
IAP Promo の利用には、これをサポートする Unity IAP SDK (1.17 以上) が必要です。最新の IAP SDK を取得するには Services Window (Window > Services) 内の In-App Purchasing を有効にするか、または、Asset store からインポートしてください。Services Window から有効にする場合は、プロンプトが表示されたら Import をクリックし、アセットパッケージをインポートしてください。

詳細については IAP の設定 を参照してください。
Unity Ads の設定
IAP Promo の利用には、これをサポートする Unity Ads SDK (2.2以上) が必要です。Asset store からインポートして最新の Ads SDK を取得してください。これで Unity Ads は有効になります。
詳細については Unity Ads の設定 を参照してください。
実装
これらの必要な Services が設定されると、ゲームに実装できます。
IAP の実装
IAP の初期化にはコードレスとスクリプティングの2つの選択肢があります。
Codeless IAP を利用する
Codeless IAP は初期化の処理を行います。Codeless IAP の初期化を利用する場合は、Unity Ads の初期化メソッドをコード内で呼び出す必要があります。
Codeless IAP を使うには Product Catalog を入力し、カタログを取得するために IAP Listener を作成します。
エディター内で Window > UnityIAP > IAP Catalog を選択し、*IAP Catalog ウィンドウを開きます。このウィンドウは以前の Products の設定がすべて記載されています。Product Catalog には少なくとも 1 つの Product が設定されている必要があります。Products を設定するための詳しい手順については Codeless IAP のドキュメントを参照してください。
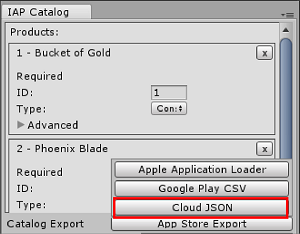
IAP Catalog ウィンドウで App Store Export > Cloud JSON を選択し、Product Catalog のローカルコピーをエクスポートします。

IAP Listener を作成します。Window > Unity IAP > Create IAP Listener を選択し、ゲームの最初のシーンにこれを加えます。このリスナーは Product Catalog をゲーム起動時に取得します。これによって、Product の準備がまだ完了していないのに Promotions がリクエストされるというエラーは回避できます。なぜなら、Codeless のボタンがシーンに表示されないためです。
スクリプトを利用する
Codeless IAP を使用しない場合は、スクリプトを使って 手動で UnityIAP を初期化する 必要があります。以下のコードサンプルを参照してください。
using System.Collections;
using System.Collections.Generic;

using UnityEngine;
using UnityEngine.Events;
using UnityEngine.Purchasing;
using UnityEngine.UI;

public class UnityIAP : MonoBehaviour, IStoreListener
{
    private IStoreController controller;

    private const string product_coins = "100.gold.coins";
    private const string product_hat = "top_hat";
    private const string product_elite = "elite_status";
    private const string product_bundle = "gem_super_box";
    public int coin_count = 0;
    public int gems_count = 0;
    public bool hat_owned = false;
    public bool elite_member = false;

    private void Start()
    {
        Debug.Log("UnityIAP.Init()");

        StandardPurchasingModule module = StandardPurchasingModule.Instance();
        ProductCatalog catalog = ProductCatalog.LoadDefaultCatalog();
        ConfigurationBuilder builder = ConfigurationBuilder.Instance(module);
        IAPConfigurationHelper.PopulateConfigurationBuilder(ref builder, catalog);

        UnityPurchasing.Initialize(this, builder);
    }

    public void OnInitialized(IStoreController controller, IExtensionProvider extensions)
    {
        Debug.Log("UnityIAP.OnInitialized(...)");
        this.controller = controller;

        // 必要に応じて初期化のロジックを加えます
    }

    public void OnInitializeFailed(InitializationFailureReason error)
    {
        Debug.Log("UnityIAP.OnInitializeFailed(" + error + ")");

        // 必要に応じて初期化失敗のロジックを加えます
    }

    public void Buy(string productId)
    {
        Debug.Log("UnityIAP.BuyClicked(" + productId + ")");
        this.controller.InitiatePurchase(productId);
    }

    public void OnPurchaseFailed(Product item, PurchaseFailureReason r)
    {
        Debug.Log("UnityIAP.OnPurchaseFailed(" + item + ", " + r + ")");
    }

    public PurchaseProcessingResult ProcessPurchase(PurchaseEventArgs e)
    {
        string purchasedItem = e.purchasedProduct.definition.id;

        switch (purchasedItem)
        {
            case product_coins:
                Debug.Log("IAPLog: Congratualtions you are richer!");
                coin_count += 100;
                Debug.Log("IAPLog: Coin count: " + coin_count);
                break;

            case product_hat:
                hat_owned = true;
                Button topHatButton = GameObject.Find("buyTopHat").GetComponent<Button>();
                topHatButton.interactable = false;
                topHatButton.GetComponentInChildren<Text>().text = "That hat is dashing!";
                Debug.Log("IAPLog: Hat owned: " + hat_owned);
                break;

            case product_elite:
                elite_member = true;
                Button eliteButton = GameObject.Find("buyElite").GetComponent<Button>();
                eliteButton.interactable = false;
                eliteButton.GetComponentInChildren<Text>().text = "Welcome to Elite Status";
                Debug.Log("IAPLog: Elite member: " + elite_member);
                break;
            case product_bundle:
                gems_count += 5000;
                break;
        }

        return PurchaseProcessingResult.Complete;
    }
}
Unity Ads の実装
Codeless または、手動の IAP 初期化方法、どちらを使うかにかかわらず、Unity Ads の初期化 を行う必要があります。以下のコードサンプルは、初期化メソッドの呼び出し方を示しています。
using System.Collections;
using System.Collections.Generic;

using UnityEngine;
using UnityEngine.Advertisements;
using UnityEngine.Events;
using UnityEngine.Purchasing;
using UnityEngine.UI;

public class AdsManager : MonoBehaviour
{
    #if UNITY_IOS
        private string gameId = "0000000"; // 自分の iOS game ID
    #elif UNITY_ANDROID
        private string gameId = "9999999"; // 自分の Android game ID
    #else
        private string gameId = "0123456"; //  エディターのエラーを避ける
    #endif

    public void Init()
    {
        Debug.Log("UnityAds.Init()");
        if (!Advertisement.isSupported || Advertisement.isInitialized)
        {
            Debug.Log("Could not initialize ads");
            return;
        }

        Debug.Log("Initializing Unity Ads with game ID: " + gameId);
        Advertisement.Initialize(gameId, false);
    }

    public void ShowAdUnit()
    {
        Debug.Log("Unity Ads Log: Ad shown");
        Advertisement.Show("testAdButton"); // 広告の Ad Placement ID
    }

    public void ShowPromo()
    {
        Debug.Log("Unity Ads Log: Promo Shown");
        Advertisement.Show("testPromoButton"); // プロモーションの Ad Placement ID
    }
}
ダッシュボードで Promotions を設定
ダッシュボードの IAP Promo セクション を操作して、IAP Promo の提供を設定します。
- ゲーム内のどこで、どのように Promotions を表示させるかをコントロールするには Placements を使います。
- Product Catalog をインポートして各プロダクトのクリエイティブアセットを管理するには Product のインターフェースを使います。
- プロモーションの実行時、その中に含まれる Placements と Products、ターゲットとするユーザーなど、 Promotions のパラメーターを定義します。
インテグレーションのテスト
以下のサンプコードを使って IAP Promo のコンテンツを呼び出します。
public void ShowPromo()
{
    Advertisement.Show (placementID);
}
エディターの Play を押して、Placement のリクエストによってテスト広告が表示されることを確認します。実際のプロモーションのクリエイティブアセットを見るには、プロダクションモードで実機にゲームをビルドする必要があります。
- 2018–09–10 編集レビュー を行って修正されたページ