Network Lobby Manager
NetworkLobbyManager は特別なタイプの NetworkManager で、マルチプレイヤーゲームの実際のゲームの前の、ロビーを提供します。これを使用してネットワークに以下の設定を行うことができます。
- プレイヤーの最大数
- すべてのプレイヤーが準備完了になったときに自動でゲームを開始
- ゲーム中に他のプレイヤーが参加するのを防ぐオプション
- Couch Multiplayer (各クライアントに複数のプレイヤーを持つこと) のサポート
- ロビーにいる間、プレイヤーがオプションを選択するためのカスタマイズ可能な方法
NetworkLobbyManager のプレイヤーオブジェクトには 2 種類あります。
LobbyPlayer オブジェクト
- プレイヤーごとに存在します。
- クライアント接続時またはプレイヤーが加えられた時に作成されます。
- クライアントが切断されるまで継続します。
- 準備完了フラグと設定データを保持します。
- ロビーでのコマンド処理を行います。
- NetworkLobbyPlayer コンポーネントを使用する必要があります。
GamePlayer オブジェクト
- プレイヤーごとに存在します。
- ゲームシーンの開始時に作成されます。
- ロビーに再入場すると破棄されます。
- ゲーム内のコマンド処理を行います。
プロパティー
| プロパティー | 機能 |
|---|---|
| showLobbyGUI | ロビーに関する開発向けの GUI を表示します |
| maxPlayers | ロビーに入室できるプレイヤーの最大人数 |
| maxPlayersPerConnection | クライアントの接続ごとに追加できるプレイヤーの最大人数 |
| lobbyPlayerPrefab | ロビーに入室したときにプレイヤーとして作成されるプレハブ |
| gamePlayerPrefab | ゲームが開始したときにプレイヤーとして作成されるプレハブ |
| lobbyScene | ロビーで使用されるシーン |
| playScene | ゲーム本体で使用されるシーン |
詳細
- Lobby Player Prefab フィールドには、NetworkLobbyPlayer コンポーネントがアタッチされているオブジェクトを設定する必要があります。
- Lobby Manager には GUI が用意されています。詳細は multiplayer-lobby アセットパッケージを参照してください。
Network Lobby Manager
Network Lobby Manager は特別なタイプの NetworkManager で、マルチプレイヤーゲームのゲーム本体の前に入室する、簡単に使用できるロビーを提供します。
Network Lobby Manager には、マルチプレイヤーゲームに共通する多くのビルトイン機能があります。例えば、最大プレイヤー数の設定、すべてのプレイヤーの準備が完了したときに自動的にゲームを開始する機能、プレイヤーが進行中のゲームに加わることを防ぐオプションをサポートしています。Network Lobby Manager は、複数のプレイヤーが同じクライアントを使用して一緒にプレイする「カウチ」マルチプレイヤーゲームもサポートしています。
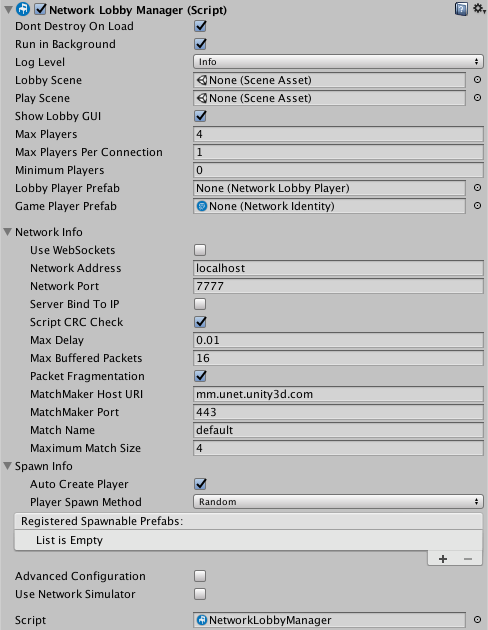
| プロパティー | 機能 |
|---|---|
| Show Lobby GUI | これを有効にするとロビーの開発用の GUI 制御を表示します。これは、開発者の作業用の目的でのみ提供されています。リリースするゲーム用には、プレイヤーが使用するために独自の UI を作成する必要があります。 |
| Max Players | ロビーに入室できるプレイヤーの最大人数 |
| Max Players Per Connection | クライアントの接続ごとに追加できるプレイヤーの最大人数 |
| Min Players | ロビーに必要な最小プレイヤー数 |
| Lobby Player Prefab | ロビーに入室したときにプレイヤーとして作成されるプレハブ |
| Game Player Prefab | ゲームが開始したときにプレイヤーとして作成されるプレハブ |
| Lobby Scene | ロビーで使用されるシーン |
| Play Scene | ゲーム本体で使用されるシーン |
| Network Info | You can expand this section of the inspector to access network-related settings, listed below |
| Use Web Sockets | When running as a host, enable this setting to make the host listen for WebSocket connections instead of normal transport layer connections, so that WebGL clients can connect to it (if you build your game for the WebGL platform). These WebGL instances of your game cannot act as a host (in either peer-hosted or server-only mode). Therefore, for WebGL instances of your multiplayer game to be able to find each other and play together, you must host a server-only instance of your game running in LAN mode, with a publicly reachable IP address, and it must have this option enabled. This checkbox is unticked by default. |
| Network Address | The network address currently in use. For clients, this is the address of the server that is connected to. For servers, this is the local address. This is set to ‘localhost’ by default. |
| Network Port | The network port currently in use. For clients, this is the port of the server connected to. For servers, this is the listen port. This is set to 7777 by default. |
| Server Bind To IP | Allows you to tell the server whether to bind to a specific IP address. If this checkbox is not ticked, then there is no specific IP address bound to (IP_ANY). This checkbox is unticked by default. Use this if your server has multiple network addresses (eg, internal LAN, external internet, VPN) and you want to specific the IP address to serve your game on. |
| Server Bind Address | This field is only visible when the Server Bind To IP checkbox is ticked. Use this to enter the specific IP address that the server should bind to. |
| Script CRC Check | When this is enabled, Unity checks that the clients and the server are using matching scripts. This is useful to make sure outdated versions of your client are not connecting to the latest (updated) version of your server. This checkbox is ticked by default. It does this by performing a (CRC check)[https://en.wikipedia.org/wiki/Cyclic_redundancy_check] between the server and client that ensures the NetworkBehaviour scripts match. This may not be appropriate in some cases, such as when you are intentionally using different Unity projects for the client and server. In most other cases however, you should leave it enabled. |
| Max Delay | The maximum time in seconds to delay buffered messages. The default of 0.01 seconds means packets are delayed at most by 10 milliseconds. Setting this to zero disables HLAPI connection buffering. This is set to 0.01 by default. |
| Max Buffered Packets | The maximum number of packets that a NetworkConnection can buffer for each channel. This corresponds to the ChannelOption.MaxPendingBuffers channel option. This is set to 16 by default. |
| Packet Fragmentation | This allows the NetworkConnection instances to fragment packets that are larger than maxPacketSize, to up a maximum of 64K. This can cause delays in sending large packets. This checkbox is ticked by default. |
| MatchMaker Host URI | The host address for the MatchMaker server. By default this points to the global Unity Multiplayer Service at mm.unet.unity3d.com, and usually you should not need to change this. Unity automatically groups players of your game into regional servers around the world, which ensures fast multiplayer response times between players in the same region. This means, for example, that players from Europe, the US, and Asia generally end up playing with other players from their same global region. You can override this value to explicitly control which regional server your game connects to. You might want to do this via scripting if you want to give your players the option of joining a server outside of their global region. For example, if “Player A” (in the US) wanted to connect to a match created via matchmaker by “Player B” (in Europe), they would need to be able to set their desired global region in your game. Therefore you would need to write a UI feature which allows them to select this. See API reference documentation on NetworkMatch.baseUri for more information, and for the regional server URIs. |
| MatchMaker Port | The host port for the Matchmaker server. By default this points to port 443, and usually you should not need to change this. |
| Match Name | Define the name of the current match. This is set to “default” by default. |
| Maximum Match Size | Define the maximum number of players in the current match. This is set to 4 by default. |
| SpawnInfo | You can expand this section of the inspector to access spawn-related settings, listed below |
| Player Prefab | Define the default prefab Unity should use to create player GameObjects on the server. Unity creates Player GameObjects in the default handler for AddPlayer on the server. Implement (OnServerAddPlayer)[https://docs.unity3d.com/ScriptReference/Networking.NetworkManager.OnServerAddPlayer.html] to override this behaviour. |
| Auto Create Player | Tick this checkbox if you want Unity to automatically create player GameObjects on connect, and when the Scene changes. This checkbox is ticked by default. Note that if you are using the MigrationManager and you do not enable Auto Create Player, you need to call ClientScene.SendReconnectMessage when your client reconnects. |
| Player Spawn Method | Define how Unity should decide where to spawn new player GameObjects. This is set to Random by default. |
| Random | Choose Random to spawn players at randomly chosen startPositions. |
| Round Robin | Choose Round Robin to cycle through startPositions in a set list. |
| Registered Spawnable Prefabs | Use this list to add prefabs that you want the Network Manager to be aware of, so that it can spawn them. You can also add and remove them via scripting. |
| Advanced Configuration | Tick this checkbox to reveal advanced configuration options in the Network Manager Inspector window. |
| Max Connections | Define the maximum number of concurrent network connections to support. This is set to 4 by default. |
| Qos Channels | A list containing the different communication channels the current Network Manager has, and the Quality Of Service (QoS) setting for each channel. Use this list to add or remove channels, and adjust their QoS setting. You can also configure the channels via scripting. For the descriptions of each QoS option, see QosType. |
| Timeouts | |
| Min Update Timeout | Set the minimum time (in milliseconds) the network thread waits between sending network messages. The network thread doesn’t send multiplayer network messages immediately. Instead, it check each connection periodically at a fixed rate to see if it has something to send. This is set to 10ms by default. See API reference documentation on MinUpdateTimeout for more information. |
| Connect Timeout | Define the amount of time (in milliseconds) Unity should wait while trying to connect before attempting the connection again. This is set to 2000ms by default. See API reference documentation on ConnectTimeout for more information. |
| Disconnect Timeout | The amount of time (in milliseconds) before Unity considers a connection to be disconnected. This is set to 2000ms by default. See API reference documentation on DisconnectTimeout for more information. |
| Ping Timeout | The amount of time (in milliseconds) between sending pings (also known as “keep-alive” packets). The ping timeout duration should be approximately one-third to one-quarter of the Disconnect Timeout duration, so that Unity doesn’t assume that clients are disconnected until the server has failed to receive at least three pings from the client. This is set to 500ms by default. See API reference documentation on ConnectionConfig.PingTimeout for more information. |
| Global Config | These settings relate to the Reactor. The Reactor is the part of the multiplayer system which receives network packets from the underlying operating system, and passes them into the multiplayer system for processing. |
| Thread Awake Timeout | The timeout duration in milliseconds, used by the Reactor. How the Reactor uses this value depends on which Reactor Model you select (see below). This is set to 1ms by default. |
| Reactor Model | Choose which type of reactor to use. The reactor model defines how Unity reads incoming packets. For most games and applications, the default Select reactor is appropriate. If you want to trade a small delay in the processing of network messages for lower CPU usage and improved battery life, use the Fix Rate reactor. |
| Select Reactor | This model uses the select() API which means that the network thread “awakens” (becomes active) as soon as a packet is available. Using this method means your game gets the data as fast as possible. This is the default Reactor Model setting. |
| Fix Rate Reactor | This model lets the network thread sleep manually for a given amount of time (defined by the value in Thread Awake Timeout) before checking whether there are incoming packets waiting to be processed. |
| Reactor Max Recv Messages | Set the maximum number of messages stored in the receive queue. This is set to 1024 messages by default. |
| Reactor Max Sent Messages | Set the maximum number of messages stored in the send queue. This is set to 1024 messages by default. |
| Use Network Simulator | Tick this checkbox to enable the usage of the network simulator. The network simulator introduces simulated latency and packet loss based on the following settings: |
| Simulated Average Latency | The amount of delay in milliseconds to simulate. |
| Simulated Packet Loss | The amount of packet loss to simulate in percent. |