Select colors and color gradients
The InspectorA Unity window that displays information about the currently selected GameObject, asset or project settings, allowing you to inspect and edit the values. More info
See in Glossary window displays color properties as swatches. The swatch:
- Shows the current color.
- Shows the transparency as a slider under the color.
- Acts as a button to open the Color window.
Color window types
The Unity Editor opens the type of Color window that matches the property you’re editing. The window can be one of three types:
- Single color: Used for most color properties.
- High Dynamic Range (HDR) color: For example, for the emission color in the standard shader. For more information, refer to the HDR color picker reference.
- Gradient: For example, for the color over lifetime in the Particle SystemA component that simulates fluid entities such as liquids, clouds and flames by generating and animating large numbers of small 2D images in the scene. More info
See in Glossary.
Select a color
To select a color, use the color wheel, the sliders or text fields, or the eyedropper tool.
Pick a color from the color wheel
The color wheel represents the full color spectrum. To select a color, click anywhere on the circle.
The square at the center of the circle is a zoomed-in view of the color wheel. Use it to fine-tune the color you selected in the wheel.
To set the transparency (the Alpha value), use the A slider.
Enter values or use the sliders
The sliders and entry fields in the color picker window let you enter color values in different formats:
- RGB
0-255 - RGB
0-1.0 - HSV
All three options have an alpha (A) slider for transparency.
You can enter exact values in the fields, or use the sliders to change the values.
Use the Hexadecimal field to enter a color value in hexadecimal format.
Use an existing color with the eyedropper tool
To use an existing color, sample it with the eyedropper tool:
- Click the eyedropper.
- Click on a pixelThe smallest unit in a computer image. Pixel size depends on your screen resolution. Pixel lighting is calculated at every screen pixel. More info
See in Glossary to select its color. You can use any pixel, in or outside of the Unity Editor.
Tip: The eyedropper is also available in the Inspector window, so you can use it without opening the Color window.
Return to the previous color
The Color window has two swatches. One shows the color before you edited it, and the other shows the current selection.
To reset your selection to the original color, click the original color swatch.
Create swatch presets and libraries
You can save your color swatch selections as presets, and organize them into libraries.
Save a swatch preset
In the Swatches section, the last swatch in the list is a representation of your current edit. To save the color as a preset:
- Click the last swatch in the list.
- Enter a name for the preset.
Manage a swatch preset
To delete a preset, right-click it and select Delete.
To replace a preset, right-click it and select Replace. This saves your current color selection to the preset.
To rearrange the swatches, drag them to a new position in the list.
Create and manage swatch libraries
You can save your swatch presets to one or more libraries, and move between your library and the default library. Use the More (⋮) menu to create and move between libraries.
Use a gradient
A gradient moves from one color to another over time or space. The transition can be gradual, with the colors blending into each other, or as steps between color blocks.
The Gradient Editor is available only for properties that set up to use gradients rather than single colors. For example:
- The Particle System uses gradients to change particle color over their lifetime.
- The Line RendererA component that takes an array of two or more points in 3D space and draws a straight line between each one. You can use a single Line Renderer component to draw anything from a simple straight line to a complex spiral. More info
See in Glossary uses gradients to change the color of the line along its length.
You can’t change a single color property to a gradient property in the Inspector window, but you can use a script to override the property. For more information, refer to Gradient class.
Use the Gradient Editor
To open the Gradient Editor, click the color swatch in the Inspector window.

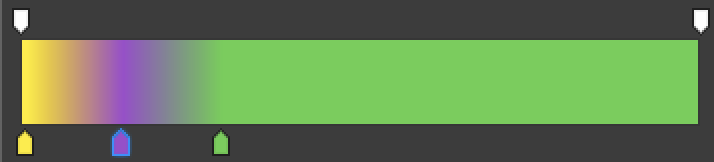
The Gradient Editor controls both the colors and transparency of the gradient. The gradient bar shows the colors and how they blend, as determined by the interpolation mode. The color stops are upward-pointing markers, and the transparency stops are downward-pointing markers.
Gradient types
Every gradient has both color and transparency settings. With these settings, you can create four types of gradients:
- Two or more colors with a transparency gradient.
- Two or more colors with a fixed transparency.
- A single color with a transparency gradient.
- A single color with a fixed transparency. Use this if you don’t want to change the color, but also don’t want to override the gradient property with a script.
Select colors
A gradient has two color stops by default, but you can:
- Add stops for a more complex gradient.
- Set both stops to the same color to avoid blending between colors.
The color stops are upward-pointing markers along the bottom of the gradient bar. Click a stop to select it, or click under the bar to add a stop, and then:
- To change the color:
- Select the color swatch to edit the color using a standard Color window. Note that the Color window for gradient stops doesn’t have an alpha slider, because the gradient itself handles transparency.
- Use the eyedropper tool to sample a color value. Click the eyedropper button, then click anywhere on the screen. Unity sets the color property to the color of the pixel you clicked.
- To move the stop, drag it along the bar, or enter a new value in the Location field.
- To delete a stop, drag it out of the gradient bar.
Color interpolation happens only between the stops. To start or end a gradient with a solid color, move the first or last stop away from the gradient’s edge.
Tip: You can undo changes one by one, or you can save your start gradient as a preset before editing it.
Set transparency
The transparency stops are downward-pointing markers along the top of the gradient bar. The stop’s color ranges from white to black to indicate the level of transparency.
The default gradient has two transparency stops set to 100% alpha, making the gradient fully opaque. You can:
- Edit a stop to adjust the transparency.
- Add stops to change the transparency at different points in the gradient.
You can edit and add transparency stops the same way you edit and add color stops. When you select a transparency stop, the color swatch changes to a transparency slider.
Transparency in the fixed mode isn’t interpolated between stops. It forms a block of fixed transparency to the left of each stop, and isn’t applied to the right of that stop. However, the transparency blocks don’t have to align with the color blocks within the gradient. You can change the transparency multiple times within a color block, or use a single transparency across multiple color blocks.
Select an interpolation mode
A gradient can use one of three color interpolation modes:
- Classic blend: A linear interpolation between stops.
- Perceptual blend: A perceptually uniform Oklab color space to interpolate between stops. This creates smoother transitions between colors, with smaller differences in brightness, when compared to the classic mode.
- Fixed: No interpolation between stops. This creates a set of color blocks. You can still change transparency within and between blocks.
The images show the three color modes. Note that the gradient in the classic mode has sharper transitions between colors than the perceptual mode.


Create gradient presets and libraries
Presets save both the color values and the transparency values you’re using. Any preset you save is available in the Gradient Editor for any gradient property in your project.
The Presets section previews the gradient as the next preset on the list, and it changes as you edit. To save a preset from your current edit, click New on the preview preset.
To use a preset, click it. Any changes you make then create a new preset that you can save. To save your changes to the original preset, right-click the preset and select Replace.
Tip: You can create a preset from the default gradient, so you can always return to it.
You can save your presets to one or more libraries, and move between your library and the default library. Use the More (⋮) menu to create and move between libraries.