Troubleshooting Light Probes
Ringing
Under certain circumstances, Light Probes exhibit an unwanted behaviour called “ringing”. This often happens when there are significant differences in the light surrounding a Light ProbeLight probes store information about how light passes through space in your scene. A collection of light probes arranged within a given space can improve lighting on moving objects and static LOD scenery within that space. More info
See in Glossary. For example, if you have bright light on one side of a Light Probe, and no light on the other side, the light intensity can “overshoot” on the back side. This overshoot causes a light spot on the back side.

There are several ways to deal with this:
- In the Light Probe Group component, enable Remove Ringing. Unity automatically removes the unintended light spots. However, this generally makes the Light Probes less accurate, and reduces light contrast, so you must check the visual results.
- Place in-game obstacles in such a way that players can’t get to a position where they can see the light spot.
- Avoid baking direct light into Light Probes. Direct light tends to have sharp discontinuities (such as shadow edges), which makes it unsuitable for Light Probes. To only bake indirect light, use Mixed lighting.
Troubleshooting Light Probe placement
Your choice of Light Probe positions must take into account that the lighting is interpolated between sets of Light Probes. Problems can arise if your Light Probes don’t adequately cover the changes in lighting across your SceneA Scene contains the environments and menus of your game. Think of each unique Scene file as a unique level. In each Scene, you place your environments, obstacles, and decorations, essentially designing and building your game in pieces. More info
See in Glossary.
The example below shows a night-time Scene with two bright street lamps on either side, and a dark area in the middle. If Light Probes are only placed near the street lamps, and none in the dark area, the lighting from the lamps “bleeds” across the dark gap, on moving objects. This is because the lighting is being interpolated from one bright point to another, with no information about the dark area in-between.

If you are using Realtime or Mixed lights, this problem may be less noticeable, because only the indirect light bleeds across the gap. The problem is more noticable if you are using fully baked lightsLight components whose Mode property is set to Baked. Unity pre-calculates the illumination from Baked Lights before runtime, and does not include them in any runtime lighting calculations. More info
See in Glossary, because in this situation the direct light on moving objects is also interpolated from the Light Probes. In this example Scene, the two lamps are baked, so moving objects get their direct light from Light Probes. Here you can see the result.

This is an undesired effect - the ambulance remains brightly lit while passing through a dark area, because no Light Probes were placed in the dark area.
To solve this, you should place more Light Probes in the dark area, as shown below:

Now the Scene has Light Probes in the dark area too. As a result, the moving ambulance takes on the darker lighting as it travels from one side of the Scene to the other.

Troubleshooting Light Probe noise
In the following example, both images are scenes lit by using the same lighting settings except for the Light Probe Sample Multiplier value. The scene on the left is when you set Light Probe Sample Multiplier to 1, which cause the light probes to not be homogenous and causes noise in the scene. In the right image, you can mitigate the issue by setting the Sample Multiplier to 32.
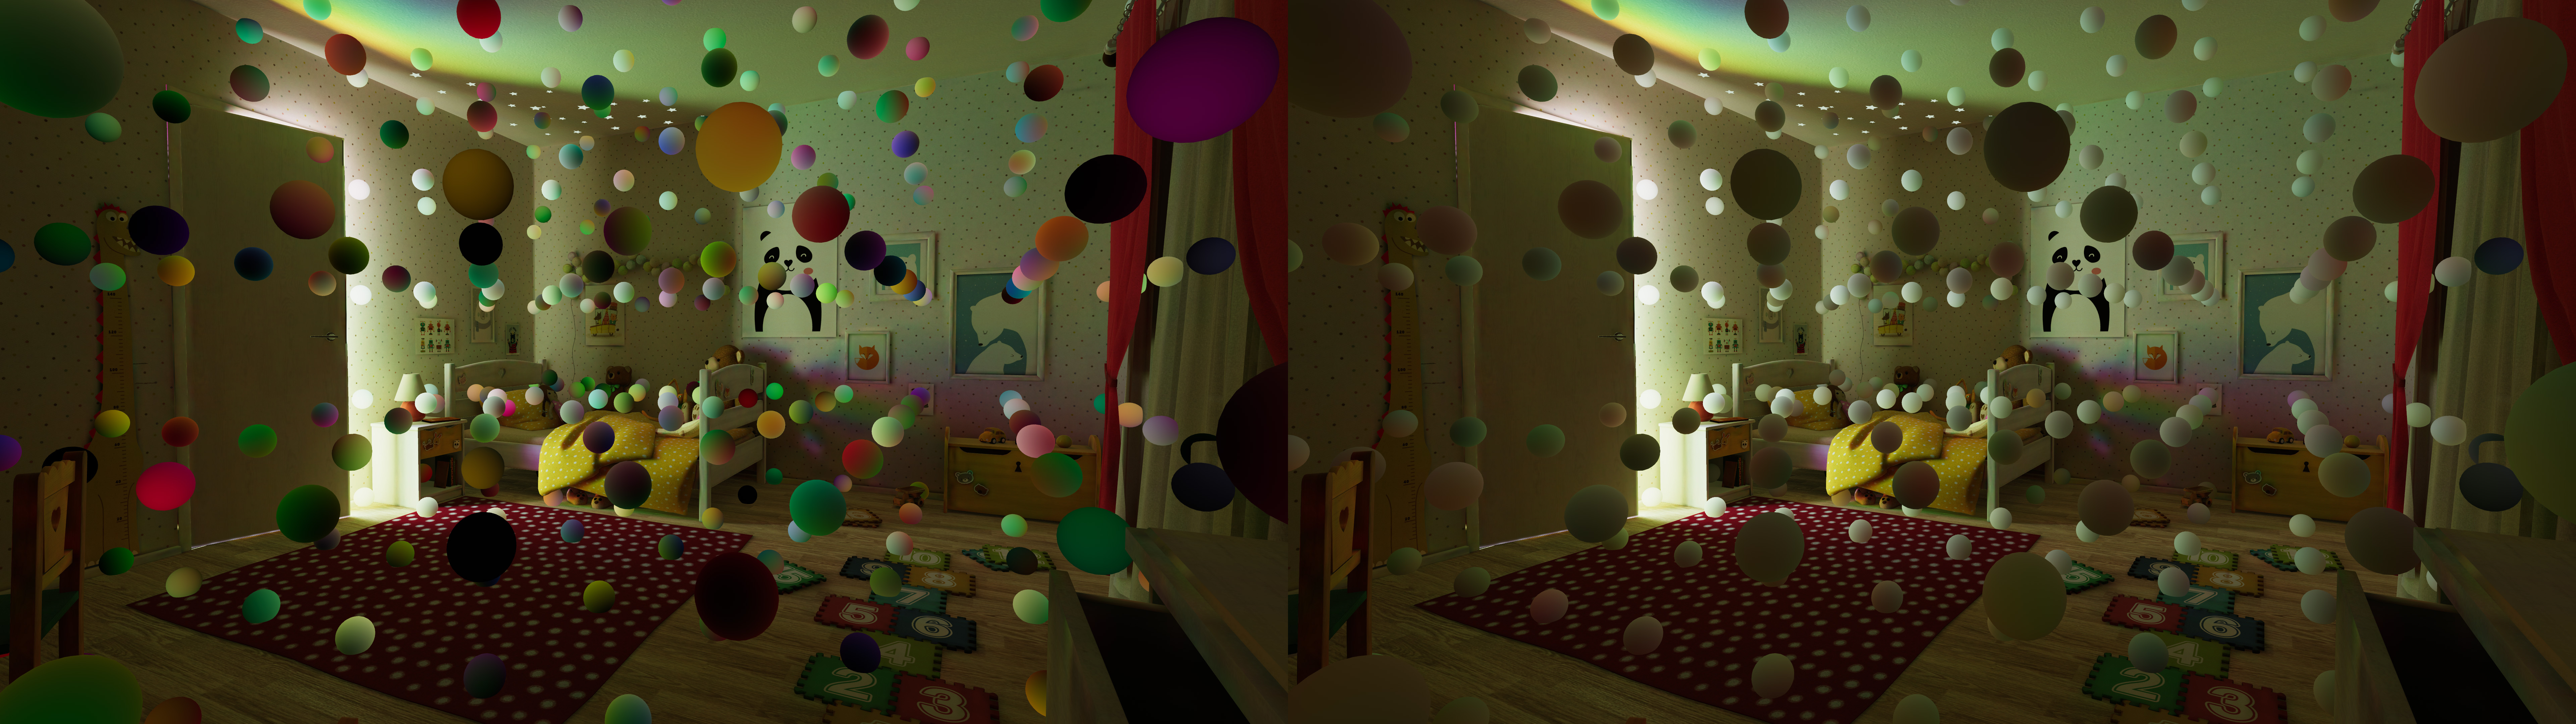
Cause
In scenes with a lot of indirect noise, probe-lit objects can exhibit flickering as they traverse through the environment. The cause is inadequate sample counts used by light probes. As a result, adjacent light probes will appear to have varying lighting information, when they should appear homogenous.
This also applies to Light Probe Groups and Adaptive Probe Volumes.
Resolution
You can mitigate this issue by tweaking the Light Probe Sample Multiplier value. The Light Probe Sample Multiplier acts as a general multiplier for Direct, Indirect, and Environment sample counts. The higher the multiplier, the more samples light probes will receive. This will improve their visual quality at a slight expense of baking time.
If the Light Probe Sample Multiplier property isn’t available in the Lighting window, navigate to Project Settings > Editor > Graphics and disable the Use legacy Light Probe sample counts checkbox.
Troubleshooting redundant Light Probes
In the following example, the image on the left contains light probes from an unloaded scene, while the right image shows how the scene should look like after the redundant light probes are removed by calling LightProbes.TetrahedralizeAsync upon loading a new scene.
Note: LightProbes.TetrahedralizeAsync only applies if you use Light Probe GroupsA component that enables you to add Light Probes to GameObjects in your scene. More info
See in Glossary to place the Light Probes, and does not apply to Adaptive Probe Volumes.
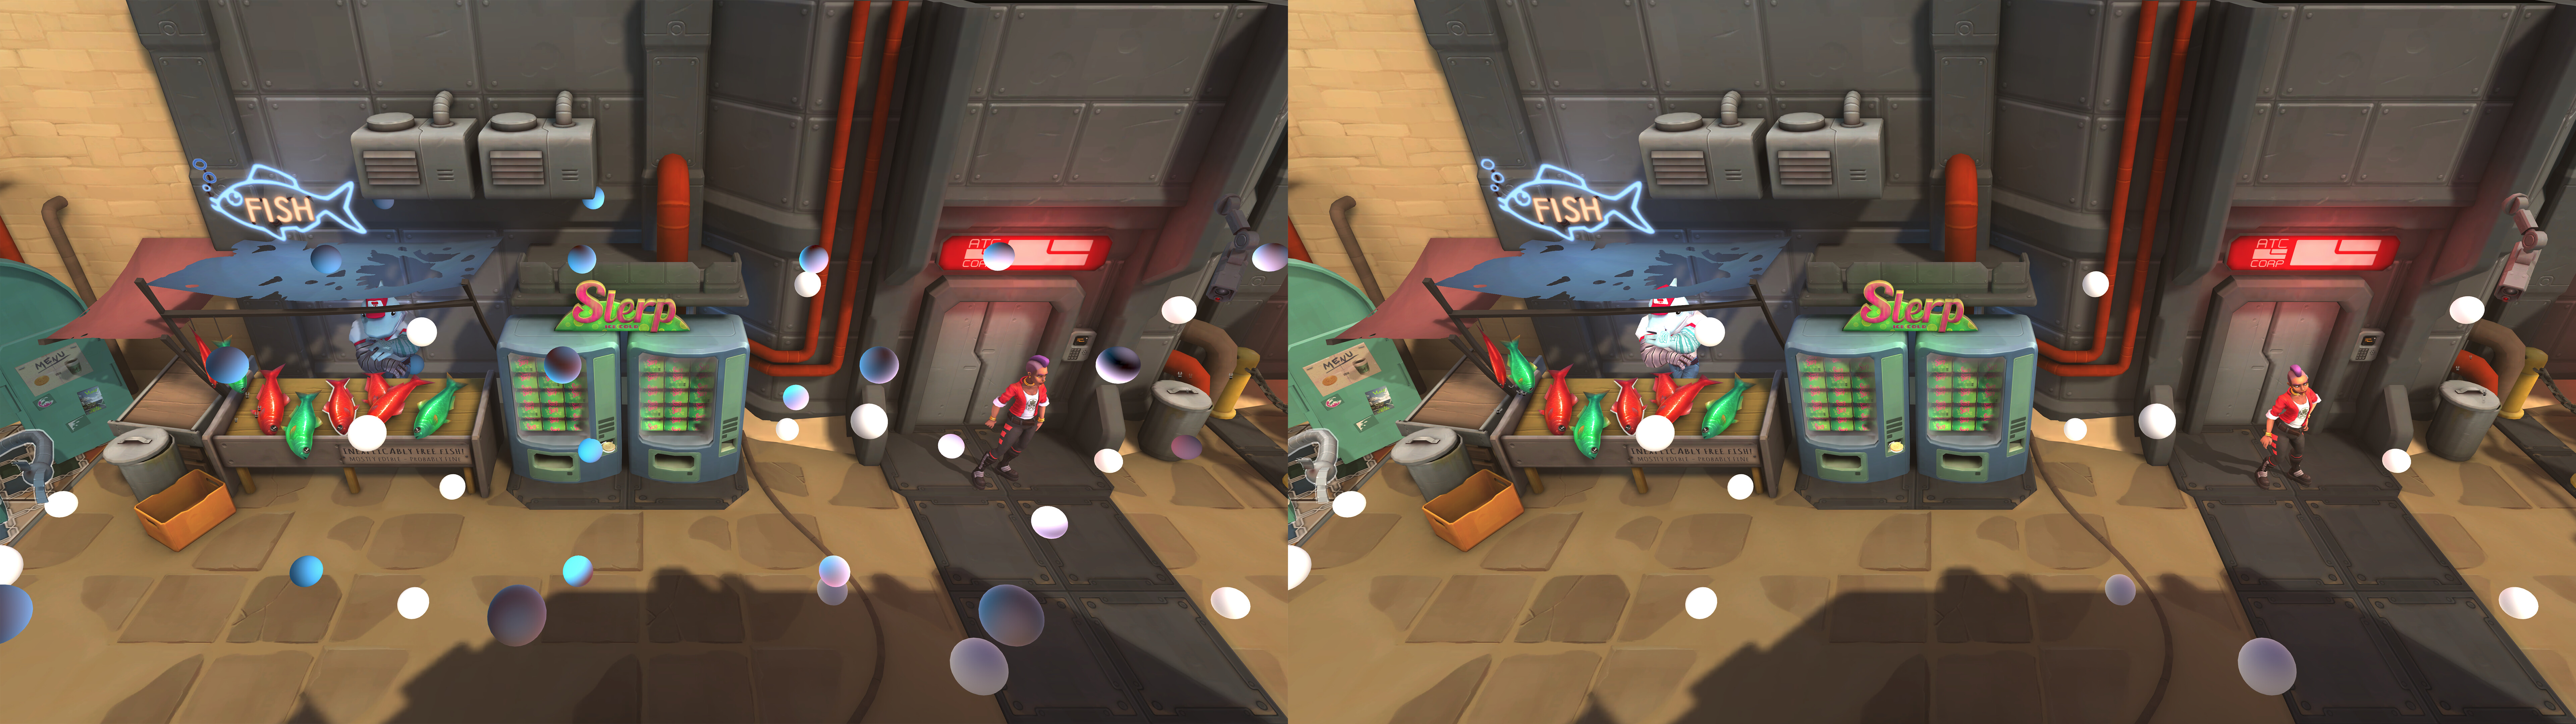
Cause
Unity uses tetrahedral space mapping to determine which light probes to use for illuminating dynamic GameObjectsThe fundamental object in Unity scenes, which can represent characters, props, scenery, cameras, waypoints, and more. A GameObject’s functionality is defined by the Components attached to it. More info
See in Glossary. When loading and unloading scenes containing light probes, it’s important to recalculate the tetrahedral mapping. If this fails, it will result in the incorrect shading for probe-lit objects.
Resolution
You can adjust the level design of the scene or use the additive loading approach to avoid issues with redundant or overlapping probes,
The following example is from the Additive Loading Lighting Examples project. This project setup ensures that there will be a seamless lighting transition when loading and unloading the scenes.

- The Persistent Scene has the blue room, and some probe-lit objects. It has no light probes. This scene is always loaded and will act as a transitional area.
- Scene A has a green corridor, and some probe-lit objects. It has a light probe group that envelops Scene A and the Persistent Scene. This scene is additively loaded on demand.
- Scene B has a red corridor, and some probe-lit objects. It has a light probe group that envelops Scene B and the Persistent Scene. This scene is additively loaded on demand.
To learn more about additive lighting, please refer to the Additive Loading Lighting Examples project in the Unity Asset StoreA growing library of free and commercial assets created by Unity and members of the community. Offers a wide variety of assets, from textures, models and animations to whole project examples, tutorials and Editor extensions. More info
See in Glossary.
Light probe leaking
Light probe leaking occurs when a probe from a bright area affects an object in a dark area, or vice versa. This issue is most noticeable near walls or other occluding geometry when the probe density is insufficient.
Symptoms
Objects lit by light probes appear too bright or too dark compared to their surroundings. This issue often occurs in enclosed spaces, such as rooms or shaded areas, where light is expected to be blocked but instead leaks in.

Cause
Light probe leaking occurs when the interpolation of light probe data incorrectly assigns lighting from one area to another due to low probe density.
This issue commonly arises in scenes with a sparse Light Probe Group. For example, in a bright outdoor environment, a probe-lit object in a shaded area can incorrectly sample lighting from a nearby bright probe, making it appear out of place.
Resolution
To resolve light probe leaking in Light Probe Groups, do the following.
Increase light probe density
To increase light probe density, do the following:
- Add more light probes around the affected object to improve accuracy.
- If the issue is noticeable near walls, place dense probe clusters along them.
- To help reduce light leaking, place a buffer of two probes on each side of a wall.
Refer to Place Light Probes with the Editor.
Adjust the Anchor Override property
By default, Unity determines which light probes to sample using the center of the GameObject’s bounding box, which can cause incorrect lighting in sparse probe networks.
To adjust the Anchor Override property, do the following:
- Set the Anchor Override property in the Mesh RendererA mesh component that takes the geometry from the Mesh Filter and renders it at the position defined by the object’s Transform component. More info
See in Glossary component. - Assign an existing GameObject or create an empty one to act as an anchor point.
Use Light Probe Proxy Volumes (LPPVs)
The Light Probe Proxy Volume (LPPV) component places probes at a custom density within a GameObject’s bounding box.
Use LPPVs sparingly, as they increase the computational load at runtime.