Building and running a WebGL project*
WebGL プロジェクトを ビルド すると、以下のファイルを含むフォルダーが Unity 内に作成されます。
index.html ファイル。ブラウザーでコンテンツをロードするために使用されます。
A Development or Release folder containing your generated build output files (which folder depends on whether you do a development build or not).
A TemplateData folder (at least when building with the default template), containing the loading bar and other template assets. See the User Manual page on WebGL templates for more information.
The Development or Release folder contains the following files (the MyProject file name represents the name of your project). (Note that if you make a release build, files in this folder are compressed and have a .gz suffix. See the comments on Distribution size below.)
A MyProject.js JavaScript file containing the code for your player.
A MyProject.mem file containing a binary image to initialize the heap memory for your player.
A MyProject.data file containing the asset data and scenes.
A UnityLoader.js file containing the code needed to load up the Unity content in the web page.
index.html ファイルを開くだけで、多くのブラウザーで直接 WebGL プレイヤーを表示できます。セキュリティ上の理由により、Chrome ではローカルの file: URL から開いたスクリプトに対して制限を設けているため、この方法は使えません。Unity の Build & Run コマンド(menu: File > Build & Run )を使っていれば、ファイルは一時的にローカルのウェブサーバーにホストされ、localhost URL から開かれます(これによりセキュリティ上の制限を回避することができます。)。また、Chrome を --disable-web-security オプション付きで起動することで file: の URL で開くことができるようになります。
On some servers you need to make .mem and .data files accessible because the server needs to provide these files to clients.
ビルドのプレイヤーオプション
Build Settings ウィンドウ ( File > Build Settings…) で WebGL オプションにアクセスします。Platform リストから WebGL を選択してから Player Settings… を選択します。
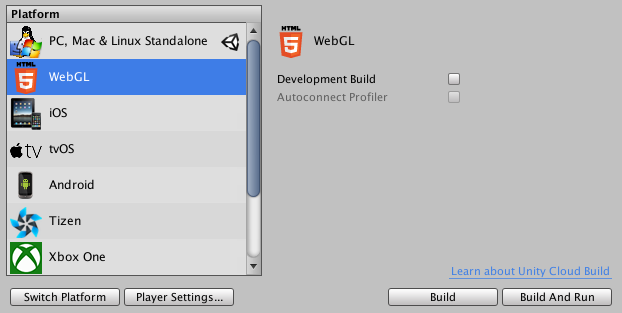
Development Build
Development Build チェックボックスをチェックすると、プロファイラーサポートとエラーを見るためのデベロッパーコンソールが含まれる開発ビルドが生成されます。また、開発ビルドはコンテンツを圧縮しません (つまり、コンテンツは 縮小 されません)。開発ビルドでは JavaScript を人間が読める形式で維持し、関数名を保存して、エラーの有用なスタックトレースを取得できます。ただし、このことは開発ビルドが非常に大きく、配布するには大きすぎることを意味します。
Use pre-built Engine
This option only appears when you have the Development Build checkbox checked. Use the Use pre-built Engine option in the Build Settings dialog box to speed up build iteration time during development. When this option is enabled, Unity rebuilds only the managed code and then links dynamically with the pre-build Unity engine, so the project is rebuilt approximately 30–40% faster. Note that this type of build is only suited for development purposes, as it always produces unstripped engine code. Also, due to the dynamic linking overhead, the performance of this type of build is slower than a normal build.
Autoconnect Profiler
このオプションは、Development Build チェックボックスがチェックされているときにのみ使用できます。Autoconnect Profiler オプションを有効にすると、Unity WebGL コンテンツがプロファイルされます。WebGL の場合、他のプラットフォームのように プロファイラー を実行中のビルドに接続することはできません。そのため、コンテンツをエディターに接続するにはこのオプションを使用する必要があります。これは、プロファイラーの接続は WebGL 上の WebSocket を使用して処理されるためです。ただし、ウェブブラウザーはコンテンツからの発信接続のみを許可します。
Player Settings
WebGL には、PlayerSettings ウィンドウ (Edit > Project Settings > Player) にいくつか追加オプションがあります。
Other Settings

Strip Engine Code
Strip Engine Code オプションにアクセスするには Other Settings を開きます。 このオプションはデフォルトでチェックされており、WebGL のコードストリップを有効にしています。このオプションをチェックすると、使用しないクラスのコードは含まれません。例えば、物理関連のコンポーネントや機能を使用しない場合は、物理エンジン全体がビルドから削除されます。 詳細は、後述の「ストリップ」のセクションを参照してください。
Publishing Settings

WebGL の Memory Size
Open Publishing Settings to access the WebGL Memory Size field. Here, you can specify how much memory (in MB) the content should allocate for its heap. If this value is too low, you will get “out of memory” errors. This means your loaded content and scenes cannot fit into the available memory. However if this value too high, your content might fail to load in some browsers or on some machines, because the browser might not have enough available memory to allocate the requested heap size. This value is written to a variable named TOTAL_MEMORY in the generated .html file, so if you want to experiment with this setting, you can edit the .html file to avoid the need to rebuild your project. See the User Manual page on WebGL memory usage for more details.
Enable Exceptions
Open Publishing Settings to access Enable Exceptions. Enable Exceptions allows you to specify how unexpected code behavior (generally considered errors) is handled at run time. There are three options:
- None: 例外に関するサポートを必要としない場合はこれを選択します。これにより、最高のパフォーマンスと最小のビルドが得られます。このオプションでは、例外がスローされるとコンテンツはその設定のままエラーで停止します。
-
Explicitly Thrown Exceptions Only (default): Select this to capture exceptions which are explicitly specified from a
throwstatement in your scripts. This option also makesfinallyblocks in your scripts work. Note that selecting this option makes the generated JavaScript code from your scripts bigger and slower, but, unless scripts are the main bottleneck in your project, this is not likely to be a significant issue. -
Full: Select this option to capture:
- Exceptions which are explicitly specified from a
throwstatement in your scripts - Null 参照
- 範囲外の配列アクセス
- Managed Stack traces
- Exceptions which are explicitly specified from a
Unity generates these exceptions by embedding checks for them into the code, so this option increases the code size and slows down performance. Use this mode only when you need to debug issues in your code, as it generates very large and very slow builds.
Data Caching にアクセスするには、Publishing Settings を選択します。 これを選択して、プレイヤーデータの自動ローカルキャッシュを有効にします。このオプションは、アセットストレージをブラウザーの IndexedDB データベースにローカルにキャッシュされるものとして設定するため、その後のコンテンツの実行でアセットを再度ダウンロードする必要はありません。ブラウザーごとに IndexedDB ストレージの許可に関する規則が異なります。ブラウザーがデータを保存する許可をユーザに要求したり、ビルドがブラウザーで定義されたサイズ制限を超える場合もあります。
配布サイズ
WebGL 用にパブリッシュするときは、コンテンツの開始前のダウンロード時間を妥当なものにするために、ビルドサイズを小さく抑えることが重要です。 アセットサイズを縮小するための一般的なヒントについては、ビルドサイズの削減 を参照してください。
WebGL に特有のヒントとコツ
テクスチャインポーター ですべての圧縮テクスチャに対して__Crunch__ テクスチャ圧縮型式を指定します。
開発ビルドをデプロイしないでください。開発ビルドは圧縮も Minify もされていないので、ファイルサイズはずっと大きくなります。
ビルドで例外を必要としない場合は、PlayerSettings に移動し (Edit > Project Settings > Player)、Publishing Settings を開いて、Enable Exceptions を __None__に設定します。
効率的なビルドを確実に行うには PlayerSettings に移動し (Edit> Project Settings> Player)、Other Settings を開いて Strip Engine Code を有効にします。
サードパーティ製のマネージ DLL を使用する場合は注意が必要です。依存が多く含まれるため、生成されるコードサイズが大幅に増加する可能性があるためです。
リリースビルドを作成する場合、Unity は WebGL の PlayerSettings > Publishing Settings ウィンドウで選択された__Compression Format__ に従ってビルド出力ファイルを圧縮します。
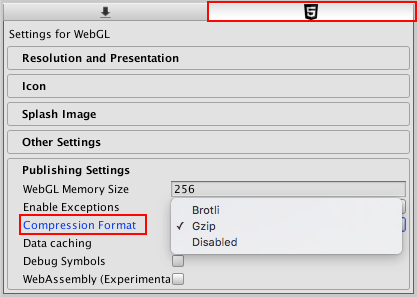
これらのオプションやそれらを使ったビルドの生成に関して、詳しくは 圧縮ビルドの展開 を参照してください。
アセットバンドル
コンテンツを開始する前にすべてのアセットデータを事前にダウンロードする必要があるため、アセットを主要データファイルから アセットバンドル に移動することを検討すると良いでしょう。このようにすると、コンテンツをロードするためのシーンを小さくすることができ、素早くロードすることができます。その後、ユーザーがコンテンツを処理するときにオンデマンドで動的にアセットをロードします。アセットバンドルは、アセットデータのメモリ の管理にも役立ちます。AssetBundle.Unload を呼び出すことで、不要になったアセットのアセットデータをメモリからアンロードできます。
WebGL プラットフォームでアセットバンドルを使用する場合に、以下を考慮する必要があります。
When you use class types in your AssetBundle which are not used in your main build, Unity may strip the code for those classes from the build. This can cause a fail when trying to load Assets from the AssetBundle. See the section on Stripping, below, to learn how to fix that.
WebGL does not support threading, but http downloads only become available when they have finished downloading. Because of this, Unity WebGL builds need to decompress AssetBundle data on the main thread when the download is done, blocking the main thread. To avoid this interruption, LZMA AssetBundle compression is not available for AssetBundles on WebGL. AssetBundles are compressed using LZ4 instead, which is de-compressed very efficiently on-demand. If you need smaller compression sizes than LZ4 delivers, you can configure your web server to use gzip or Brotli compression (on top of LZ4 compression) on your AssetBundles. See documentation on Deploying compressed builds for more information on how to do this.
WWW.LoadFromCacheOrDownload を使用したアセットバンドルキャッシングは、WebGL で、ブラウザから IndexedDB API を使用してユーザーのコンピューターにキャッシングを実装することによってサポートされています。一部のブラウザーでは IndexedDB のサポートが制限されている可能性があります。また、ブラウザーでデータをディスクに保存するためにユーザ許可が必要な場合があります。詳細については WebGL のブラウザ間での互換性 を参照してください。
ストリップ
Unity はデフォルトでビルドから未使用のコードをすべて削除します。 この挙動は、PlayerSettings ウィンドウ (Edit > Project Settings > Player) の Other Settings で Strip Engine Code オプションで変更できます。通常は、ストリップを有効にしてビルドすることをお勧めします。
コードストリップを使用すると、Unity は使用されている (スクリプトコード内、または、シーン内のシリアル化されたデータ内で参照されている) UnityObject 派生クラスがないかプロジェクトをスキャンします。それから、どのクラスも使用されていない Unity のサブシステムをビルドから削除します。これにより、ビルドのコード数が減り、ダウンロードが少なくなり、パースするコードも減少します (したがって、コードの実行速度が速くなり、メモリの使用量も少なくなります)。
コードストリップの問題
コードストリップによって実際には必要なコードを削除すると、問題が生じる可能性があります。これは、メインビルドに含まれていないためにプロジェクトからストリップされたクラスを含むアセットバンドルを、実行時にロードすると発生する可能性があります。これが発生すると、ブラウザの JavaScript コンソールに例えば、以下のようなエラーメッセージが表示されます (さらに他のエラーメッセージも表示される可能性があります)。
Could not produce class with ID XXX
これらのエラーをトラブルシューティングするには、クラス ID リファレンス で ID (上記の例では XXX) を調べて、どのクラスのインスタンスを作成しようとしているかを確認します。そのような場合は、そのクラスへの参照をスクリプトかシーンに追加するか、link.xml ファイルをプロジェクトに追加することによって、そのクラスのコードを強制的にビルドに加えることができます。
以下は、Collider クラス (したがって Physics モジュール) をプロジェクト内で確実に保持する例です。この XML コードを link.xml というファイルに加え、そのファイルを Assets フォルダーに置きます。
<linker>
    <assembly fullname="UnityEngine">
        <type fullname="UnityEngine.Collider" preserve="all"/>
    </assembly>
</linker>
ストリップがビルドの問題を引き起こしていると疑われる場合は、テスト中に Strip Engine Code オプションを無効にすることも可能です。
Unity には、適切なストリップを行うようプロジェクトを最適化するために、ビルドに含まれるモジュールやクラスを確認する便利な方法がありません。 ただし、含まれているクラスとモジュールの概要を確認するために、ビルドの後に生成される Temp/StagingArea/Data/il2cppOutput/UnityClassRegistration.cpp ファイルを確認できます。
Strip Engine Code オプションは Unity エンジンコードにのみ影響します。IL2CPP は常にマネージ DLL とスクリプトからバイトコードを取り除きます。このことは、コードの静的参照を通してではなく、リフレクションを通して動的にマネージ型を参照する必要がある場合に問題を引き起こすことがあります。リフレクションを通して型にアクセスする必要がある場合は、それらの型を保持するために link.xml ファイルを設定する必要もあります。link.xml ファイルの詳細については、iOS ビルドサイズの最適化 を参照してください。
ビルド出力ファイルの移動
If you want to change the location of your output files relative to the index.html file, you can do so by editing the dataUrl, codeUrl, and memUrl fields and the UnityLoader.js script tag in the index.html file. You can specify URLs on external servers for these if you want to host your files on a content distribution network (CDN), but you need to make sure that the hosting server has enabled Cross Origin Resource Sharing (CORS) for this to work. See the manual page on WebGL networking for more information about CORS.
インクリメンタルビルド
IL2CPP によってプロジェクト用に生成された C ++ コードは、インクリメンタルにコンパイルされます。つまり、最後にビルドしてから変更された C ++ コードのみが再度コンパイルされます。変更のないソースコードは、前回のビルドで生成されたものと同じオブジェクトファイルを再利用します。インクリメンタルな C ++ ビルドに使用されるオブジェクトファイルは、Unity プロジェクトの Library/il2cpp_cache ディレクトリに格納されます。
インクリメンタルコンパイルを使用しないで、生成された C ++ コードをゼロからクリーンにビルドするには、Unity プロジェクトの Library/il2cpp_cache ディレクトリを削除します。Unity エディターのバージョンが以前の WebGL ビルドで使用されていたものと異なる場合、Unity は自動的にゼロからクリーンなビルドを行います。