WheelCollider チュートリアル
PhysX3 Vehicles SDK によって WheelCollider が強化され新しくなりました。PhysX3 Vehicles SDK はPhysX2 と比較してもまったく新しい車両シミュレーションライブラリです。
それでは Unity5.0 で基本要素をおさえた、動く車を作成してみましょう。
まず初めに GameObject -> 3D Object -> Plane と選択してください。これは車を運転するための地面です。地面は単純化のために Transform の Position 値をゼロ (Transform -> Reset) にして作成します。Transform の Scale を 100 ぐらいに拡大します。
-
基本的な車のスケルトンを作成します。
まず、車のルートオブジェクトになるゲームオブジェクトを追加します。GameObject -> Create Empty と選択し、名前を
car_rootに変更します。Physics 3D Rigidbody コンポーネントを
car_rootに追加します。デフォルトで設定されている質量 1kg では、デフォルトのサスペンション設定には軽すぎるので、 1500kg に変更してください。次に、カーボディーコライダーを作成します。GameObject -> 3D Object -> Cube を選択してください。
car_rootの下に、そのボックスを親子付けします。ローカル座標空間にぴったり配置するために、トランスフォームをリセットします。車を Z軸方向に向けたいので、ボックスの Z のスケーリング値を 3に設定して、Z軸方向に拡大します。ホイールルートを追加します。
car_rootを選択し GameObject -> Create Empty Child を表示します。名前をwheelsに変更します。Transform をリセットしてください。このノードは強制ではありませんが、後で調整するのに便利です。最初のホイールを作成します。
wheelsオブジェクトを選択して GameObject -> Create Empty Child を選び、名前をfrontLeftにします。Transform をリセットし、ポジションを (–1, 0, 1) に設定します。ホイールに Wheel Collider を追加します (Component > Physics > Wheel Collider)。frontLeftオブジェクト(CMD-DまたはControl-D)を複製します。X のポジションを 1 に変更し、名前をfrontRightに変更します。frontLeftとfrontRightオブジェクトの両方を選択します。それらを複製し、両方の Z ポジションを−1 に変更します。それぞれ名前をrearLeftとrearRightに変更します。最後に、
car_rootオブジェクトを選択し、トランスフォームマニピュレータを使用して、それを地面の少し上に上げます。
-
これで、下のように見えるはずです。

この車を実際に動かすにはコントローラーを作成する必要があります。それでは、いくつかのスクリプトを見てみましょう。
    using UnityEngine;
    using System.Collections;
    using System.Collections.Generic;

    public class SimpleCarController : MonoBehaviour {
        public List<AxleInfo> axleInfos; // the information about each individual axle
        public float maxMotorTorque; // maximum torque the motor can apply to wheel
        public float maxSteeringAngle; // maximum steer angle the wheel can have

        public void FixedUpdate()
        {
            float motor = maxMotorTorque * Input.GetAxis("Vertical");
            float steering = maxSteeringAngle * Input.GetAxis("Horizontal");

            foreach (AxleInfo axleInfo in axleInfos) {
                if (axleInfo.steering) {
                    axleInfo.leftWheel.steerAngle = steering;
                    axleInfo.rightWheel.steerAngle = steering;
                }
                if (axleInfo.motor) {
                    axleInfo.leftWheel.motorTorque = motor;
                    axleInfo.rightWheel.motorTorque = motor;
                }
            }
        }
    }

    [System.Serializable]
    public class AxleInfo {
        public WheelCollider leftWheel;
        public WheelCollider rightWheel;
        public bool motor; // is this wheel attached to motor?
        public bool steering; // does this wheel apply steer angle?
    }
スクリプトを `car_root` オブジェクトに設定し、スクリプトパラメータを以下のように調整するだけで、プレイモードを開始できます。設定をいろいろ変えてみてください。以下に表示したものは、まあまあ良く動くようです。
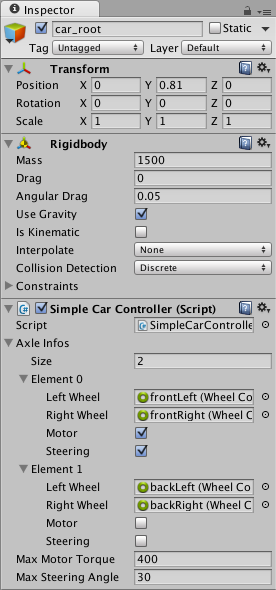
1 つの 車両インスタンスに対し、それぞれに steering, motor, または、braking torque を適用したホイールを最高 20 まで設定できます。
-
今度は視覚的な車輪に移ります。ご覧のとおり、WheelCollider はシミュレーションされたホイール位置と回転を WheelCollider の Transform には適用しません。そのため、視覚的なホイールを追加するには、いくつかのトリックが必要です。
まず、いくつかホイールジオメトリを作らなくてはなりません。シリンダーから簡単なホイール形状を作ることが可能です。
視覚的なホイールを追加するにはいくつかの方法があります。そのためには、スクリプトプロパティーで、手動で視覚的なホイールを割り当てるか、または、いくつかのロジックを書いて、自動的に対応する視覚ホイールを検索する必要があります。私たちは、第 2 のアプローチを取ります。
Wheel Collider オブジェクトに、視覚的なホイールを付加します。
コントローラ-スクリプトを変更します。
    using UnityEngine;
    using System.Collections;
    using System.Collections.Generic;

    [System.Serializable]
    public class AxleInfo {
        public WheelCollider leftWheel;
        public WheelCollider rightWheel;
        public bool motor;
        public bool steering;
    }

    public class SimpleCarController : MonoBehaviour {
        public List<AxleInfo> axleInfos;
        public float maxMotorTorque;
        public float maxSteeringAngle;

        // finds the corresponding visual wheel
        // correctly applies the transform
        public void ApplyLocalPositionToVisuals(WheelCollider collider)
        {
            if (collider.transform.childCount == 0) {
                return;
            }

            Transform visualWheel = collider.transform.GetChild(0);

            Vector3 position;
            Quaternion rotation;
            collider.GetWorldPose(out position, out rotation);

            visualWheel.transform.position = position;
            visualWheel.transform.rotation = rotation;
        }

        public void FixedUpdate()
        {
            float motor = maxMotorTorque * Input.GetAxis("Vertical");
            float steering = maxSteeringAngle * Input.GetAxis("Horizontal");

            foreach (AxleInfo axleInfo in axleInfos) {
                if (axleInfo.steering) {
                    axleInfo.leftWheel.steerAngle = steering;
                    axleInfo.rightWheel.steerAngle = steering;
                }
                if (axleInfo.motor) {
                    axleInfo.leftWheel.motorTorque = motor;
                    axleInfo.rightWheel.motorTorque = motor;
                }
                ApplyLocalPositionToVisuals(axleInfo.leftWheel);
                ApplyLocalPositionToVisuals(axleInfo.rightWheel);
            }
        }
    }
- WheelCollider コンポーネントの重要なパラメータの 1つは forceAppPointDistance です。これは、静止ホイールの底からホイールの力が適用される点までの距離のことを言います。デフォルト値は 0 で、静止ホイールの底に力を適用します。しかし実際には、車の中心部の少し下のあたりに置くのが無難です。