WheelCollider 튜토리얼(WheelCollider Tutorial)
새 WheelCollider는 PhysX2에 비해 완전히 새로운 차량 시뮬레이션 라이브러리인 PhysX3 Vehicles SDK로 구동됩니다.
Unity 5.0에서 기본 기능만 있는 차량을 만드는 프로세스를 살펴보겠습니다.
GameObject -> 3D Object -> Plane을 선택하여 시작합니다. 이 평면은 자동차가 주행할 지면입니다. 트랜스폼이 없는 간단한 지면인지 확인해야 합니다(Transform -> Reset). Transform 스케일 컴포넌트에 100 같은 숫자를 입력하여 지면을 스케일합니다.
-
기본 차량 스켈레톤을 만듭니다.
먼저 게임 오브젝트를 차량 루트 오브젝트로 추가합니다(GameObject -> Create Empty). 이름을
car_root로 변경합니다.car_root에 Physics 3D Rigidbody 컴포넌트를 추가합니다. 기본 질량 1kg은 기본 서스펜션 설정으로 너무 가볍습니다. 1,500kg으로 변경합니다.차량 바디 콜라이더를 만들고
car_root아래 박스를 부모로 지정합니다(GameObject -> 3D Object -> Cube). 로컬 공간에서 완벽하게 정렬되도록 변환을 초기화합니다. 차량 방향이 Z축을 따를 것이므로 z 스케일링을 3으로 설정하여 Z축을 따라 박스를 스케일합니다.휠 루트를 추가합니다.
car_root와 GameObject -> Create Empty Child를 선택합니다. 이름을wheels로 변경합니다. 변환을 초기화합니다. 이 노드는 필수는 아니지만, 나중에 편리한 미세 조정을 위해 사용합니다.첫 번째 휠을 만듭니다.
wheels오브젝트, GameObject -> Create Empty Child를 선택하고 이름을frontLeft로 지정합니다. 변환을 초기화합니다. 포지션을 (–1, 0, 1)로 설정합니다. Physics Component -> Wheel Collider를 휠에 추가합니다.frontLeft오브젝트를 복제합니다(Cmd+D 또는 Ctrl+D). x 포지션을 1로 변경합니다. 이름을frontRight로 변경합니다.frontLeft및frontRight오브젝트를 모두 선택하고 복제합니다. 두 오브젝트의 z 포지션을 모두 –1로 변경합니다. 이름을 각각rearLeft와rearRight로 변경합니다.마지막으로,
car_root오브젝트를 선택하고, 트랜스폼 조종기를 사용해 지면에서 약간 위로 올립니다.
-
이제 다음과 같은 그림이 보입니다.

이 차를 실제로 운전할 수 있으려면 컨트롤러를 작성해야 합니다. 다음과 같이 스크립팅합니다.
    using UnityEngine;
        using System.Collections;
        using System.Collections.Generic;

        public class SimpleCarController : MonoBehaviour {
            public List<AxleInfo> axleInfos; // the information about each individual axle
            public float maxMotorTorque; // maximum torque the motor can apply to wheel
            public float maxSteeringAngle; // maximum steer angle the wheel can have

            public void FixedUpdate()
            {
                float motor = maxMotorTorque * Input.GetAxis("Vertical");
                float steering = maxSteeringAngle * Input.GetAxis("Horizontal");

                foreach (AxleInfo axleInfo in axleInfos) {
                    if (axleInfo.steering) {
                        axleInfo.leftWheel.steerAngle = steering;
                        axleInfo.rightWheel.steerAngle = steering;
                    }
                    if (axleInfo.motor) {
                        axleInfo.leftWheel.motorTorque = motor;
                        axleInfo.rightWheel.motorTorque = motor;
                    }
                }
            }
        }

        [System.Serializable]
        public class AxleInfo {
            public WheelCollider leftWheel;
            public WheelCollider rightWheel;
            public bool motor; // is this wheel attached to motor?
            public bool steering; // does this wheel apply steer angle?
        }
간단히 이 코드 조각을 `car_root` 오브젝트에 적용하고, 아래와 같이 스크립트 파라미터를 세부 조정하며, 플레이 모드를 시작합니다. 설정을 다양하게 변경해 봅니다. 아래에 나와 있는 설정을 사용하면 무난합니다.
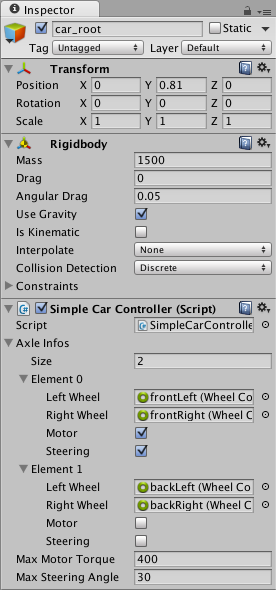
차량 인스턴스 하나에 스티어링, 모터 또는 제동 토크를 저마다 가하는 휠을 20개까지 부착할 수 있습니다.
-
이제 비주얼 휠로 넘어가겠습니다. 보시다시피 WheelCollider는 시뮬레이션된 휠 포지션 및 회전을 WheelCollider의 트랜스폼에 다시 적용하지 않습니다. 따라서 비주얼 휠을 추가하려면 몇 가지 비결이 필요합니다.
여기에는 휠 지오메트리가 몇 개 필요합니다. 실린더를 사용하여 간단한 휠 모양을 만들 수 있습니다.
비주얼 휠을 추가하는 두 가지 방법이 있습니다. 첫 번째는 스크립트 프로퍼티에서 비주얼 휠을 수동으로 할당하는 것이고, 두 번째는 약간의 로직을 작성하여 자동으로 해당 비주얼 휠을 찾도록 하는 것입니다. 여기서는 후자를 선택하겠습니다.
비주얼 휠을 휠 콜라이더 오브젝트에 부착합니다.
이제 컨트롤러 스크립트를 다음과 같이 변경합니다.
    using UnityEngine;
        using System.Collections;
        using System.Collections.Generic;

        [System.Serializable]
        public class AxleInfo {
            public WheelCollider leftWheel;
            public WheelCollider rightWheel;
            public bool motor;
            public bool steering;
        }

        public class SimpleCarController : MonoBehaviour {
            public List<AxleInfo> axleInfos;
            public float maxMotorTorque;
            public float maxSteeringAngle;

            // finds the corresponding visual wheel
            // correctly applies the transform
            public void ApplyLocalPositionToVisuals(WheelCollider collider)
            {
                if (collider.transform.childCount == 0) {
                    return;
                }

                Transform visualWheel = collider.transform.GetChild(0);

                Vector3 position;
                Quaternion rotation;
                collider.GetWorldPose(out position, out rotation);

                visualWheel.transform.position = position;
                visualWheel.transform.rotation = rotation;
            }

            public void FixedUpdate()
            {
                float motor = maxMotorTorque * Input.GetAxis("Vertical");
                float steering = maxSteeringAngle * Input.GetAxis("Horizontal");

                foreach (AxleInfo axleInfo in axleInfos) {
                    if (axleInfo.steering) {
                        axleInfo.leftWheel.steerAngle = steering;
                        axleInfo.rightWheel.steerAngle = steering;
                    }
                    if (axleInfo.motor) {
                        axleInfo.leftWheel.motorTorque = motor;
                        axleInfo.rightWheel.motorTorque = motor;
                    }
                    ApplyLocalPositionToVisuals(axleInfo.leftWheel);
                    ApplyLocalPositionToVisuals(axleInfo.rightWheel);
                }
            }
        }
- WheelCollider 컴포넌트의 중요한 파라미터 중 하나는 forceAppPointDistance입니다. 이 파라미터는 정지된 휠의 베이스에서 휠 힘이 가해지는 점까지의 거리입니다. 디폴트는 레스팅 휠 베이스에 가해지는 힘인 0이지만, 실제로는 이 점을 차의 무게 중심보다 약간 낮은 위치로 설정하는 것이 좋습니다.