Particle system
Switch to ScriptingA Particle System component simulates fluid entities such as liquids, clouds and flames by generating and animating large numbers of small 2D images in the scene. For a full introduction to particle systems and their uses, see the manual page.
Properties
The Particle System component has many properties and for convenience, the inspector organises them into collapsible sections or “modules” described below. Each section can be expanded and collapsed by clicking the bar that shows its name. At the left side of the bar is a checkbox that can be used to enable or disable the functionality of the properties in that section. For example, if you don’t want to vary the sizes of particles over their lifetime, you can simply uncheck the Size over lifetime section.
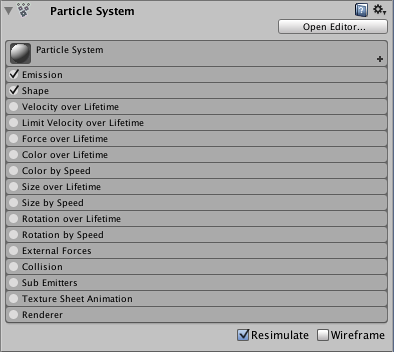
Aside from the module bars, the inspector contains a few other controls. The Open Editor button shows the options in a separate editor window that also allows you to edit multiple systems at once. The Resimulate checkbox determines whether or not property changes should be applied immediately to particles already generated by the system (the alternative is that existing particles are left as they are and only the new particles have the changed properties). The Wireframe button shows the outlines of the mesh objects used to show the particles in the scene.
Particle System Module
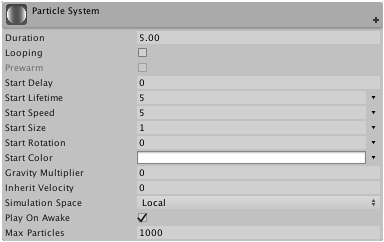
This module contains global properties that affect the system overall.
Properties
| Property: | Function: |
|---|---|
| Duration | The length of time the system will run. |
| Looped | If enabled, the system will start again at the end of its duration time and continue to repeat the cycle. |
| Prewarm | If enabled, the system will be initialized as though it had already completed a full cycle (only works if Looping is also enabled). |
| Start Delay | Delay in seconds before the system starts emitting once enabled. |
| Start Lifetime | The initial lifetime for particles. |
| Start Speed | The initial speed of each particle in the appropriate direction. |
| Start Size | The initial size of each particle. |
| Start Rotation | The initial rotation angle of each particle. |
| Start Color | The initial color of each particle. |
| Gravity Multiplier | Scales the gravity value set in the physics manager. A value of zero will switch gravity off. |
| Inherit Velocity | Do the particles start with the same velocity as the particle system object? |
| Simulation Space | Should particles be animated in the parent object’s local space (and therefore move with the object) or in world space? |
| Play on Awake | Does the system start automatically when the object is created? |
| Max Particles | The maximum number of particles in the system at once. Older particles will be removed when the limit is reached. |
Details
The system emits particles for a specific duration but can be set to emit continuously using the Looped property. This means you can create, say, smoke in short puffs or in a steady stream. The “Start” properties (for lifetime, speed, size, rotation and color) specify the state of a particle on emission but other property groups (such as Size Over Lifetime) can modify the values as the system progresses. Also, all of these properties can have randomised values in a range specified by curves. All particle systems use the same gravity vector specified in the physics settings but the Gravity Multiplier value can be used to scale the gravity or switch it off if set to zero (dust clouds will fall to earth but not at the same rate as solid objects). The Inherit Velocity and Simulation Space properties together determine whether the particles move with the particle system object or independently in the game world. Systems like clouds, hoses and flamethrowers will tend to leave trails that persist in world space even if the object producing them moves around. On the other hand, when particles are used to create a spark between two electrodes, the spark should move along with the object.
Emission Module
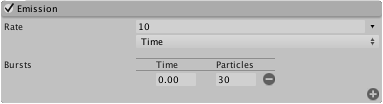
The properties in this module affect the rate and timing of particle emissions.
Properties
| Property: | Function: |
|---|---|
| Rate | The number of particles emitted per unit of time or distance moved (selected from the adjacent popup menu). |
| Bursts | Allows extra particles to be emitted at specified times (only available when the Rate is in Time mode). |
Details
The rate of emission can be constant or can vary over the lifetime of the system according to a curve. If Distance mode is selected then a certain number of particles are released per unit of distance moved by the parent object. This is very useful for simulating particles that are actually created by the motion of the object (eg, dust from a car’s wheels on a dirt track). Note that Distance mode is only available when Simulation Space is set to World in the Particle System section. If the rate is set to Time mode then the desired number of particles will be emitted each second regardless of how the parent object moves. Additionally, you can add bursts of extra particles that appear at specific times. For example, you might have a steam engine chimney that produces puffs of smoke.
Shape Module
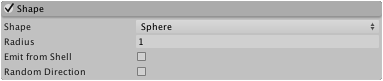
This module is used to select the shape of the emission volume and where the particles are launched from within it.
Properties
| Property: | Function: |
|---|---|
| Shape | The shape of the emission volue: Sphere, Hemisphere, Cone, Box or Mesh. For the Mesh shape, there is an extra menu to select whether particles are emitted from the vertices, triangles or edges of the mesh. |
| Random Direction | When enabled, the particles’ initial direction will be chosen randomly. |
| Radius | The radius of the circular aspect of the shape (for Sphere, Hemisphere and Cone only). |
| Angle | The angle of the cone at its point (for Cone only). An angle of 0 produces a cylinder while an angle of 90 gives a flat disc. |
| Box X, Y, Z | Width, height and depth of the box shape (for Box only). |
| Mesh | The mesh that provides the emitter’s shape (for Mesh only). |
| Emit from Shell | Should particles be emitted from the outer surface rather than the inner volume of the shape? (For Sphere and Hemisphere only). |
| Emit from | Selects the part of the cone to emit from: Base, Volume, Base Shell or Volume Shell (for Cone only). |
Details
All the shapes except Mesh have properties that define their dimensions (eg, radius). These can be edited by dragging the handles on the wireframe emitter shape in the scene view. The choice of shape affects the region from which particles can be launched but also the initial direction of the particles. For example, a sphere throws particles outward in all directions, a cone produces a diverging stream of particles and a mesh emits particles in directions that are normal to the surface.
Velocity Over Lifetime Module
Acceleration can be applied to change the velocities of particles over their lifetime, as specified in this module.

Properties
| Property: | Function: |
|---|---|
| X, Y, Z | Velocity in the X, Y and Z axes. |
| Space | Selects whether the X, Y and Z axes refer to local or world space. |
Details
This effect can be used to create an overall drift of particles in a particular direction.
Limit Velocity Over Lifetime Module
This module controls how the speed of particles is reduced over their lifetime.

Properties
| Property: | Function: |
|---|---|
| Speed | Speed limit (split into separate X, Y and Z components if Separate Axes is enabled). |
| Space | Selects whether the speed limitation refers to local or world space (only when Separate Axes is enabled). |
| Dampen | The fraction by which a particle’s speed will be reduced when it exceeds the speed limit. |
Details
This effect is very useful for simulating air resistance that slows the particles, especially when a decreasing curve is used to lower the speed limit over time. For example, an explosion or firework initially bursts at great speed but the particles emitted from it rapidly slow down as they pass through the air.
Force Over Lifetime Module
Particles can be accelerated by forces (wind, attraction, etc) that are specified in this module.

Properties
| Property: | Function: |
|---|---|
| X, Y, Z | Force applied to each particle in the X, Y and Z axes. |
| Space | Selects whether the force is applied in local or world space. |
Details
Fluids are often affected by forces as they move. For example, smoke will accelerate slightly as it rises from a fire, carried up by the hot air around it. Subtle effects can be achieved by using curves to control the force over the particles’ lifetimes. Using the previous example, smoke will initially accelerate upward but as the rising air gradually cools, the force will diminish. Thick smoke from a fire might initially accelerate, then slow down as it spreads and perhaps even start to fall to earth if it persists for a long time.
Color Over Lifetime Module
This module specifies how a particle’s color and transparency vary over time.

Properties
| Property: | Function: |
|---|---|
| Color | The color gradient of a particle over its lifetime. |
Details
Many types of natural and fantastical particles vary in color over time and so this property has many uses. For example, white hot sparks will cool as they pass through the air and a magic spell might burst into a rainbow of colors. Perhaps the more important aspect, though, is the variation of alpha (transparency). It is very common for particles to burn out, fade or dissipate as they reach the end of their lifetime (hot sparks, fireworks, smoke particles) and a simple diminishing gradient produces this effect very convincingly.
Color By Speed Module
The color of a particle can be set here to change according to its speed in distance units per second.

Properties
| Property: | Function: |
|---|---|
| Color | The color gradient of a particle defined over a speed range. |
| Speed Range | The low and high ends of the speed range to which the color gradient is mapped (speeds outside the range will map to the end points of the gradient). |
Details
Burning or glowing particles, such as sparks, will tend to burn more brightly when they move quickly through the air (being exposed to more oxygen) but then dim slightly as they slow down. To simulate this, you might use Color By Speed with a gradient that has white at the upper end of the speed range and red at the lower end.
Size Over Lifetime Module
Many effects involve a particle changing size according to a curve, which can be set in this module.

Properties
| Property: | Function: |
|---|---|
| Size | A curve defining the particle’s size over its lifetime. |
Details
Particles that represent gases, flames or smoke will typically change in size as they move away from the point of emission. For example, smoke will tend to disperse and occupy a larger volume over time. This effect can be achieved by setting the curve for the smoke particle to an upward ramp, increasing with the particle’s age. (The effect is enhanced if Color Over Lifetime is also used to fade the smoke as it spreads.) For fireballs created by burning fuel, the flame particles will tend to expand after emission but then fade and shrink as the fuel is used up and the flame dissipates. In this case, the curve would have a rising “hump” that then falls back down to a smaller size.
Size By Speed Module
The size of a particle can be set here to change according to its speed in distance units per second.

Properties
| Property: | Function: |
|---|---|
| Size | A curve defining the particle’s size over a speed range. |
| Speed Range | The low and high ends of the speed range to which the size curve is mapped (speeds outside the range will map to the end points of the curve). |
Details
There are some situations where particles are emitted with random speeds and the smallest particles should also be the ones that move fastest. For example, you would expect small pieces of debris to be accelerated more by an explosion than larger pieces. You can achieve effects like this using Size By Speed with a simple ramp curve that increases the size in proportion to the speed of the particle. (Note that this should not be used with Limit Velocity Over Lifetime unless you are sure you want particles to shrink as they slow down.)
Rotation Over Lifetime Module
Here, you can arrange for particles to rotate as they move.

Properties
| Property: | Function: |
|---|---|
| Angular Velocity | Rotation velocity in degrees per second. |
Details
This setting is useful when particles represent small solid objects, such as pieces of debris from an explosion. Assigning random values of rotation will make the effect more realistic than having the particles remain upright as they fly. Also, the random rotations will help to break up the regularity of similarly-shaped particles (the same texture repeated many times can be very noticeable).
Rotation By Speed Module
The rotation of a particle can be set here to change according to its speed in distance units per second.

Properties
| Property: | Function: |
|---|---|
| Angular Velocity | Rotation velocity in degrees per second. |
| Speed Range | The low and high ends of the speed range to which the size curve is mapped (speeds outside the range will map to the end points of the curve). |
Details
This property can be used when the particles represent solid objects moving over the ground such as rocks from a landslide. The rotation of the particles can be set in proportion to the speed so that they roll over the surface convincingly.
External Forces Module
This property modifies the effect of wind zones on particles emitted by the system.

Properties
| Property: | Function: |
|---|---|
| Multiplier | Scale value applied to wind zone forces. |
Details
A Terrain can incorporate wind zones which affect the movement of trees on the landscape. Enabling this section allows the wind zones to blow particles from the system. The Multiplier value lets you scale the effect of the wind on the particles, since they will often be blown more strongly than tree branches.
Collision Module
This module controls the way particles collide with solid objects in the scene.
Properties
| Property: | Function: |
|---|---|
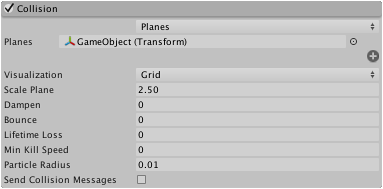
| World/Planes popup | Selects between World and Planes modes (see below for details). |
| Planes | An expandable list of Transforms that define collision planes (Planes mode only). |
| Visualization | Selects whether the collision plane gizmos will be shown in the scene view as wireframe grids or solid planes (Planes mode only). |
| Scale Plane | Size of planes used for visualization (Planes mode only). |
| Dampen | The fraction of a particle’s speed that it loses after a collision. |
| Bounce | The fraction of a particle’s speed that rebounds from a surface after a collision. |
| Lifetime Loss | The fraction of a particle’s total lifetime that it loses if it collides. |
| Min Kill Speed | Particles travelling below this speed after a collision will be removed from the system. |
| Particle Radius | Approximate size of a particle, used to avoid clipping with collision planes (Planes mode only). |
| Collides With | Particles will only collide with objects on the selected layers (World mode only). |
| Collision Quality | This affects how “watertight” the collisions are - at lower quality levels, particles may sometimes pass through colliders (World mode only). |
| Send Collision Messages | If enabled, particle collisions can be detected from scripts by the OnParticleCollision function. |
Details
When other objects surround a particle system, the effect is often more convincing when the particles interact with those objects. For example, water or debris should be obstructed by a solid wall rather than simply passing through it. With Collision enabled, particles can collide with objects in the scene.
A particle system can be set so its particles collide with any collider in the scene by selecting World mode from the popup. (Colliders can also be disabled according to the layer they are on by using the Collides With property.) The popup also has a Planes mode option which allows you to add a set of planes to the scene that don’t need to have colliders. This option is useful for simple floors, walls and similar objects and has a lower processor overhead than World mode. When Planes mode is enabled, a list of transforms (typically empty GameObjects) can be added via the Planes property. The planes extend infinitely in the objects’ local XZ planes with the positive Y axis indicating the planes’ normal vectors. To assist with development, the planes will be shown as gizmos in the scene, regardless of whether or not the objects have any visible mesh themselves. The gizmos can be shown as a wireframe grid or a solid plane, and can also be scaled. However, the scaling only applies to the visualization - the collision planes themselves extend infinitely through the scene.
When collisions are enabled, the size of a particle is sometimes a problem because its graphic can be clipped as it makes contact with a surface. This can result in a particle appearing to “sink” partway into a surface before stopping or bouncing. The Particle Radius property addresses this issue by defining an approximate circular radius for the particles. This size information is used to prevent clipping and avoid the sinking-in effect.
The Dampen and Bounce properties are useful when the particles represent solid objects. For example, gravel will tend to bounce off a hard surface when thrown but a snowball’s particles might lose speed during a collision. Lifetime Loss and Min Kill Speed can help to reduce the effects of residual particles following a collision. For example, a fireball might last for a few seconds while flying through the air but after colliding, the separate fire particles should dissipate quickly.
You can also detect particle collisions from a script if Send Collision Messages is enabled. The script can be attached to the object with the particle system or the one with the collider or both. By detecting collisions, you can use particles as active objects in gameplay, such as projectiles, magic spell and power-ups. See the script reference page for MonoBehaviour.OnParticleCollision for further details and examples.
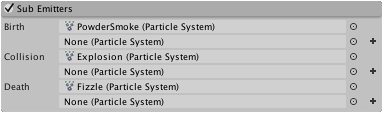
Sub Emitters Module
This module lets you set up sub-emitters. These are additional particle systems that are created at a particle’s position at certain stages of its lifetime.
Properties
| Property: | Function: |
|---|---|
| Birth, Collision, Death | Phases of a particles life where sub-emitters can be created. Two sub-emitters can be added for each phase using the “+” arrows at the right of the inspector. |
Details
Many types of particles produce effects at different stages of their lifetimes that can also be implemented using particle systems. For example, a bullet might be accompanied by a puff of powder smoke as it leaves the gun barrel and a fireball might explode on impact. You can use sub-emitters to create effects like these. The sub-emitters are just ordinary particle system objects created in the scene or from prefabs. This means that sub-emitters can have sub-emitters of their own and this type of arrangement can be useful for complex effects like fireworks. However, it is very easy to generate an enormous number of particles using sub-emitters, so you should take care that performance doesn’t suffer as a result.
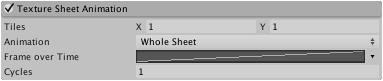
Texture Sheet Animation Module
A particle’s graphic need not be a still image. This module lets you treat the texture as a grid of separate sub-images that can be played back as frames of animation.
Properties
| Property: | Function: |
|---|---|
| Tiles | The number of tiles the texture will be divided into in the X (horizontal) and Y (vertical) directions. |
| Animation | The animation mode can be set to Whole Sheet or Single Row (ie, each row of the sheet represents a separate animation sequence). |
| Random Row | Chooses a row from the sheet at random to produce the animation (only available when Single Row is selected as the animation mode). |
| Row | Selects a particular row from the sheet to produce the animation (only available when Single Row mode is selected and Random Row is disabled). |
| Frame Over Time | A curve that specifies how the frame of animation increases as time progresses. |
| Cycles | The number of times the animation sequence repeats over the particle’s lifetime. |
Details
Particle animations are typically simpler and less detailed than character animations. In systems where the particles are visible individually, animations can be used to convey actions or movements. For example, flames may flicker and insects in a swarm might vibrate or shudder as if flapping their wings. In cases where the particles form a single, continous entity like a cloud, animated particles can help add to the impression of energy and movement.
You can use the Single Row mode to create separate animation sequences for particles and switch between animations from a script. This can be useful for creating variation or switching to a different animation after a collision. The Random Row option is highly effective as a way to break up conspicuous regularity in a particle system (eg, a group of flame objects that are all repeating the exact same flickering animation over and over again). This option can also be used with a single frame per row as a way to generate particles with random graphics. This can be used to break up regularity in a object like a cloud or to produce different types of debris or other objects from a single system. For example, a blunderbuss might fire out a cluster of nails, bolts, balls and other projectiles.
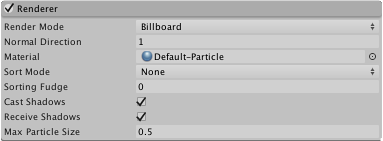
Renderer Module
This module’s settings determine how a particle’s image or mesh is transformed, shaded and overdrawn by other particles.
Properties
| Property: | Function: |
|---|---|
| Render Mode | How the rendered image is produced from the graphic image (or mesh). The options are Billboard (particle always faces the camera, Stretched Billboard (faces the camera but with scaling applied), Horizontal Billboard (particle plane is parallel to the XZ “floor” plane), Vertical Billboard (particle is upright on the world Y axis but turns to face the camera) and Mesh (particle is rendered from a 3D mesh instead of a texture). |
| Camera Scale | The amount of stretching applied in proportion to camera movement (Stretched Billboard mode only). |
| Speed Scale | The amount of stretching applied in proportion to a particle’s speed (Stretched Billboard mode only). |
| Length Scale | The amount of stretching applied in proportion to a particle’s length (Stretched Billboard mode only). |
| Mesh | One or more meshes used to render particles (Mesh mode only). |
| Normal Direction | Bias of lighting normals used for the particle graphics. A value of 1.0 points the normals at the camera, while a value of 0.0 points them towards the centre of the screen (Billboard modes only). |
| Material | Material used to render the particle. |
| Sort Mode | The order in which particles are drawn (and therefore overlaid). The possible values are By Distance (ie, from camera), Youngest First and Oldest First. |
| Sorting Fudge | Bias of particle sort ordering. Lower values increase the relative chance that particles will be drawn over other transparent objects, including particles from other systems. |
| Cast Shadows | Should the particle cast shadows on other objects? Only opaque materials cast shadows. |
| Receive Shadows | Should shadows be cast onto particles? Only opaque materials can receive shadows. |
| Max Particle Size | The largest particle size (regardless of other settings), expressed as a fraction of viewport size. |
Details
The Render Mode lets you choose between several billboard (2D) graphic modes and mesh mode. Using 3D meshes gives particles extra authenticity when they represent solid objects, such as rocks, but can also improve the sense of volume for clouds, fireballs and liquids. When 2D billboard graphics are used, the different options can be used for a variety of effects. The default Billboard mode is good for particles representing volumes that look much the same from any direction (eg, clouds). Horizontal Billboard mode can be used when the particles cover the ground (eg, target indicators and magic spell effects) or when they are flat objects that fly or float parallel to the ground (eg, shurikens). Vertical Billboard mode keeps each particle upright and perpendicular to the XZ plane but allows it to rotate around its Y axis. This can be helpful when you are using an orthographic camera and want particle sizes to stay consistent. Stretched Billboard mode accentuates the apparent speed of particles in a similar way to the “stretch and squash” techniques used by traditional animators.
The Normal Direction can be used to create shading based on the particle’s direction from the center of the screen. This can help create a feeling of size and depth on, say, a cloud - the outer edges of the cloud particles (relative to screen center) will tend to be darkened giving the impression of a volume shaded all over rather than a set of unformly shaded elements.