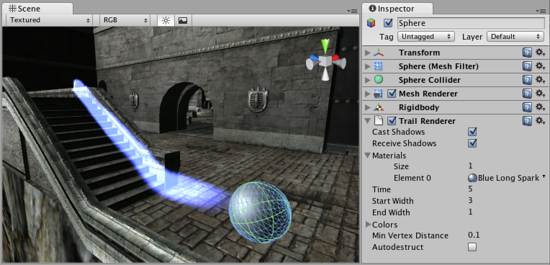
Trail Renderer
Switch to ScriptingThe Trail Renderer is used to make trails behind objects in the scene as they move about.
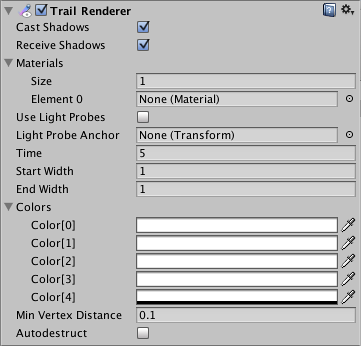
Properties
| Property: | Function: |
|---|---|
| Materials | An array of materials used for rendering the trail. Particle shaders work the best for trails. |
| Size | The total number of elements in the Material array. |
| Element 0 | Reference to the Material used to render the trail. The total number of elements is determined by the Size property. |
| Time | Length of the trail, measured in seconds. |
| Start Width | Width of the trail at the object’s position. |
| End Width | Width of the trail at the end. |
| Colors | Array of colors to use over the length of the trail. You can also set alpha transparency with the colors. |
| Color0 to Color4 | The trail’s colors, initial to final. |
| Min Vertex Distance | The minimum distance between anchor points of the trail. |
| AutoDestruct | Enable this to make the object be destroyed when the object has been idle for Time seconds. |
Details
The Trail Renderer is great for a trail behind a projectile, or contrails from the tip of a plane’s wings. It is good when trying to add a general feeling of speed.
When using a Trail Renderer, no other renderers on the GameObject are used. It is best to create an empty GameObject, and attach a Trail Renderer as the only renderer. You can then parent the Trail Renderer to whatever object you would like it to follow.
Materials
Trail Renderers should use a material that has a Particle Shader. The Texture used for the Material should be of square dimensions (e.g. 256x256 or 512x512).
Trail Width
By setting the Trail’s Start and End Width, along with the Time property, you can tune the way it is displayed and behaves. For example, you could create the wake behind a boat by setting the Start Width to 1, and the End Width to 2. These values would probably need to be fine-tuned for your game.
Trail Colors
You can cycle your trail through 5 different color/opacity combinations. Using colors could make a bright green plasma trail gradually dim down to a dull grey dissipation, or cycle through the other colors of the rainbow. If you don’t want to change the color, it can be very effective to change only the opacity of each color to make your trail fade in and out at the head and/or tail.
Min Vertex Distance
The Min Vertex Distance value determines how far the object that contains the trail must travel before a segment of the trail is solidified. Low values like 0.1 will create trail segments more often, creating smoother trails. Higher values like 1.5 will create segments that are more jagged in appearance. There is a slight performance trade off when using lower values/smoother trails, so try to use the largest possible value to achieve the effect you are trying to create.
Hints
- Use Particle Materials with the Trail Renderer.
- Trail Renderers must be laid out over a sequence of frames, they can’t appear instantaneously.
- Trail Renderers rotate to display the face toward the camera, similar to other Particle Systems.