Avatar Mask
Specific body parts can be selectively enabled or disabled in an animation using a so-called Body Mask. Body masks are used in the Animation tab of the mesh import inspector and Animation Layers. Body masks enable you to tailor an animation to fit the specific requirements of your character more closely. For example, you may have a standard walking animation that includes both arm and leg motion, but if a character is carrying a large object with both hands then you wouldn’t want his arms to swing by his sides as he walks. However, you could still use the standard walking animation by switching off the arm movements in the body mask.
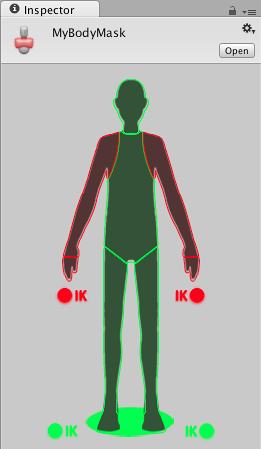
The body parts included are: Head, Left Arm, Right Arm, Left Hand, Right Hand, Left Leg, Right Leg and Root (which is denoted by the “shadow” under the feet). In the body mask, you can also toggle inverse kinematics (IK) for hands and feet, which will determine whether or not IK curves will be included in animation blending.
- Click the avatar section to toggle inclusion or exclusion (green/red)
- Double click in empty space surrounding the avatar to toggle all

In the Animation tab of the mesh import inspector, you will see a list entitled Clips that contains all the object’s animation clips. When you select an item from this list, options for the clip will be shown, including the body mask editor.
You can also create Avatar Mask Assets (), which show up as .mask files on disk.
The Mask assets can be reused in Animator Controllers, when specifying Animation Layers
A benefit of using Masks is that they tend to reduce memory overheads since body parts that are not active do not need their associated animation curves. Also, the unused curves need not be calculated during playback which will tend to reduce the CPU overhead of the animation.