Tags
A Tag is a word which you link to one or more GameObjects. For instance, you might define “Player” and “Enemy” Tags for player-controlled characters and non-player characters respectively; a “Collectable” Tag could be defined for items the player can collect in the Scene; and so on. Clearly, Tags are intended to identify GameObjects for scripting purposes. We can use them to write script code to find a GameObject by looking for any object that contains our desired Tag. This is achieved using the GameObject.FindWithTag() function.
For example:
// Instantiates respawnPrefab at the location
// of the game object with tag "Respawn"

var respawnPrefab : GameObject;
var respawn = GameObject.FindWithTag ("Respawn");
Instantiate (respawnPrefab, respawn.position, respawn.rotation);
This saves us having to manually add our GameObjects to a script’s exposed properties using drag and drop – a useful timesaver if the same script code is being used in a number of GameObjects. Another example is a TriggerCollider->class-SphereCollider control script which needs to work out whether the player is interacting with an enemy, as opposed to, say, a random prop or collectable item. Tags make this kind of test easy.
Applying a Tag
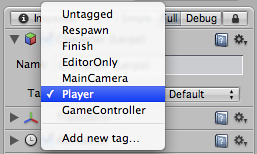
The Inspector will show the Tag and Layer->Layers drop-down menus just below any GameObject’s name. To apply a Tag to a GameObject, simply open the Tags drop-down and choose the Tag you require:

The GameObject will now be associated with this Tag.
Creating new Tags
To create a new Tag, click the “Add new tag…” option at the end of the drop-down menu. This will open up the Tag Manager in the Inspector. The Tag Manager is described here.
Layers appear similar to Tags, but are used to define how Unity should render GameObjects in the Scene. See the Layers page for more information.
Hints
A GameObject can only have one Tag assigned to it.
- Unity includes some built-in Tags which do not appear in the Tag Manager:
- “Untagged”
- “Respawn”
- “Finish”
- “EditorOnly”
- “MainCamera”
- “Player”
- and “GameController”.
You can use any word you like as a Tag. (You can even use short phrases, but you may need to widen the Inspector to see the tag’s full name.)