Lightmapping In-Depth
If you are about to lightmap your first scene in Unity, this Quickstart Guide might help you out.
Lightmapping is fully integrated in Unity, so that you can build entire levels from within the Editor, lightmap them and have your materials automatically pick up the lightmaps without you having to worry about it. Lightmapping in Unity means that all your lights’ properties will be mapped directly to the Beast lightmapper and baked into textures for great performance. Unity Pro extends this functionality by Global Illumination, allowing for baking realistic and beautiful lighting, that would otherwise be impossible in realtime. Additionally Unity Pro brings you sky lights and emissive materials for even more interesting scene lighting.
In this page you will find a more in-depth description of all the attributes that you can find in the Lightmapping window. To open the Lightmapping window select – .
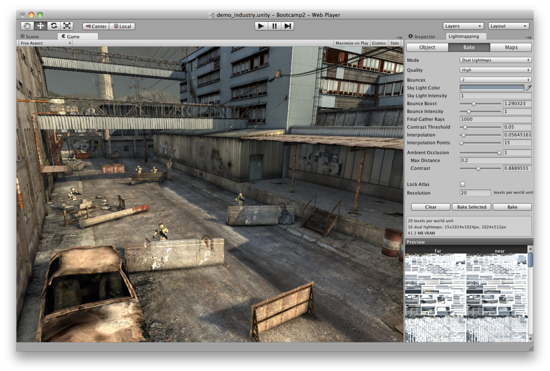
At the top of the Lightmapping view are three Scene Filter buttons that enable you to apply the operation to all objects or to restrict it to lights or renderers.
Object
Per-object bake settings for lights, mesh renderers and terrains - depending on the current selection.
Use the Scene Filter buttons to easily view only the lights, renderers or terrains in the Hierarchy.
Mesh Renderers and Terrains:
| Property: | Function: |
|---|---|
| Lightmap Static | Mesh Renderers and Terrains have to be marked as static to be lightmapped. |
| Scale In Lightmap | (Mesh Renderers only) Bigger value will result in more resolution to be dedicated to the given mesh renderer. The final resolution will be proportional (Scale in lightmap) * (Object’s world-space surface area) * (Global bake settings Resolution value). A value of 0 will result in the object not being lightmapped (it will still affect other lightmapped objects). |
| Lightmap Size | (Terrains only) Lightmap size for this terrain instance. Terrains are not atlased as other objects - they get their individual lightmaps instead. |
| Atlas | Atlasing information – will be updated automatically if Lock Atlas is disabled. If Lock Atlas is enabled, those parameters won’t be modified automatically and can be edited manually. |
| Lightmap Index | An index into the lightmap array. |
| Tiling | (Mesh Renderers only) Tiling of object’s lightmap UVs. |
| Offset | (Mesh Renderers only) Offset of object’s lightmap UVs. |
Lights:
| Property: | Function: |
|---|---|
| Lightmapping | The Lightmapping mode: Realtime Only, Auto or Baked Only. See Dual Lightmaps description below. |
| Color | The color of the light. Same property is used for realtime rendering. |
| Intensity | The intensity of the light. Same property is used for realtime rendering. |
| Bounce Intensity | A multiplier to the intensity of indirect light emitted from this particular light source. |
| Baked Shadows | Controls whether shadows are cast from objects lit by this light (controls realtime shadows at the same time in case of Auto lights). |
| Shadow Radius | (Point and Spot lights only) Increase this value for soft direct shadows - it increases the size of the light for the shadowing (but not lighting) calculations. |
| Shadow Angle | (Directional lights only) Increase this value for soft direct shadows - it increases the angular coverage of the light for the shadowing (but not lighting) calculations. |
| Shadow Samples | If you’ve set Shadow Radius or Angle above zero, increase the number of Shadow Samples as well. Higher sample numbers remove noise from the shadow penumbra, but might increase rendering times. |
Bake
Global bake settings.
| Property: | Function: |
|---|---|
| Mode | Controls both offline lightmap baking and runtime lightmap rendering modes. In Dual Lightmaps mode both near and far lightmaps will be baked; only deferred rendering path supports rendering dual lightmaps. Single Lightmaps mode results in only the far lightmap being baked; can also be used to force single lightmaps mode for the deferred rendering path. |
| Use in forward rendering | (Dual lightmaps only) Enables dual lightmaps in forward rendering. Note that this will require you to create your own shaders for the purpose. |
| Quality | Presets for high (good-looking) and low (but fast) quality bakes. They affect the number of final gather rays, contrast threshold and some other final gather and anti-aliasing settings. |
| Bounces | The number of light bounces in the Global Illumination simulation. At least one bounce is needed to give a soft, realistic indirect lighting. 0 means only direct light will be computed. |
| Sky Light Color | Sky light simulates light emitted from the sky from all the directions - great for outdoor scenes. |
| Sky Light Intensity | The intensity of the sky light - a value of 0 disables the sky light. |
| Bounce Boost | Allows to exaggerate light bouncing in dark scenes. If a scene is authored with dark materials, it’s easy to compensate with strong direct lighting. Indirect lighting will be very subtle though, as the bounced light will fade out quickly. Setting bounce boost to a value larger than 1 will compensate for this by pushing the albedo color towards 1 for GI computations. Note that values between 0 and 1 will decrease the light bounce. The actual computation taking place is a per component pow(colorComponent, (1.0/bounceBoost)). |
| Bounce Intensity | A multiplier to the intensity of the indirect light. |
| Final Gather Rays | The number of rays shot from every final gather point - higher values give better quality. |
| Contrast Threshold | The threshold above which new final gather points will be created by the adaptive sampling algorithm. Higher values make Beast be more tolerant about illumination changes on the surface, thus producing smoother but less-detailed lightmaps. A low number of final gather rays gives noise, which is local contrast. It might need higher contrast threshold values not to force additional final gather points to be created. |
| Interpolation | Controls the way the color from final gather points will be interpolated. 0 for linear interpolation, 1 for advanced, gradient-based interpolation. In some cases the latter might introduce artifacts. |
| Interpolation Points | The number of final gather points to interpolate between. Higher values give more smooth results, but can also smooth out details in the lighting. |
| Ambient Occlusion | The amount of ambient occlusion to be baked into the lightmaps. Ambient occlusion is the visibility function integrated over the local hemisphere of size Max Distance, so doesn’t take into account any lighting information. |
| Lock Atlas | When Lock Atlas is enabled, automatic atlasing won’t be run and lightmap index, tiling and offset on the objects won’t be modified. |
| Resolution | The resolution of the lightmaps in texels per world unit. A value of 50 and a 10x10 unit plane will result in the plane occupying 500x500 texels in the lightmap. |
| Padding | The space between individual objects in the atlas, given in texels. |
Maps
The editable array of all the lightmaps.
| Property: | Function: |
|---|---|
| Compressed | Toggles compression on all lightmap assets for this scene. |
| Array Size | Size of the lightmaps array (0 to 254). |
| Lightmaps Array | The editable array of all the lightmaps in the current scene. Unassigned slots are treated as black lightmaps. Indices correspond to the Lightmap Index value on Mesh Renderers and Terrains. Unless Lock Atlas is enabled, this array will get auto-resized and populated whenever you bake lightmaps. |
Lightmap Display
Utilities for controlling how lightmaps are displayed in the editor. Lightmap Display is a sub window of the Scene View, visible whenever the Lightmapping window is visible.
| Property: | Function: |
|---|---|
| Use Lightmaps | Whether to use the lightmaps during the rendering or not. |
| Shadow Distance | The distance at which objects stop receiving shadows. In the Dual Lightmaps mode it controls the end of the fade from Near to Far lightmaps. This setting overrides, but not overwrites, the QualitySettings.shadowDistance setting. |
| Show Resolution | Toggles the scene view Lightmap Resolution mode, which allows you to preview how you spend your lightmap texels on objects marked as static. |
Details
Dual Lightmaps
Dual lightmaps is Unity’s approach to make lightmapping work with specular, normal mapping and proper blending of baked and realtime shadows. It’s also a way to make your lightmaps look good even if the lightmap resolution is low.
Dual lightmaps by default can only be used in the Deferred Lighting rendering path. In Forward rendering path, it’s possible to enable Dual Lightmaps by writing custom shaders (use the dualforward surface shader directive).
Dual lightmaps use two sets of lightmaps:
- Far: contains full illumination.
- Near: contains indirect illumination from lights marked as Auto, full illumination from lights marked as Baked Only, emissive materials and sky lights.
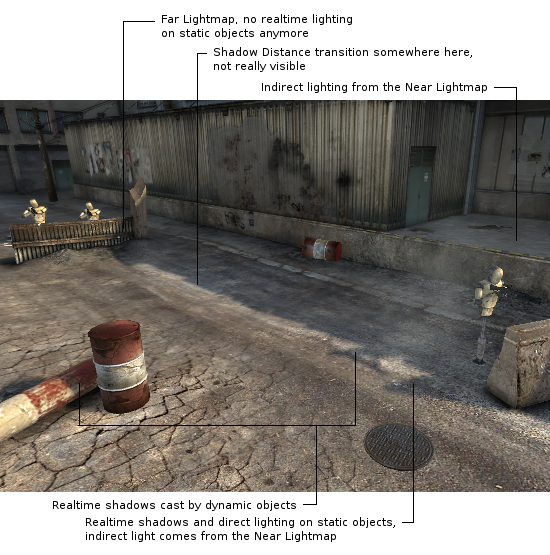
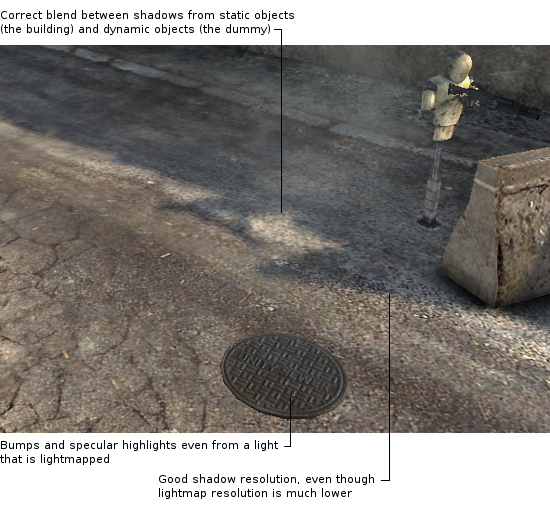
Realtime Only lights are never baked. The Near lightmap set is used within the distance from the camera smaller than the Shadow Distance quality setting. Within this distance Auto lights are rendered as realtime lights with specular, bump and realtime shadows (this makes their shadows blend correctly with shadows from Realtime Only lights) and their indirect light is taken from the lightmap. Outside Shadow Distance Auto lights no longer render in realtime and full illumination is taken from the Far lightmap (Realtime Only lights are still there, but without the shadows).
The scene below is baked and rendered in the Dual Lightmaps mode. It contains one directional light with the lightmapping mode set to the default Auto, a number of static lightmapped objects (buildings, obstacles, immovable details) and some dynamic moving or movable objects (dummies with guns, barrels). Within the Shadow Distance the dummy, the static lightmapped buildings and the ground are lit in realtime and cast realtime shadows, whereas the soft indirect light comes from the near lightmap. Past the Shadow Distance the buildings are fully lit only with the lightmaps, while the two dummies are dynamically lit, but don’t cast shadows anymore.
Directional Lightmaps
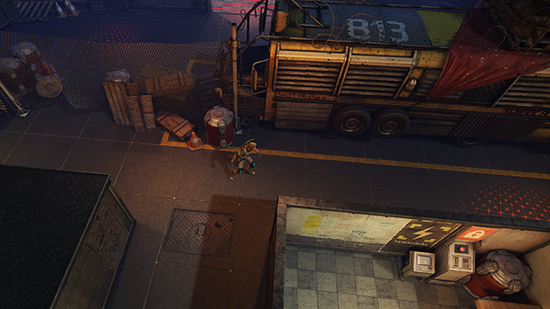
Dual lightmaps allow for specular lighting and normal mapping, but only within shadow distance and in direct light. If you need these effects in areas lit mostly by indirect light or far away from the camera, or if you want to avoid the cost of rendering realtime lights necessary for dual lightmaps, you should use directional lightmaps instead.
Directional lightmaps store information on light directionality in a second set of lightmaps. The first set of lightmaps (color) stores just the diffuse lighting, same as Single Lightmaps do. The second set of lightmaps (scale) stores the ratio of the desaturated incoming light per basis vector.
Advantages:
- Allows for normal mapping and specular without realtime lights.
- Gives specular for indirect lighting, important in areas that are mostly in shadow, e.g. caves.
- The first lightmap (color) is the same as the one in Single Lightmaps mode.
- If an object doesn’t need normal mapping nor specular, the second lightmap is not sampled.
Disadvantages:
- The encoding is lossy, so when direct lighting from more than one light affects a certain area, the lighting from directional lightmaps might look differently than realtime lighting.
- The scale lightmap does not compress very well.
- Not a problem on flat areas.
- Artifacts can be hidden by albedo textures.
Realtime lighting typically handles one light per pass. Directional lightmaps, on the other hand, handle an arbitrary amount of lights in one pass, as long as they are baked.
The decoding of directional lightmaps is done in a space relative to tangent space. This space is defined by a basis consisting of three pairwise orthogonal vectors, which evenly cover the hemisphere in the direction of the surface normal.
The three coefficients from the scale lightmap are combined depending on the normal from the normal map. This operation is done in the shader at runtime, so normal maps can be dynamically changed, if needed. The normal from the normal map is transformed into the directional lightmaps basis. It is then used to combine the three coefficients from the scale lightmap, with respect to each of the basis vectors, into a final scaling value that is applied to the color lightmap.
The scale lightmap can be interpreted as the amount of light coming from each of the basis directions that contributed to the value stored in the color lightmap. The coefficients linearly combined with the basis vectors give a general light direction that can be used for specular calculations.
Single Lightmaps
Single Lightmaps is a much simpler technique, but it can be used in any rendering path. All static illumination (i.e. from baked only and auto lights, sky lights and emissive materials) gets baked into one set of lightmaps. These lightmaps are used on all lightmapped objects regardless of shadow distance.
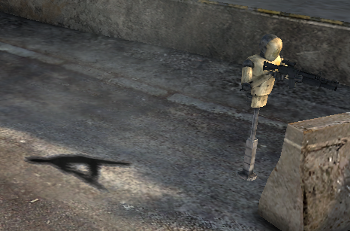
To match the strength of dynamic shadows to baked shadows, you need to manually adjust the Shadow Strength property of your light:
Lightmapped Materials
Unity doesn’t require you to select special materials to use lightmaps. Any built-in shader and any Surface Shader you write already supports lightmaps out of the box, without you having to worry about it.
Lightmap Resolution
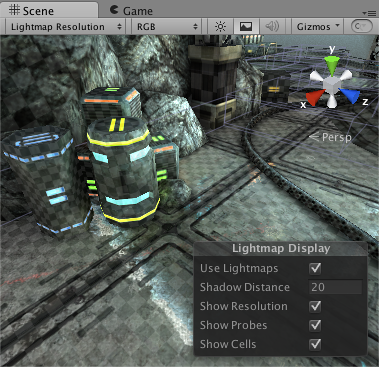
With the Resolution bake setting you control how many texels per unit are needed for your scene to look good. If there’s a 1x1 unit plane in your scene and the resolution is set to 10 texels per unit, your plane will take up 10x10 texels in the lightmap. The Resolution bake setting is a global setting. If you want to modify it for a special object (make it very small or very big in the lightmap) you can use the Scale in Lightmap property of a Mesh Renderer. Setting Scale in Lightmap to 0 will result in the object not being lightmapped at all (it will still influence lightmaps on other objects). Use the Lightmap Resolution scene view render mode to preview how you spend your lightmap texels.
UVs
A mesh that you’re about to lightmap needs to have UVs suitable for lightmapping. The easiest way to ensure that is to enable the Generate Lightmap UVs option in Mesh Import Settings for a given mesh.
For more information see the Lightmap UVs page.
Material Properties
The following material properties are mapped to Beast’s internal scene representation:
- Color
- Main Texture
- Specular Color
- Shininess
- Transparency
- Alpha-based: when using a transparent shader, main texture’s alpha channel will control the transparency
- Color-based: Beast’s RGB transparency can be enabled by adding a texture property called _TransparencyLM to the shader. Bear in mind that this transparency is defined in the opposite way compared to the alpha-based transparency: here a pixel with value (1, 0, 0) will be fully transparent to red light component and fully opaque to green and blue component, which will result in a red shadow; for the same reason white texture will be fully transparent, while black texture - fully opaque.
- Emission
- Self Illuminated materials will emit light tinted by the Color and Main Texture and masked by the Illum texture. The intensity of emitted light is proportional to the Emission property (0 disables emission).
- Generally large and dim light sources can be modeled as objects with emissive materials. For small and intense lights normal light types should be used, since emissive materials might introduce noise in the output.
Note: When mapping materials to Beast, Unity detects the ‘kind’ of the shader by the shader’s properties and path/name keywords such as: ‘Specular’, ‘Transparent’, ‘Self-Illumin’, etc.
Skinned Mesh Renderers
Having skinned meshes that are static makes your content more flexible, since the shape of those meshes can be changed in Unity after import and can be tweaked per level. Skinned Mesh Renderers can be lightmapped in exactly the same way as Mesh Renderers and are sent to the lightmapper in their current pose.
Lightmapping can also be used if the vertices of a mesh are moved at runtime a bit – the lighting won’t be completely accurate, but in a lot of cases it will match well enough.
Advanced
Automatic Atlasing
Atlasing (UV-packing) is performed automatically every time you perform a bake and normally you don’t have to worry about it – it just works.
Object’s world-space surface area is multiplied by the per-object Scale In Lightmap value and by the global Resolution and the result determines the size of the object’s UV set (more precisely: the size of the [0,1]x[0,1] UV square) in the lightmap. Next, all objects are packed into as few lightmaps as possible, while making sure each of them occupies the amount of space calculated in the previous step. If a UV set for a given object occupies only a part of the [0,1]x[0,1] square, in many cases atlasing will move neighboring UV sets closer, to make use of the empty space.
As a result of atlasing, every object to be lightmapped has it’s place in one of the lightmaps and that space doesn’t overlap with any other object’s space. The atlasing information is stored as three values: Lightmap Index, Tiling (scale) and Offset in Mesh Renderers and as one value: Lightmap Index in Terrains and can be viewed and modified via the Object pane of the lightmapping window.
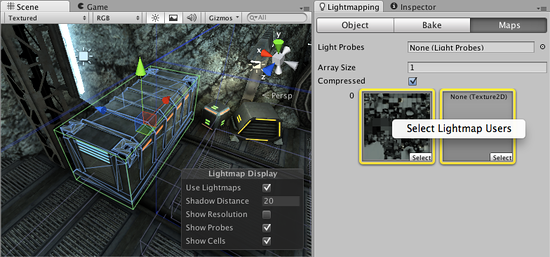
Atlasing can only modify per-object data which is Lightmap Index, Tiling and Offset and can not modify the UV set of an object, as the UV set is stored as part of the shared mesh. Lightmap UVs for a mesh can only be created at import time using Unity’s built-in auto-unwrapper or in an external 3D package before importing into Unity.
Lock Atlas
When Lock Atlas is enabled, automatic atlasing won’t be run and Lightmap Index, Tiling and Offset on the objects won’t be modified. Beast will rely on whatever is the current atlasing, so it’s the user’s responsibility to maintain correct atlasing (e.g. no overlapping objects in the lightmaps, no objects referencing a lightmap slot past the lightmap array end, etc.).
Lock Atlas opens up the possibility for alternative workflows when sending your object’s for lightmapping. You can then perform atlasing manually or via scripting to fit you specific needs; you can also lock the automatically generated atlasing if you are happy with the current atlasing, have baked more sets of lightmaps for your scene and want to make sure, that after adding one more object to the scene the atlasing won’t change making the scene incompatible with other lightmap sets.
Remember that Lock Atlas locks only atlasing, not the mesh UVs. If you change your source mesh and the mesh importer is set to generate lightmap UVs, the UVs might be generated differently and your current lightmap will look incorrectly on the object - to fix this you will need to re-bake the lightmap.
Custom Beast bake settings
If you need even more control over the bake process, see the custom Beast settings page.