Android environment setup
To build and run for Android, you must install the Unity Android Build Support platform module. You also need to install the Android Software Development Kit (SDK) and the Native Development Kit (NDK) to build and run any code on your Android device. By default, Unity installs a Java Development Kit based on OpenJDK.
Note: Unity supports Android 4.4 “KitKat” and above. See AndroidSdkVersions for details.
1. Install Android Build Support and the Android SDK & NDK tools
Use the Unity Hub to install Android Build Support and the required dependencies
See in Glossary: Android SDK & NDK tools, and OpenJDK.

You can install Android Build Support, the Android SDK & NDK tools and OpenJDK when you install the Unity Editor, or add them at a later time.
For information on adding the Android modules:
- At install time, see Get Started.
- To an existing installation, see Adding modules to the Editor.
Note: If you’re using Unity on macOS 10.15 (Catalina) and you don’t install Android tools through the Unity Hub, your operating system’s default security settings will prevent the Android NDK binaries being executed. You must either change these security settings, or download a signed Android NDK (r16b) from the Android developer website.
If you are using a 2018 version of Unity, see the Unity 2018.4 documentation for information on manually installing these dependencies.
2. Enable USB debugging on your device
To enable USB debugging, you must enable Developer options on your device. To do this, find the build number in your device’s Settings menu. The location of the build number varies between devices; for stock Android, it’s usually Settings > About phone > Build number. For specific information on your device and Android version, refer to your hardware manufacturer.
After you navigate to the build number using the instructions above, tap on the build number seven times. A pop-up notification saying “You are now X steps away from being a developer” appears, with “X” being a number that counts down with every additional tap. On the seventh tap, Developer options are unlocked.
Note: On Android versions prior to 4.2 (Jelly Bean), the Developer options are enabled by default.
Go to Settings > Developer options (or, if this does not work, on some devices the path is Settings > System > Developer options), and check the USB debugging checkbox. Android now enters debug mode when it is connected to a computer via USB.
Connect your device to your computer using a USB cable. If you are developing on a Windows computer, you might need to install a device-specific USB driver. See the manufacturer website for your device for additional information.
The setup process differs for Windows and macOS and is explained in detail on the Android developer website. For more information on connecting your Android device to the SDK, refer to the Run Your App section of the Android Developer documentation.
ADB debugging for Chrome OS devices
For information on how to set up your development environment for Chrome OS devices, and enable ADBAn Android Debug Bridge (ADB). You can use an ADB to deploy an Android package (APK) manually after building. More info
See in Glossary debugging, see Google’s documentation on Chrome OS Developer Environments.
Connecting to your Chrome OS device
Before you can deploy to your device you need to manually connect with ADB via the device’s IP address.
To begin you need the IP address. Open up the Settings app and choose Network in the sidebar. Next click on the active network interface.
If the interface is wireless then next choose the SSID that you are connected to. In the details you will see your IP address. Make a note of it.
If you are using a wired connection your IP address will be shown on the first details page.
Now we are ready to connect. For the sake of this example let’s say that the device’s IP is 192.168.0.100. In a shell or terminal run the following command
adb connect 192.168.0.100
If the connection was successful you will see a message such as connected to 192.168.0.65:5555. And adb devices should verify that the device is connected.
List of devices attached
192.168.0.65:5555       device
From now on you may run ADB commands to target the device just as you would over a USB connection.
Note: If your device or host machine goes to sleep or loses network connectivity you may need to reconnect.
Customizing the Android SDK & NDK Tools and OpenJDK installation
Unity recommends that you use the Unity Hub to install Android SDK & NDK tools, to ensure that you receive the correct versions and configuration. Unity installs Android SDK & NDK Tools and OpenJDK respectively in the SDK, NDK and OpenJDK folders under /Unity/Hub/Editor/[EditorVersion]/Editor/Data/PlaybackEngines/AndroidPlayer/.
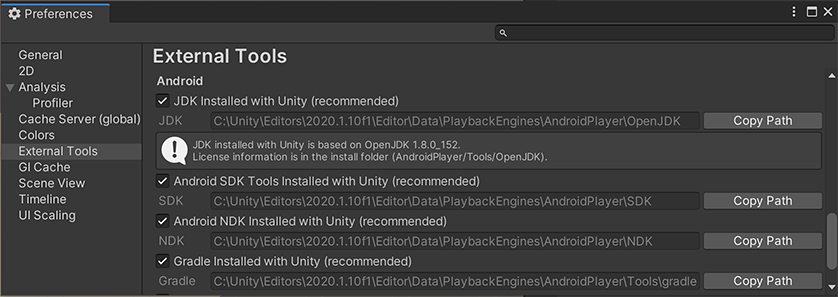
If you have multiple versions of Unity with the same required dependencies (be sure to check System requirements for the latest) and you want to avoid duplicating the installation of Android SDK & NDK Tools and OpenJDK, you can specify a shared location in the Unity Preferences window. To do this, go to Preferences > External tools and enter the directory paths in the SDK and NDK fields:
Warning: Unity does not officially support versions of the OpenJDK, SDK, or NDK other than the ones it supplies.
To change the OpenJDK, SDK Tools, or NDK that Unity uses to build Android apps:
- Open the Project.
- Open the Preferences window (Windows and Linux: Edit > Preferences; macOS: Unity > Preferences).
- In the left navigation column, select External Tools.
Change the OpenJDK path
- Uncheck JDK Installed with Unity (recommended).
- In the JDK field, enter the path to the JDK installation folder, or use the Browse button to locate it.
Change the Android SDK Tools path
- Uncheck Android SDK Tools Installed with Unity (recommended).
- In the SDK field, enter the path to the SDK installation folder, or use the Browse button to locate it.
Unity works with the most recent version of the Android SDK available at the time of the Unity version release.
Change the Android NDK path
- Uncheck Android NDK Installed with Unity (recommended).
- In the NDK field, enter the path to the NDK installation folder, or use the Browse button to locate it.
Each version of Unity requires a specific version of the Android NDK to be installed:
| Unity version | NDK version |
|---|---|
| 2018.4 LTS | r16b |
| 2019.4 LTS | r19 |
See the System requirements page for a complete list of requirements.
Updating the Android SDK Target API
Unity Hub installs the latest version of the Android SDK Target API required by Google Play.
If you need to use a more recent version, you can change the Target API from the Target API Level field in the Player Settings window (menu: Edit > Project Settings > Player, then select the Android platform). You can find the Target API Level option in the Other Settings > Identification section.
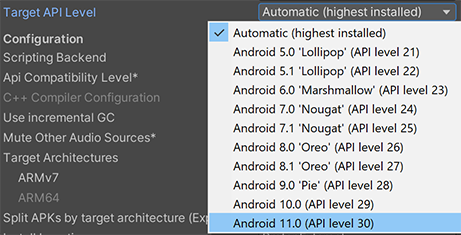
After you select an option other than the default, Unity prompts you to update the Android SDK API. You can choose to either:
- Update the Android SDK
- Continue to use the highest installed version of the Android SDK
Note: If you select an older version of the Target API, the Unity Android SDK Updater will not be able to perform the update and will give you this message:
Android SDK does not include your Target SDK of (version). Please use the Android SDK Manager to install your target SDK version. Restart Unity after SDK installation for the changes to take effect.
In this case, to update the Android SDK Target API, you must use the Android sdkmanager from either Android Studio or the command line tool. Regardless of the method you chose, make sure to select the correct Android SDK folder for Unity in the Edit > Preferences > External Tools window.
On Windows, if the Unity Editor is installed in the default folder (/Program Files/), you must run the sdkmanager with elevated privilege (Run as Administrator) to perform the update.