Flare asset
Switch to ScriptingA Flare asset allows you to create and configure the appearance of lens flares. Lens flares simulate the effect of lights refracting inside a camera lens. Use them to represent bright lights or to add a bit more atmosphere to your SceneA Scene contains the environments and menus of your game. Think of each unique Scene file as a unique level. In each Scene, you place your environments, obstacles, and decorations, essentially designing and building your game in pieces. More info
See in Glossary.
Note: This workflow is compatible only with the Built-in Render Pipelne. For similar functionality in other render pipelines, see Lens flares and halos.
Using Flare assets
- Assign the Flare asset to a Light component or a Lens flare component.
- If you assign it to the Flare property of a Light component, Unity automatically tracks the position and direction of the Light and uses those values to configure the appearance of the lens flare.
- If you assign it to the Flare property of a Lens flare component, you can use the Lens Flare component to configure additional values for more precise control.
- If you want a CameraA component which creates an image of a particular viewpoint in your scene. The output is either drawn to the screen or captured as a texture. More info
See in Glossary to see lens flares, attach a Flare Layer component to the Camera’s GameObjectThe fundamental object in Unity scenes, which can represent characters, props, scenery, cameras, waypoints, and more. A GameObject’s functionality is defined by the Components attached to it. More info
See in Glossary. - To see the lens flare effect in the Scene ViewAn interactive view into the world you are creating. You use the Scene View to select and position scenery, characters, cameras, lights, and all other types of Game Object. More info
See in Glossary, enable the Effect toggle in the Scene View toolbarA row of buttons and basic controls at the top of the Unity Editor that allows you to interact with the Editor in various ways (e.g. scaling, translation). More info
See in Glossary and, in the drop-down, enable Flares.
Examples
There are some sample Flare assets in Unity’s Standard Assets.
Flare Inspector reference
Flares work by containing several Flare Elements on a single TextureAn image used when rendering a GameObject, Sprite, or UI element. Textures are often applied to the surface of a mesh to give it visual detail. More info
See in Glossary. Within the Flare, you pick and choose which Elements you want to include from any of the Textures.
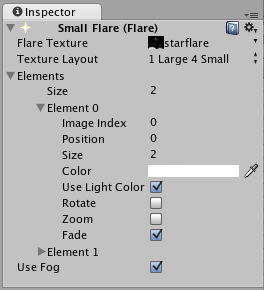
| Property: | Function: |
|---|---|
| Elements | The number of Flare images included in the Flare. |
| Image Index | Which Flare image to use from the Flare Texture for this Element. See the Flare Textures section below for more information. |
| Position | The Element’s offset along a line running from the containing GameObject’s position through the screen center. 0 = GameObject position, 1 = screen center. |
| Size | The size of the element. |
| Color | Color tint of the element. |
| Use Light Color | If the Flare is attached to a Light, enabling this will tint the Flare with the Light’s color. |
| Rotate | If enabled, bottom of the Element will always face the center of the screen, making the Element spin as the Lens Flare moves around on the screen. |
| ZoomA camera control that lets you scale the view on your screen. To zoom a camera in the Unity Editor, press Alt + right click and drag. More info See in Glossary |
If enabled, the Element will scale up when it becomes visible and scale down again when it isn’t. |
| Fade | If enabled, the Element will fade in to full strength when it becomes visible and fade out when it isn’t. |
| Flare Texture | A texture containing images used by this Flare’s Elements. It must be arranged according to one of the TextureLayout options. |
| Texture Layout | How the individual Flare Element images are laid out inside the Flare Texture (see Texture Layouts below for further details). |
| Use Fog | If enabled, the Flare will fade away with distance fog. This is used commonly for small Flares. |
Configuring Flare assets
A Flare consists of multiple Elements, arranged along a line. The line is calculated by comparing the position of the GameObject containing the Lens Flare to the center of the screen. The line extends beyond the containing GameObject and the screen center. All Flare Elements are strung out on this line.
For performance reasons, all Elements of one Flare must share the same Texture. This Texture contains a collection of the different images that are available as Elements in a single Flare. The Texture Layout defines how the Elements are laid out in the Flare Texture. If you use many different Flare assets, using a shared single Flare Texture that contains all the Elements will give you best renderingThe process of drawing graphics to the screen (or to a render texture). By default, the main camera in Unity renders its view to the screen. More info
See in Glossary performance.
Lens Flares are blocked by CollidersAn invisible shape that is used to handle physical collisions for an object. A collider doesn’t need to be exactly the same shape as the object’s mesh - a rough approximation is often more efficient and indistinguishable in gameplay. More info
See in Glossary. A Collider in-between the Flare GameObject and the Camera will hide the Flare, even if the Collider does not have a Mesh RendererA mesh component that takes the geometry from the Mesh Filter and renders it at the position defined by the object’s Transform component. More info
See in Glossary. If the in-between Collider is marked as Trigger it will block the flare if and only if Physics.queriesHitTriggers is true.
To override the shaderA program that runs on the GPU. More info
See in Glossary used for Flares, open the Graphics window and set Lens FlaresA component that simulates the effect of lights refracting inside a camera lens. Use a Lens Flare to represent very bright lights or add atmosphere to your scene. More info
See in Glossary to the shader that you would like to use as the override.
Texture Layouts
These are the options you have for different Flare Texture Layouts. The numbers in the images correspond to the Image Index property for each Element.
1 Large 4 Small
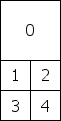
Designed for large sun-style Flares where you need one of the Elements to have a higher fidelity than the others. This is designed to be used with Textures that are twice as high as they are wide.
1 Large 2 Medium 8 Small

Designed for complex flares that require 1 high-definition, 2 medium and 8 small images. This is used in the standard assets “50mm Zoom Flare” where the two medium Elements are the rainbow-colored circles. This is designed to be used with textures that are twice as high as they are wide.
1 Texture

A single image.
2x2 grid

A simple 2x2 grid.
3x3 grid

A simple 3x3 grid.
4x4 grid

A simple 4x4 grid.