Avatar Muscle & Settings tab
Unity’s animation system allows you to control the range of motion of different bones using Muscles.
Once the Avatar has been properly configured, the animation system “understands” the bone structure and allows you to start using the Muscles & Settings tab of the AvatarAn interface for retargeting animation from one rig to another. More info
See in Glossary’s InspectorA Unity window that displays information about the currently selected GameObject, asset or project settings, allowing you to inspect and edit the values. More info
See in Glossary. Use the Muscles & Settings tab to tweak the character’s range of motion and ensure the character deforms in a convincing way, free from visual artifacts or self-overlaps.

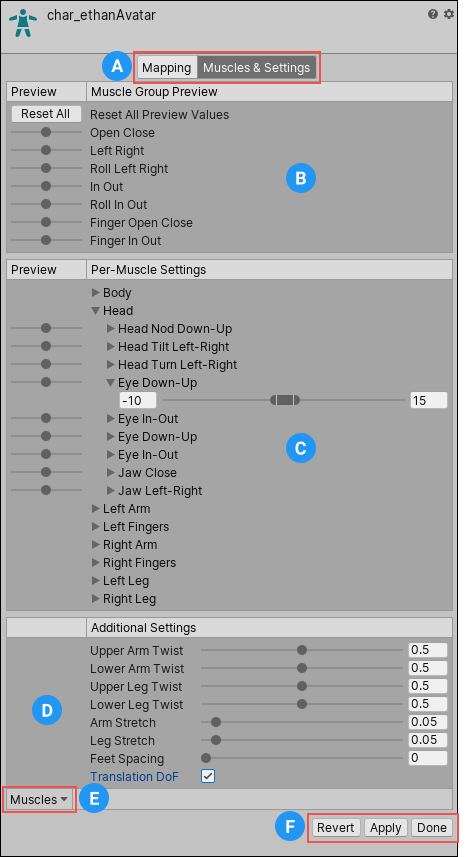
The areas of the Muscle & Settings tab include:
(A) Buttons to toggle between the Mapping and Muscles & Settings tabs. You must Apply or Revert any changes made before switching between tabs.
(B) Use the Muscle Group Preview area to manipulate the character using predefined deformations. These affect several bones at once.
(C) Use the Per-Muscle Settings area to adjust individual bones in the body. You can expand the muscle settings to change the range limits of each settings. For example, by default, Unity gives the Head-Nod and Head-Tilt settings a possible range of –40 to 40 degrees but you can decrease these ranges even further to add stiffness to these movements.
(D) Use the Additional Settings to adjust specific effects in the body.
(E) The Muscles menu provides a Reset tool to return all muscle settings to their default values.
(F) Buttons to accept any changes made (Accept), discard any changes (Revert), and leave the Avatar window (Done). You must Apply or Revert any changes made before leaving the Avatar window.
Previewing changes
For the settings in the Muscle Group Preview and Per-Muscle Settings areas, you can preview the changes right in the SceneA Scene contains the environments and menus of your game. Think of each unique Scene file as a unique level. In each Scene, you place your environments, obstacles, and decorations, essentially designing and building your game in pieces. More info
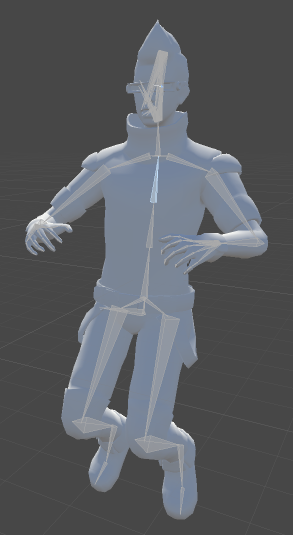
See in Glossary view. You can drag the sliders left and right to see the range of movement for each setting applied to your character:

You can see the bones of the skeleton through the MeshThe main graphics primitive of Unity. Meshes make up a large part of your 3D worlds. Unity supports triangulated or Quadrangulated polygon meshes. Nurbs, Nurms, Subdiv surfaces must be converted to polygons. More info
See in Glossary.
Translate Degree of Freedom (DoF)
You can enable the Translate DoFThe three degrees-of-freedom associated with translation (movement in X,Y & Z) as opposed to rotation.
See in Glossary option in the Additional Settings to enable translation animations for the humanoid. If this option is disabled, Unity animates the bones using only rotations. Translation DoF is available for Chest, UpperChest, Neck, LeftUpperLeg, RightUpperLeg, LeftShoulder and RightShoulder muscles.
Note: Enabling Translate DoF can increase performance requirements, because the animation system needs to perform an extra step to retarget humanoid animationAn animation using humanoid skeletons. Humanoid models generally have the same basic structure, representing the major articulate parts of the body, head and limbs. This makes it easy to map animations from one humanoid skeleton to another, allowing retargeting and inverse kinematics. More info
See in Glossary. For this reason, you should only enable this option if you know your animation contains animated translations of some of the bones in your character.