Quality
Switch to ScriptingUnity allows you to set the level of graphical quality it attempts to render. Generally speaking, quality comes at the expense of framerate and so it may be best not to aim for the highest quality on mobile devices or older hardware since it tends to have a detrimental effect on gameplay. Use the Quality settings (menu: Edit > Project Settings, then select the Quality category) to select the quality level in the Editor for the chosen device. It is split into two main areas: the Quality matrix appears at the top; and below it, the settings for the selected quality level appear.
Unity lets you assign a name to a given combination of quality options for easy reference. The rows of the matrix let you choose which of the different platforms each quality level applies to. The Default row at the bottom of the matrix is not a quality level in itself but rather sets the default quality level used for each platform (a green checkbox in a column denotes the level currently chosen for that platform). Unity comes with six quality levels pre-enabled but you can add your own levels.
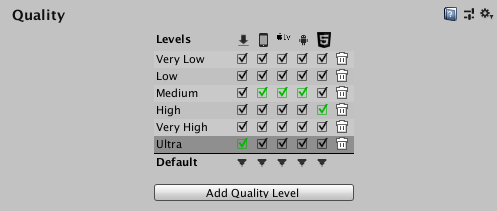
To delete an unwanted quality level, use the trashcan icon (the rightmost column).
To select a quality level for editing, click on its name in the matrix. Its definitions appear in the panel below the settings and you can modify any settings you need to:
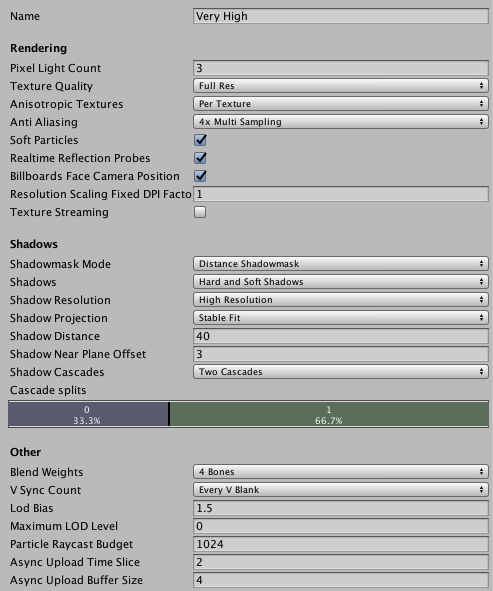
To define a new Quality level, click the Add Quality Level button and type the name for the new level in the Name property box.
Then you can choose which of the quality options documented in the following sections you need to update or set:
Rendering
| Property | Function |
|---|---|
| Pixel Light Count | Set the maximum number of pixelThe smallest unit in a computer image. Pixel size depends on your screen resolution. Pixel lighting is calculated at every screen pixel. More info See in Glossary lights when Unity uses Forward RenderingA rendering path that renders each object in one or more passes, depending on lights that affect the object. Lights themselves are also treated differently by Forward Rendering, depending on their settings and intensity. More info See in Glossary. |
| Texture Quality | Choose the maximum mipmap level that Unity uses when rendering textures. Higher mipmap levels have lower resolutions, which means that the textures require less GPU memory and less GPU processing time. The options are Full Res, Half Res, Quarter Res and Eighth Res. Textures that do not have mipmaps will render at their full resolution, regardless of the option you choose. |
| Anisotropic Textures | Choose if and how Unity uses anisotropic Textures. The options are Disabled, Per Texture and Forced On (that is, always enabled). |
| AntiAliasingA technique for decreasing artifacts, like jagged lines (jaggies), in images to make them appear smoother. More info See in Glossary |
Choose the level of Multi-Sample Anti-aliasing (MSAA) that the GPU performs. The options are Disabled, 2x Multi Sampling, 4x Multi Sampling and 8x Multi Sampling. Anti aliasing smooths the appearance of polygon edges. As the level of anti-aliasing increases, so does the smoothness and the performance cost on the GPU. MSAA is compatible only with Forward rendering. For more information on other types of anti-aliasing and compatibility, see Post processing. |
| Soft ParticlesParticles that create semi-transparent effects like smoke, fog or fire. Soft particles fade out as they approach an opaque object, to prevent intersections with the geometry. More info See in Glossary |
Enable this option to use soft blending for particles? See Soft Particles for more information. |
| Realtime Reflection Probes | Enable this option to update reflection probesA rendering component that captures a spherical view of its surroundings in all directions, rather like a camera. The captured image is then stored as a Cubemap that can be used by objects with reflective materials. More info See in Glossary during gameplay. |
| Billboards Face CameraA component which creates an image of a particular viewpoint in your scene. The output is either drawn to the screen or captured as a texture. More info See in Glossary Position |
Enable this option to force billboardsA textured 2D object that rotates so that it always faces the Camera. More info See in Glossary to face the camera while rendering instead of the camera plane. This produces a better, more realistic image, but is more expensive to render. |
| Resolution Scaling Fixed DPI Factor | Downscales the device’s screen resolution below its native resolution. For more details, see Android Player settings and iOS Player settings. |
|
Texture Streaming |
Enable this checkbox to use Mipmap Streaming. If you are not planning to use the Mipmap Streaming system, disable this feature to avoid any overhead. |
| Add All Cameras | Enable this checkbox to make Unity calculate Mipmap Streaming for all active Cameras in the Project. This is enabled by default. For more information, see Mipmap Streaming system: Configuring Cameras. |
| Memory Budget | Set the total amount of memory you want to assign to all loaded textures (in MB) when using the Mipmap Streaming system. This is set to 512 MB by default. For more information, see Mipmpap Streaming system: Setting the memory budget. |
| Renderers Per Frame | This controls the CPU processing overhead for the Mipmap Streaming system for the main thread and associated jobs. This is 512 by default (that is, processing 512 Mesh renderers per frame). Lower values reduce processing time, but increase delays to Unity loading the mipmaps. |
| Max Level Reduction | Set the maximum number of mipmaps that the Mipmap Streaming system can discard if the Mipmap Streaming system reaches the Memory Budget. This is set to 2 by default (which means that the system discards no more than two mipmaps). This value is also the mipmap level that the Mipmap Streaming system initially loads at startup. For example, when this is set to 2, Unity skips the two highest mipmaps on first load. For more information, see Mipmpap Streaming system: Setting the memory budget. |
| Max IO Requests | Set the maximum number of texture file in/out (IO) requests from the MipMap Streaming system that are active at any one time. This is set to 1024 by default. This default is set high enough to prevent any IO cap beyond what is already active due to the Async Upload pipeline or file system itself. If the Scene Texture content changes significantly and rapidly, the system might attempt to load more Texture mipmaps than the file IO can keep up with. Lowering this value reduces the IO bandwidth that the Mipmap Streaming system generates. The result is a more rapid response to changing mipmap requirements. |
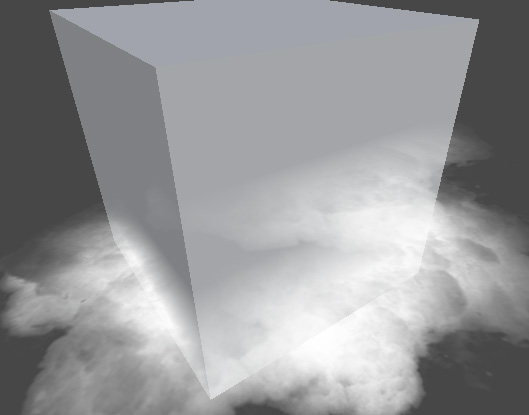
Soft particles
Soft particles fade out near intersections with other SceneA Scene contains the environments and menus of your game. Think of each unique Scene file as a unique level. In each Scene, you place your environments, obstacles, and decorations, essentially designing and building your game in pieces. More info
See in Glossary geometry. This looks much nicer, but is more resource intensive to process and only works on platforms that support depth textures. Furthermore, you have to use either the Deferred ShadingA rendering path in the Built-in Render Pipeline that places no limit on the number of Lights that can affect a GameObject. All Lights are evaluated per-pixel, which means that they all interact correctly with normal maps and so on. Additionally, all Lights can have cookies and shadows. More info
See in Glossary or Legacy Deferred Lighting rendering pathThe technique Unity uses to render graphics. Choosing a different path affects the performance of your game, and how lighting and shading are calculated. Some paths are more suited to different platforms and hardware than others. More info
See in Glossary, or make the camera render depth textures from scriptsA piece of code that allows you to create your own Components, trigger game events, modify Component properties over time and respond to user input in any way you like. More info
See in Glossary.

Shadows
| Property: | Function: | |
|---|---|---|
| Shadowmask Mode | Choose the shadowmask behavior when using the Shadowmask Mixed lighting mode. Use the Lighting window (menu: Window > RenderingThe process of drawing graphics to the screen (or to a render texture). By default, the main camera in Unity renders its view to the screen. More info See in Glossary > Lighting Settings) to set this up in your Scene. |
|
| Distance ShadowmaskA version of the Shadowmask lighting mode that includes high quality shadows cast from static GameObjects onto dynamic GameObjects. More info See in Glossary |
Unity uses real-time shadows up to the Shadow Distance, and baked shadows beyond it. | |
| ShadowmaskA Texture that shares the same UV layout and resolution with its corresponding lightmap. More info See in Glossary |
Static GameObjectsThe fundamental object in Unity scenes, which can represent characters, props, scenery, cameras, waypoints, and more. A GameObject’s functionality is defined by the Components attached to it. More info See in Glossary that cast shadows always cast baked shadows. |
|
| ShadowsA UI component that adds a simple outline effect to graphic components such as Text or Image. It must be on the same GameObject as the graphic component. More info See in Glossary |
Choose which type of shadows to use. The available options are Hard and Soft Shadows, Hard Shadows Only and Disable Shadows. | |
| Shadow Resolution | Choose which resolution to render shadows at. The available options are Low Resolution, Medium Resolution, High Resolution and Very High Resolution. The higher the resolution, the greater the processing overhead. | |
| Shadow Projection | Choose which method to use for projecting shadows from a directional light. | |
| Close Fit | Renders higher resolution shadows but they can sometimes wobble slightly if the camera moves. | |
| Stable Fit | Renders lower resolution shadows but they don’t wobble with camera movements. | |
| Shadow Distance | Enter the maximum distance from the Camera at which shadows are visible. Unity does not render shadows that fall beyond this distance. | |
| Shadow Near Plane Offset | Enter the offset shadow near plane to account for large triangles being distorted by shadow pancaking. | |
| Shadow Cascades | Choose the number of shadow cascades to use. The available options are No Cascades, Two Cascades, or Four Cascades. A higher number of cascades gives better quality but at the expense of processing overhead (see Shadow Cascades for further details). | |
| Cascade splits | Adjust the cascade shadow split(s) by moving the vertical line between each cascade left or right. Depending on what value you chose for the Shadow Cascades setting, you can see two or four different colors. If Shadow Cascades is set to No Cascades, then this entire control is hidden. |
|
Other
| Property | Function |
|---|---|
| Blend Weights | Choose the number of bones that can affect a given vertex during an animation. The available options are 1 Bone, 2 Bones, 4 Bones, and Unlimited. |
| V Sync Count | Choose to synchronize rendering with vertical blanks or not to synchronize at all. Unity can synchronize rendering with the refresh rate of the display device to avoid tearing artifacts. The available options are Every V Blank, Every Second V Blank, or Don’t Sync. |
| Lod Bias | Set the level-of-detail (LOD) bias. LOD levels are chosen based on the onscreen size of an object. When the size is between two LOD levels, the choice can be biased toward the less detailed or more detailed of the two Models available. This is set as a fraction from 0 to +infinity. When it is set between 0 and 1 it favors less detail. A setting of more than 1 favors greater detail. For example, setting LOD Bias to 2 and having it change at 50% distance, LOD actually only changes on 25%. |
| Maximum LODThe Level Of Detail (LOD) technique is an optimization that reduces the number of triangles that Unity has to render for a GameObject when its distance from the Camera increases. More info See in Glossary Level |
Set the highest LOD that the game uses. See Maximum LOD level for more information. |
| Particle Raycast Budget | Set the maximum number of raycasts to use for approximate particle systemA component that simulates fluid entities such as liquids, clouds and flames by generating and animating large numbers of small 2D images in the scene. More info See in Glossary collisionsA collision occurs when the physics engine detects that the colliders of two GameObjects make contact or overlap, when at least one has a Rigidbody component and is in motion. More info See in Glossary (those with Medium or Low quality). See Particle System Collision Module. |
| Async Upload Time Slice | Set the amount of CPU time in milliseconds per frame Unity spends uploading buffered Texture and MeshThe main graphics primitive of Unity. Meshes make up a large part of your 3D worlds. Unity supports triangulated or Quadrangulated polygon meshes. Nurbs, Nurms, Subdiv surfaces must be converted to polygons. More info See in Glossary data to the GPU. See LoadingTextureandMeshData. |
| Async Upload Buffer Size | Set the size in megabytes of the Async Upload Buffer Unity uses to stream Texture and Mesh data for the to the GPU. See LoadingTextureandMeshData. |
Maximum LOD level
Unity does not use Models which have a LOD below the MaximumLOD level and omits them from the build (which saves storage and memory space). Unity uses the smallest LOD value from all the MaximumLOD values linked with the Quality settings for the target platform. If an LOD level is included, then Models from that LODGroup are included in the build and always loaded at runtime for that LODGroup, regardless of the Quality setting being used. As an example, if LOD level 0 is used in any Quality setting then all the LOD levels are included in the build and all the referenced Models load at runtime.
Tearing
The picture on the display device is not continuously updated, but rather the updates happen at regular intervals much like frame updates in Unity. However, Unity’s updates are not necessarily synchronized with those of the display, so it is possible for Unity to issue a new frame while the display is still rendering the previous one. This results in a visual artifact called “tearing” at the position onscreen where the frame change occurs.
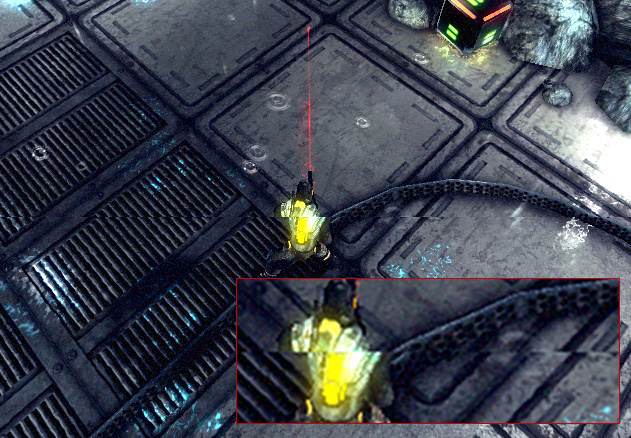
It is possible to get Unity to switch frames only during the period where the display device is not updating, the so-called “vertical blank”. The V Sync Count option in Quality settings synchronizes frame switches with the device’s vertical blank or optionally with every other vertical blank. The latter may be useful if the game requires more than one device update to complete the rendering of a frame.
2017–09–18 Page amended
Shadowmask Mode added in 2017.1 NewIn20171