Compressing mesh data
You can compress meshThe main graphics primitive of Unity. Meshes make up a large part of your 3D worlds. Unity supports triangulated or Quadrangulated polygon meshes. Nurbs, Nurms, Subdiv surfaces must be converted to polygons. More info
See in Glossary data in Unity to reduce its size, which can improve performance. Unity provides two ways of compressing meshes. They work differently, and affect different aspects of performance:
- Vertex Compression is a setting that affects every mesh in your project. It allows you to use lower precision data formats in your meshes. This reduces the size of mesh data in memory, slightly reduces file size, and might improve GPU performance. The potential downside is a loss of precision.
-
Mesh Compression is a setting that affects individual meshes. It compresses the mesh data on disk, which reduces file size. The potential downsides are increased loading times, increased temporary memory usage when loading, and the possibility of compressionA method of storing data that reduces the amount of storage space it requires. See Texture Compression, Animation Compression, Audio Compression, Build Compression.
See in Glossary artifacts.
You can use both compression methods in the same project, but not on the same mesh. If you apply Mesh Compression to a mesh, Unity doesn’t apply Vertex Compression to that mesh.
Note: Unity’s default settings for Vertex Compression and Mesh Compression are suitable for most projects. You should change these settings only if you have a problem, and assess the results to make sure that the changes have helped.
Vertex Compression
The Vertex Compression setting allows you to use lower precision data formats for all the meshes in your project. You do this by configuring the data type for specific data channels.
You can change the data type for a given channel from an FP32 (Floating Point32, a 32-bit floating point number) to an FP16 (Floating Point16, also known as a half-precision float). The FP16 format stores numbers with fewer places after the decimal point than FP32 numbers, which means that it takes up less space but offers slightly less precision.
Data converted from FP32 to FP16 takes up less space in memory, and slightly less space on disk. On the GPU, the data uses less memory bandwidth, which might slightly improve GPU performance.
The vertex compression technique compresses a mesh by a ratio that varies depending on how many vertex attributes you choose to compress. The compression ratio is usually around 1.45x when you compress normals, tangents, color, and three sets of UV coordinates.
Limitations of Vertex Compression
The mesh must meet the following requirements to use vertex compression:
- The mesh must have its Read/Write Enabled property disabled. You can change this property in the Model tab of the Model Import Settings window.
- The mesh must not be a skinned mesh.
- The target platform must support FP16 values.
- The model that contains the mesh must have its Mesh Compression value set to “Off”.
If a mesh fails to meet any of these requirements, then Unity does not apply vertex compression to that mesh and all data channels on the mesh use FP32 precision numbers.
Configuring Vertex Compression
To change the Vertex Compression settings: 1. Open the Player settings (menu: Edit > Project Settings > Player). 1. Open the Other Settings submenu and navigate to the Optimization heading. 1. Select the Vertex Compression dropdown and select any channel to enable or disable compression for that channel. You can also select None to disable compression for all channels, or select Everything to enable compression for all channels.
By default, Vertex Compression is set to Mixed, which Unity displays when multiple selections are active in the dropdown. By default, Unity uses Vertex Compression for the following channels:
- Normal
- Tangent
- Tex Coord 0
- Tex Coord 2
- Tex Coord 3
Unity compresses these channels by default because in most cases this combination of settings provides a good mixture of saved memory without significant changes to how the mesh looks. Unity doesn’t compress the other settings, Position and Tex Coord 1, by default because these are more likely to affect the appearance of the mesh, and do not offer significant reduction in memory use. If you intend to enable Vertex Compression for the Position and Tex Coord 1 channels, you should test the settings to ensure they don’t cause artifacts in your meshes.
Mesh Compression
You can use the Mesh Compression setting to compress the mesh data for a given model asset on disk. The Mesh Compression algorithm is more aggressive than the Vertex Compression technique, which results in higher compression ratios and therefore smaller file sizes. However, it also has more downsides.
When you apply this setting, Unity uses an algorithm to replace the explicit values for each compression channel with a range between the maximum and minimum, where a fixed number of bits represents where each value falls in that range. This reduces the size of the mesh data on disk. When Unity loads the mesh into memory, it decompresses the data, which means it converts this range back into the original values. After this, performance isn’t affected.
This technique can be useful if you need to reduce your final build size or the size of the AssetBundle the mesh is in as much as possible, and if the reduction in performance from the runtime decompression is acceptable.
Limitations of Mesh Compression
At runtime, mesh decompression uses additional CPU resources; this means that loading mesh data takes longer. Unity also uses more temporary memory when decompressing meshes.
Additionally, the relatively high compression ratio means that unwanted artifacts can appear when Unity decompresses the mesh. To avoid these artifacts, you should test each option for the mesh you want to compress and check that it appears correctly.
Configuring Mesh Compression
To use the Mesh Compression setting:
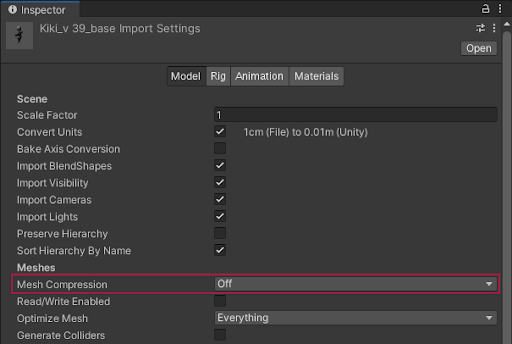
- Select a Model in your project’s Assets folder to open the Model tab of the Import Settings window.
- Navigate to the Meshes heading and find the Mesh Compression setting.
- Select the dropdown menu to choose a level for all meshes in that Model. You can also change this setting in code with the ModelImporterMeshCompression enumeration.
Available values are High, Medium, Low, or Off. The following table shows typical compression ratios for each of these settings:
| Value | Vertices | Normals | Tangents | UVs | Color |
|---|---|---|---|---|---|
| Off | 1.0 | 1.0 | 1.0 | 1.0 | 1.0 |
| Low | 1.6 | 4.6 | 4.4 | 2.0 | 1.0 |
| Medium | 2.0 | 5.6 | 5.3 | 3.2 | 1.3 |
| High | 3.2 | 7.4 | 6.7 | 4.0 | 2.0 |
Compression ratios for the mesh compression technique
Note: The “Color” column in the above table shows ratios for a mesh that uses the UNorm8 format. For a mesh that uses the FP32 format for vertex colors, the ratios are 4.0 on the Low setting, 5.3 on the Medium setting, and 8.0 on the High setting.