В недрах процесса построения Android сборки
The Android application build process has two steps:
Генерируется дистрибутив приложения (.apk-файл) со всеми необходимыми библиотеками и сериализованными ассетами.
Пакет приложения разворачивается на текущем устройстве.
Go to File > Build Settings… or File > Build & Run to open the Build Settings dialog box.
Кнопка “Build” в окне “Build settings” запускает лишь первый этап. Кнопка “Build and Run” выполняет оба этапа.
If you select Build in the Build Settings dialog box, Unity only does step 1.
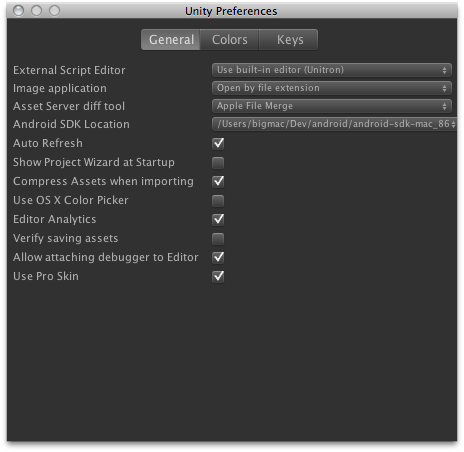
При первой сборке Android-проекта Unity попросит вас указать путь до Android SDK, требуемого для сборки и установки вашего Android приложения на устройство.
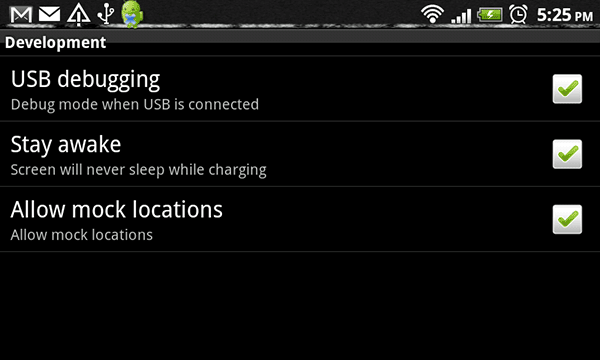
При сборке приложения под Android убедитесь, что в настройках устройства включены “USB Debugging” и “Allow mock locations”.
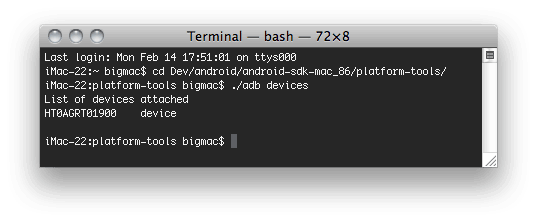
Run the adb devices command (which is in your Android SDK/platform-tools folder), so that the operating system can see your device. This works both for Mac and Windows.
Unity соберёт дистрибутив приложения (.apk-файл) и установит его на ваше подключенное устройство.
Иногда ваше приложение не сможет запуститься само как на iPhone, и вам нужно будет разблокировать экран; в редких случаях вам придётся запустить только что установленное приложение из меню.
Сжатие текстур.
В Build Settings вы также найдёте опцию Texture Compression. По умолчанию, Unity использует ETC1/RGBA16 формат для текстур, которые не имеют индивидуальных переопределений (см. 2D текстуры / переопределения для платформ).
If you want to build an application archive (an .apk file) targeting a specific hardware architecture, use the Texture Compression option to override this default behavior. Any texture that is set to not be compressed is left alone; only textures using a compressed texture format use the format selected in the Texture Compression option.
Чтобы убедиться, что приложение разворачивается только на устройствах, поддерживающих выбранное сжатие текстур, Unity включит в AndroidManifest тэги, соответствующие выбранному формату.
Permissions automatically added to the build manifest
Unity automatically adds certain permissions to the manifest. The logic is defined in the file PlatformDependent/AndroidPlayer/Editor/Managed/PostProcessor/Tasks/GenerateManifest.cs :: SetPermissionAttributes. For example, if your script code references Application.internetReachability, Unity automatically adds android.permission.ACCESS_NETWORK_STATE to the manifest. You can edit GenerateManifest.cs to remove it.
The following is the contents of /GenerateManifest.cs :: SetPermissionAttributes:
private void SetPermissionAttributes(PostProcessorContext context,

AndroidManifest manifestXML,

AssemblyReferenceChecker checker)

{

// Add internet permission if it's necessary

if (_developmentPlayer || PlayerSettings.Android.forceInternetPermission || doesReferenceNetworkClasses(checker))

manifestXML.AddUsesPermission("android.permission.INTERNET");


if (checker.HasReferenceToMethod("UnityEngine.Handheld::Vibrate"))

manifestXML.AddUsesPermission("android.permission.VIBRATE");


if (checker.HasReferenceToMethod("UnityEngine.iPhoneSettings::get_internetReachability")

|| checker.HasReferenceToMethod("UnityEngine.Application::get_internetReachability"))

manifestXML.AddUsesPermission("android.permission.ACCESS_NETWORK_STATE");


if (checker.HasReferenceToMethod("UnityEngine.Input::get_location")

|| checker.HasReferenceToMethod("UnityEngine.iPhoneInput::get_lastLocation")

|| checker.HasReferenceToMethod("UnityEngine.iPhoneSettings::get_locationServiceStatus")

|| checker.HasReferenceToMethod("UnityEngine.iPhoneSettings::get_locationServiceEnabledByUser")

|| checker.HasReferenceToMethod("UnityEngine.iPhoneSettings::StartLocationServiceUpdates")

|| checker.HasReferenceToMethod("UnityEngine.iPhoneSettings::StopLocationServiceUpdates"))

{

manifestXML.AddUsesPermission("android.permission.ACCESS_FINE_LOCATION");

manifestXML.AddUsesFeature("android.hardware.location.gps", false /*encourage gps, but don't require it*/);

// This is an implied feature, make it not required to support Android TV

manifestXML.AddUsesFeature("android.hardware.location", false);

}


if (checker.HasReferenceToType("UnityEngine.WebCamTexture"))

{

manifestXML.AddUsesPermission("android.permission.CAMERA");

// By default we don't require any camera since a WebCamTexture may not be a crucial part of the app.

// We need to explicitly say so, since CAMERA otherwise implicitly marks camera and autofocus as required.

manifestXML.AddUsesFeature("android.hardware.camera", false);

manifestXML.AddUsesFeature("android.hardware.camera.autofocus", false);

manifestXML.AddUsesFeature("android.hardware.camera.front", false);

}
Using Google Android project
To generates a project which can be opened by Android Studio, follow the steps below:
- Download Android Studio.
- Export the project from Unity with the Google Android project checkbox selected.
- Open Android Studio:
- Go to File > Import Project.
Choose a path (For example: If your project was exported to
C:\MyProjects, pickC:\MyProjects\<Product Name\>path). - Pick Import Destination Folder
- If it asks you to reload a project in the Language Level Changed dialog box, choose yes.
- Go to File > Import Project.
Choose a path (For example: If your project was exported to
Notes: If you want to debug your application, you must set android:debuggable="true" in AndroidManifest.xml. Don’t forget to set it to false once you’re done.